

The MQ-3 alcohol sensor is useful for projects that tests levels of alcohol, benzine, hexane or LPG in the air but it is most popularly used as a breathalyzer (breath analyzer) for someone who drank beer, wine or other liquor. Learn how to use this gas sensor in this tutorial.
Introduction
The MQ-3 alcohol sensor is, in fact, sensitive to other gases, besides alcohol. But we found a way to determine only the alcohol levels in the air.
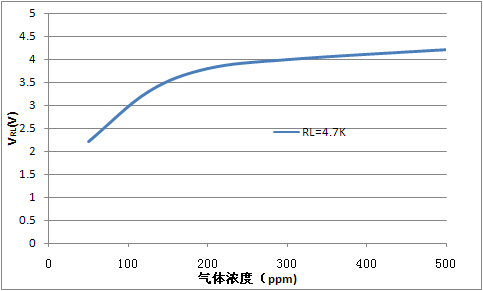
According to its datasheet, the MQ-3 alcohol sensor detects 25 to 500 ppm of alcohol (ethane). Here’s the graph of voltage vs. alcohol concentration:
Blood alcohol level (BAC) is normally measured in grams per deciliter (g/dL). 1 g/dL is equivalent to 10000 ppm. In the US and Canada, the minimum BAC for driving is 0.08 g/dL or 800 ppm. In most European countries, it’s 0.05 g/dL or 500 ppm.
Note that the graph was derived with a load of 4.7 kΩ. It would be difficult to replicate the results of the graph if we will be using the MQ-3 as a breathalyzer. Instead, we will be using the RS/R0 graph:
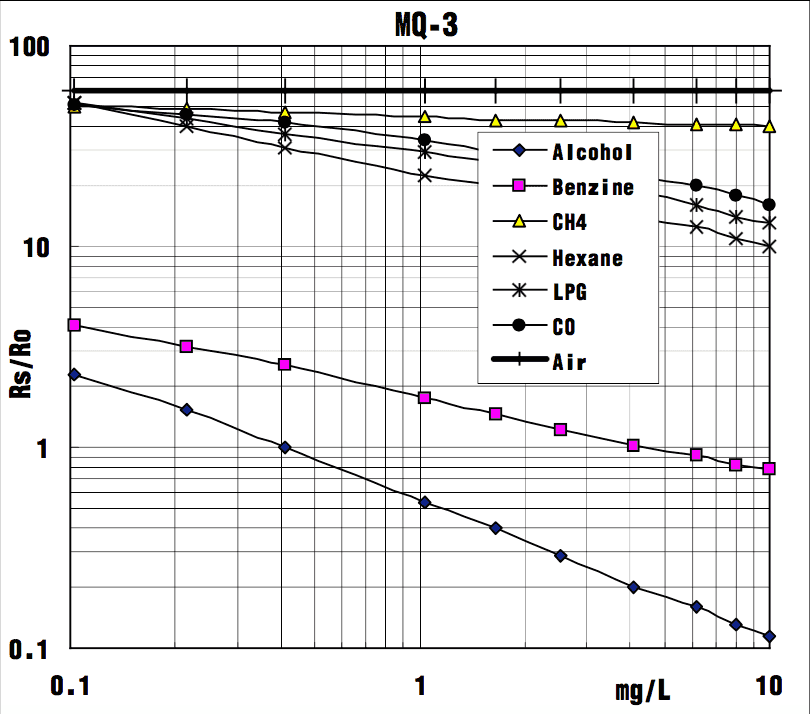
Here we see the different curves for each gas the MQ-3 can detect in a log-log plot. Rs is the resistance of the sensor at target gas while R0 is the resistance of the sensor when only 0.4 mg/L of alcohol is present in air.
Determining RS/R0
We can use the fact (from the graph above) that the RS/R0 ratio is a constant 60 in clean air. Also, by definition, only the RS changes when a gas is present while R0 remains constant. Therefore, if we can determine the value of RS in clean air, we can also determine R0 and ultimately RS/R0.
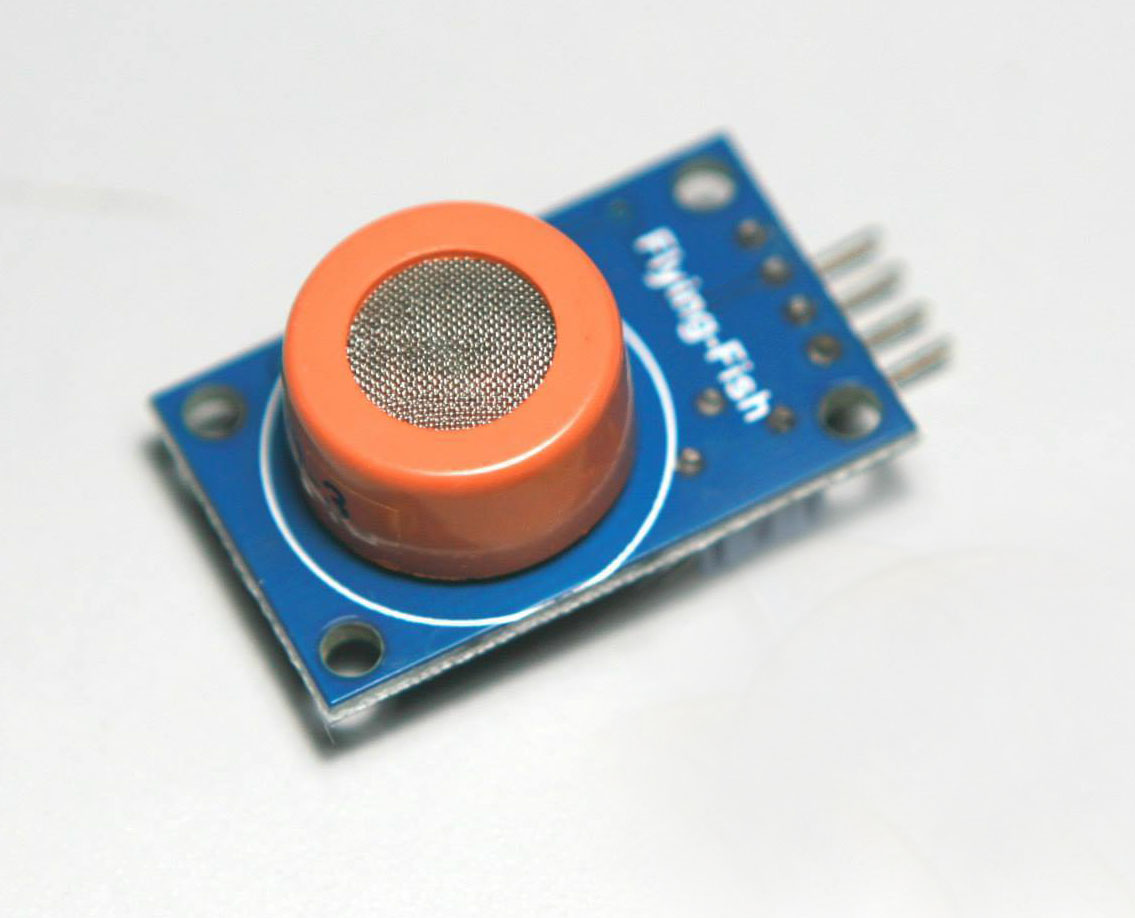
The MQ-3 alcohol sensor breakout board has four pins as shown:
Here’s the schematic diagram for the breakout board:
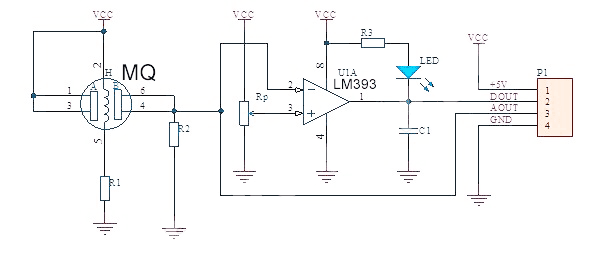
The alcohol level is readable via the AOUT pin. Since it’s a varying voltage, this pin should be connected to any of the Arduino’s or PIC’s analog pin. To use the MQ-3 alcohol sensor with the Raspberry Pi you need an external analog to digital converter.
The DOUT pin becomes high when the alcohol level exceeds a threshold value. Based on the schematic, the threshold value depends on the value of Rp which is the trimmer on the breakout board. You will need to test the device as to which BAC will trigger DOUT.
So how can we determine the RS value? If you trace the schematic, the sensor makes a voltage divider with the resistor R2:
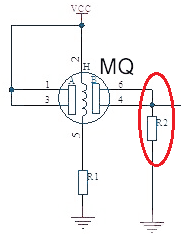
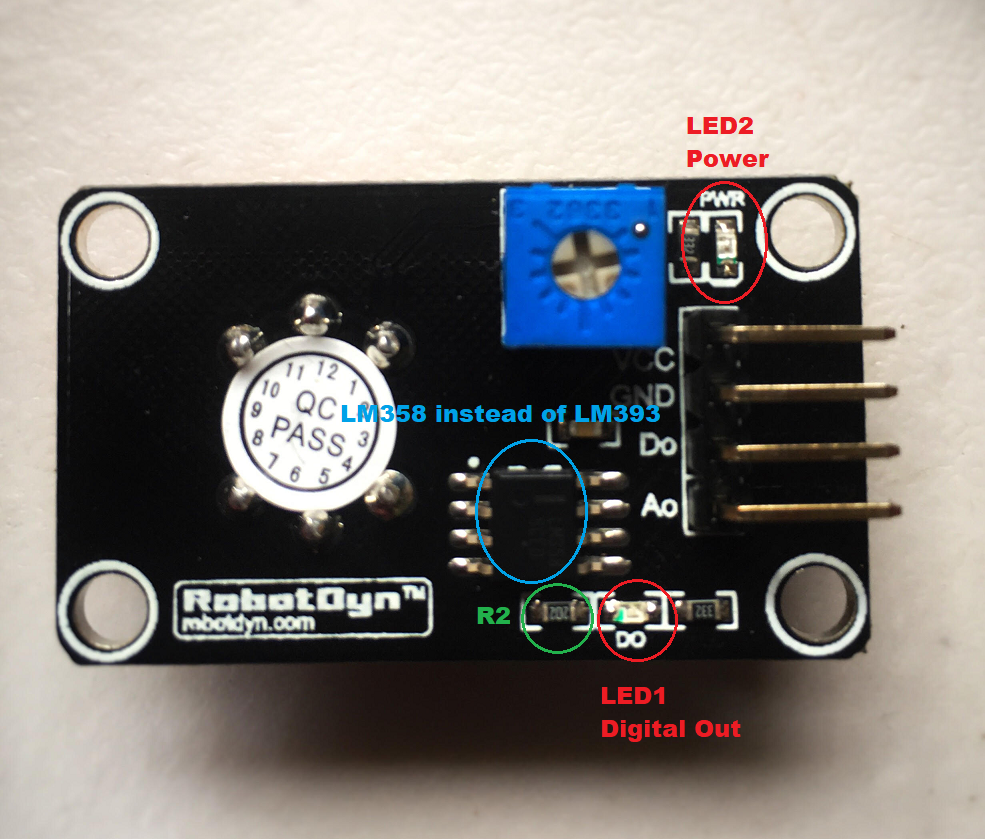
To determine R2, we look at our board and trace the connections according to the schematic diagram. We found our board had a couple of differences in the schematic, specifically the op-am used and the number of LEDs (there were two in ours).
However, we still was able to determine the value of R2, and it was 2 kilo-ohms.
We can now use this sketch to determine the RS/R0 value of the MQ-3 sensor. Just connect the breakout board following this connection:
- VCC to 5V on Arduino
- GND to GND on Arduino
- A0 to Ao on Arduino
float sensor_volt;
float RS_gas;
float R0;
int R2 = 2000;

void setup() {
 Serial.begin(9600);
}

void loop() {
  int sensorValue = analogRead(A0);
  sensor_volt=(float)sensorValue/1024*5.0;
  RS_gas = ((5.0 * R2)/sensor_volt) - R2;
  R0 = RS_gas / 60;
  Serial.print("R0: ");
  Serial.println(R0);
}
After running the sketch, we found that the R0 for our MQ-3 sensor is hovering around 16000.
RS/R0 and BAC Equation
Now that we have the value of RS in clean air, we need to determine the relationship between the RS/R0 ratio and BAC in mg/L.
The equation of a line a log-log plot is given as:

where F1, x1 and F0, x0 are two points from the line on the plot. If we only consider the alcohol line on the plot above, we can approximate the location of two points:
- F0 = 1, x0 = 0.4
- F1 = 0.2, x1 = 4
Substituting the points to the equation above:
We now have the relationship of RS/R0 and mg/L:
Solving for mg/L:
We can now use this formula to calculate the BAC in mg/L.
Alcohol Sensor with Arduino
Now that we have the formula for BAC in mg/L in, we need to convert the result to g/dL since it is the more common unit of measurement for BAC. This is simply:
This is now the resulting Arduino sketch. Remember to replace R0 with the results obtained from the previous sketch.
float sensor_volt;
float RS_gas;
float R0;
float ratio;
float BAC;
int R2 = 2000;

void setup()
{
    Serial.begin(9600);
}

void loop()
{
    int sensorValue = analogRead(A0);
    sensor_volt=(float)sensorValue/1024*5.0;
    RS_gas = ((5.0 * R2)/sensor_volt) - R2;
   /*-Replace the value of R0 with the value of R0 in your test -*/
    R0 = 16000;
    ratio = RS_gas/R0;// ratio = RS/R0
    double x = 0.4*ratio;
    BAC = pow(x,-1.431);  //BAC in mg/L
    Serial.print("BAC = ");
    Serial.print(BAC*0.0001);  //convert to g/dL
    Serial.print(" g/DL\n\n");
    delay(1000);
}
Here is a video showing the results of the sketch above using isopropyl alcohol:
To create a proper alcohol sensor, I added an LCD to my setup, particularly an I2C-based LCD to reduce pin usage. I then tested the project using isopropyl alcohol and beer with 6.9% alcohol per volume. This video shows the result:
This is the sketch for the arduino breathalyzer with LCD:
#include <Wire.h>
#include "rgb_lcd.h"

rgb_lcd lcd;

const int colorR = 255;
const int colorG = 0;
const int colorB = 0;

float sensor_volt;
float RS_gas;
float R0;
float ratio;
float BAC;
int R2 = 2000;

void setup()
{
    lcd.begin(16, 2);
    lcd.setRGB(colorR, colorG, colorB);
}

void loop()
{
    int sensorValue = analogRead(A0);
    sensor_volt=(float)sensorValue/1024*5.0;
    RS_gas = ((5.0 * R2)/sensor_volt) - R2;
   /*-Replace the value of R0 with the value of R0 in your test -*/
    R0 = 16000;
    ratio = RS_gas/R0;// ratio = RS/R0
    double x = 0.4*ratio;
    BAC = pow(x,-1.431);  //BAC in mg/L
    lcd.setCursor(0,0);
    lcd.print("BAC = ");
    lcd.print(BAC*0.0001);  //convert to g/dL
    lcd.print(" g/DL");
    delay(1000);
}
Was this article helpful? Please drop a comment below!

