

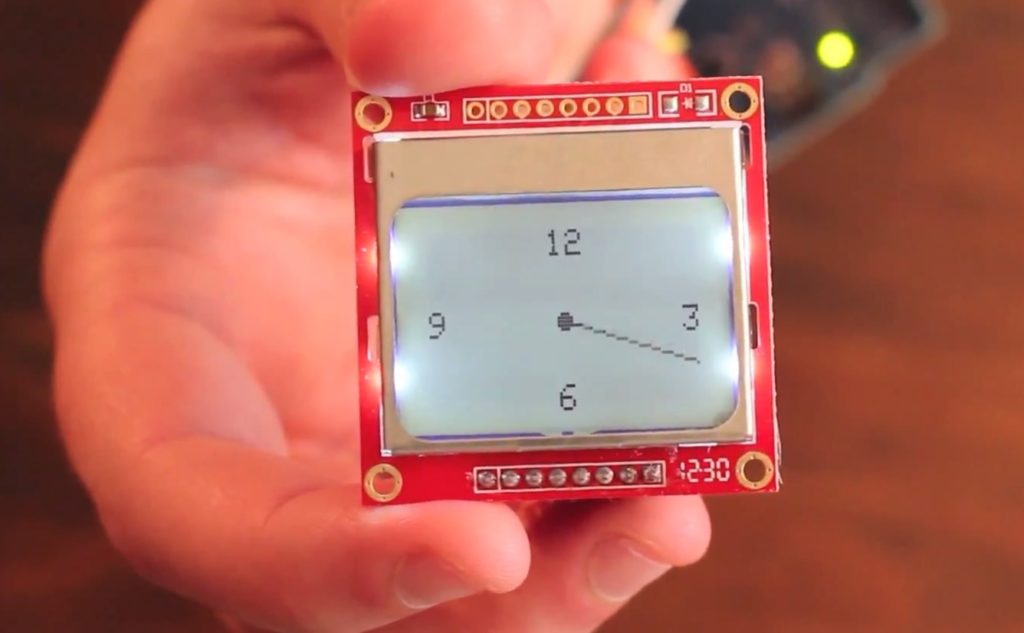
Displays are almost always a part of any microcontroller project or embedded system. Fortunately, there are cheap LCDs available with a wide support for multiple microcontroller devices. One is the PCD8544-based liquid crystal display, more popularly known as the Nokia 5110/3310 LCD. This Arduino Nokia 3310 LCD interfacing article covers how to create simple text and graphics using this LCD and the Arduino.
The example codes in this article needs Adafruit's PCD8544 and GFX libraries so go ahead and download and install them first.
Once the libraries are installed, you'll have access to a single example, pcdtest. This example was built to show all the capabilities of the library. The connections between the Arduino and the Nokia 5110/3310 LCD (which is also on the sketch) is as follows:
- D7 -> pin 5 (CLK)
- D6 -> pin 4 (DIN)
- D5 -> pin 3 (DC)
- D4 -> pin 2 (CE)
- D3 -> pin 1 (RST)
You can change the pin assignments by editing line 29 on the pcdtest sketch:
Adafruit_PCD8544 display = Adafruit_PCD8544(7, 6, 5, 4, 3);
The parameters (7, 6, 5, 4, 3) follow the sequence (CLK, DIN, DC, CE, RST).
Go ahead and upload the pcdtest sketch to your Arduino and see the results.
Displaying Text
To display text, you just call the .print() or .println() function. There are also a number of functions associated with displaying text like setting the cursor, text color and size.
Here's an example sketch that displays "hello world" at the top-left corner of the screen with white foreground and black background:
#include <SPI.h>
#include <Adafruit_GFX.h>
#include <Adafruit_PCD8544.h>

Adafruit_PCD8544 display = Adafruit_PCD8544(7, 6, 5, 4, 3);

void setup(){
  display.begin();
  display.setContrast(50);
  delay(1000);
  display.setCursor(0,0);
  display.setTextColor(WHITE, BLACK);
  display.setTextSize(1);
  display.print("Hello World");
  display.display();
}

void loop(){}
It is necessary to start with .begin() as this initiates the LCD. .setContrast() allows you to tune the darkness or lightness of the display and accepts values from 0 (lightest) to 127 (darkest). You can specify which point you want to place the text within the 84 x 48 screen with .setCursor() and then set the text color with .setTextColor() which accepts background and foreground or foreground only as parameters (obviously, you only have WHITE and BLACK to choose from). .setTextSize() multiplies the text size to the given number. The highest number you can use here is 3. Then you print the text using .print() or .println() (which ends with a new line). Finally, call .display() to update the LCD screen.
Displaying Graphics
By graphics, I mean basic shapes and bitmaps. The Adafruit GFX library enables us to draw from a single pixel to monochrome pictures!
A single pixel can be drawn on the screen using the function:
void drawPixel(uint16_t x, uint16_t y, uint16_t color);
Where x and y are the coordinates of the pixel and color is either WHITE or BLACK.
For basic shapes, here's the list of functions:
void drawLine(uint16_t x0, uint16_t y0, uint16_t x1, uint16_t y1, uint16_t color);
void drawRect(uint16_t x0, uint16_t y0, uint16_t w, uint16_t h, uint16_t color);
void drawCircle(uint16_t x0, uint16_t y0, uint16_t r, uint16_t color);
void drawRoundRect(uint16_t x0, uint16_t y0, uint16_t w, uint16_t h, uint16_t radius, uint16_t color);
void drawTriangle(uint16_t x0, uint16_t y0, uint16_t x1, uint16_t y1, uint16_t x2, uint16_t y2, uint16_t color);
Again, I suggest you toy with the pcdtest sketch which uses the following functions.
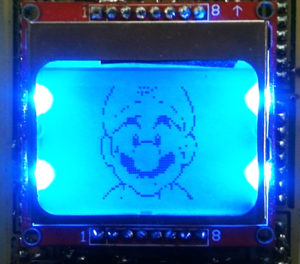
To display bitmaps, we use the following command:
void drawBitmap(int16_t x, int16_t y, uint8_t *bitmap, int16_t w, int16_t h, uint16_t color);
Where *bitmap is an array of char constants. Here's an example sketch that draws a 56 x 61 px bitmap image.
#include <SPI.h>
#include <Adafruit_GFX.h>
#include <Adafruit_PCD8544.h>
#include <avr/pgmspace.h>

Adafruit_PCD8544 display = Adafruit_PCD8544(30, 28, 26, 24, 22);

static const unsigned char PROGMEM mario[] =
{0x00, 0x00, 0x00, 0x00, 0x00, 0x00, 0x00, 0x00, 0x00, 0x00, 0x08, 0x00, 0x00, 0x00, 0x00, 0x00,
0x01, 0xc0, 0xe0, 0x00, 0x00, 0x00, 0x00, 0x0c, 0x00, 0x0c, 0x00, 0x00, 0x00, 0x00, 0x30, 0x00,
0x03, 0x00, 0x00, 0x00, 0x00, 0x40, 0x00, 0x00, 0x80, 0x00, 0x00, 0x01, 0x80, 0x00, 0x00, 0x40,
0x00, 0x00, 0x02, 0x00, 0x00, 0x00, 0x20, 0x00, 0x00, 0x04, 0x00, 0x63, 0x00, 0x10, 0x00, 0x00,
0x08, 0x00, 0x45, 0x00, 0x08, 0x00, 0x00, 0x10, 0x00, 0xa8, 0x80, 0x04, 0x00, 0x00, 0x20, 0x00,
0x02, 0x00, 0x02, 0x00, 0x00, 0x20, 0x01, 0x58, 0x00, 0x01, 0x00, 0x00, 0x40, 0x00, 0x40, 0x00,
0x01, 0x00, 0x00, 0x80, 0x00, 0x01, 0x00, 0x00, 0x80, 0x00, 0x80, 0x00, 0x00, 0x00, 0x00, 0x80,
0x01, 0x00, 0x03, 0x80, 0x30, 0x00, 0x40, 0x01, 0x00, 0x00, 0x00, 0x00, 0x00, 0x40, 0x00, 0x00,
0x20, 0x00, 0x00, 0x80, 0x20, 0x02, 0x00, 0x80, 0x00, 0x00, 0x40, 0x20, 0x02, 0x01, 0x00, 0x00,
0x00, 0x20, 0x20, 0x02, 0x00, 0x00, 0x00, 0x00, 0x00, 0x00, 0x00, 0x08, 0x03, 0x80, 0x3c, 0x00,
0x10, 0x00, 0x00, 0x3e, 0x00, 0x7f, 0x04, 0x10, 0x00, 0x00, 0x3e, 0x00, 0x7e, 0x80, 0x10, 0x02,
0x00, 0xff, 0x00, 0xee, 0x42, 0x10, 0x02, 0x01, 0x41, 0x80, 0x83, 0x32, 0x10, 0x02, 0x02, 0x00,
0x81, 0x01, 0x1a, 0x20, 0x01, 0x0c, 0x00, 0x00, 0x00, 0x0a, 0x20, 0x01, 0x10, 0x00, 0x00, 0x00,
0x00, 0x40, 0x01, 0x80, 0x02, 0x00, 0x40, 0x00, 0xe0, 0x02, 0x60, 0x05, 0x00, 0xa0, 0x01, 0x30,
0x04, 0x20, 0x07, 0x00, 0xe0, 0x00, 0x10, 0x04, 0x20, 0x07, 0x7e, 0xe0, 0x00, 0x00, 0x04, 0x20,
0x07, 0x81, 0xe0, 0x00, 0x08, 0x04, 0x24, 0x02, 0x00, 0x40, 0x01, 0x08, 0x04, 0x24, 0x00, 0x00,
0x00, 0x08, 0x00, 0x04, 0x2c, 0x04, 0x00, 0x20, 0x00, 0x00, 0x04, 0x21, 0x80, 0x00, 0x21, 0x86,
0x10, 0x02, 0x11, 0xe0, 0x00, 0x07, 0xc2, 0x10, 0x02, 0x01, 0xf8, 0x00, 0x1f, 0xc2, 0x20, 0x00,
0x01, 0xfc, 0x00, 0x3f, 0xc0, 0x20, 0x01, 0x01, 0xfc, 0x00, 0x3f, 0xc0, 0x40, 0x00, 0xe0, 0xfc,
0x00, 0x3f, 0x07, 0x80, 0x00, 0x10, 0x3e, 0x00, 0x7e, 0x06, 0x00, 0x00, 0x10, 0x3f, 0x81, 0xfc,
0x04, 0x00, 0x00, 0x10, 0x1f, 0xff, 0xf8, 0x04, 0x00, 0x00, 0x08, 0x00, 0xff, 0xc0, 0x08, 0x00,
0x00, 0x04, 0x01, 0x67, 0x00, 0x10, 0x00, 0x00, 0x02, 0x00, 0x00, 0x00, 0x20, 0x00, 0x00, 0x01,
0x00, 0x00, 0x00, 0x40, 0x00, 0x00, 0x03, 0xc0, 0x00, 0x81, 0xb0, 0x00, 0x00, 0x0c, 0x98, 0x00,
0x04, 0x88, 0x00, 0x00, 0x30, 0x84, 0x00, 0x10, 0x86, 0x00, 0x00, 0x40, 0x02, 0x00, 0x20, 0x01,
0x00, 0x00, 0x80, 0x01, 0x80, 0xe0, 0x00, 0x80, 0x01, 0x00, 0x00, 0x7f, 0x20, 0x00, 0xc0, 0x02,
0x01, 0x00, 0x00, 0x20, 0x00, 0x60, 0x06, 0x01, 0x00, 0x00, 0x00, 0x00, 0x30, 0x04, 0x00, 0x00,
0x00, 0x20, 0x00, 0x10, 0x08, 0x00, 0x03, 0xff, 0xe0, 0x00, 0x08};

void setup(){
  display.begin();
  display.setContrast(50);
  delay(1000);
  display.drawBitmap(14,-10,mario,56,61,BLACK);
  display.display();
}

void loop(){}
Here's what the output should look like:
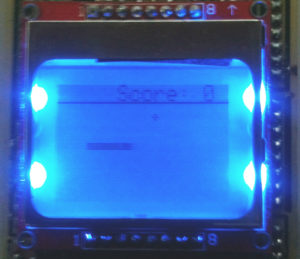
Snake Game
I managed to create a simple snake game using Arduino and the Nokia 3310 LCD as part of my LANFON project:
Do you have any interesting project using the Nokia 3310 LCD or any other microcontroller project? Contact us and become a writer for TMM!

