
If you are looking to have wireless features on your next project and don't want to spend that much, then an Arduino NRF24L01 solution might be for you.
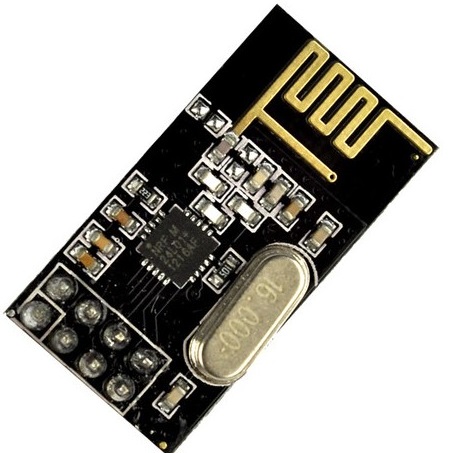
The NRF24L01 by Nordic Semiconductors contains a 2.4 GHz RF transceiver, synthesizer and baseband logic which can be interfaced through SPI. Apparently, there are two versions of this breakout board: low-power and high-power. The low-power version uses the on-board PCB antenna and can send and receive data from 50 to 200 feet (15 to 60 meters) while the high-power version has an external antenna which increases the range to up to 3500 feet! (1 kilometer).
I was able to grab one of those low-power versions for my wireless robotic arm control project:
My immediate concern was that this board runs on 3.3 V while the rest of my modules all run 5 V. Thankfully, there is a separately sold adapter that converts the voltage levels:
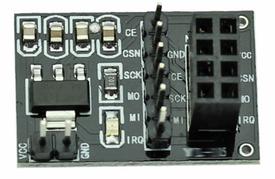
It also makes it easier to place the NRF24L01 breakout board on a PCB!
Arduino NRF24L01 Sketch
For Arduino NRF24L01 interfacing, we need the Radiohead packet radio library by Mike McCauley. Go ahead and download the library from his repository. Once the library is installed on the Arduino IDE, you are now able to use some of the example codes.
Follow these connections to use the library:
| Signal | Arduino UNO/Nano/Mini Pin | Arduino Mega2560 Pin |
| GND | GND | GND |
| VCC | 3.3V | 3.3V |
| CE | 8 | 8 |
| CSN | 10 | 53 |
| SCK | 13 | 52 |
| MOSI | 11 | 51 |
| MISO | 12 | 50 |
| IRQ | N/C | N/C |
The library contains a number of examples. To start, choose Examples > Radiohead > nrf24 > nrf24_client. This sketch initializes the communication to the server with a simple message and waits for a server's reply.
nrf24_client:
#include <SPI.h>
#include <RH_NRF24.h>

// Singleton instance of the radio driver
RH_NRF24 nrf24;

void setup()
{
  Serial.begin(9600);
  while (!Serial)
    ; // wait for serial port to connect. Needed for Leonardo only
  if (!nrf24.init())
    Serial.println("init failed");
  // Defaults after init are 2.402 GHz (channel 2), 2Mbps, 0dBm
  if (!nrf24.setChannel(1))
    Serial.println("setChannel failed");
  if (!nrf24.setRF(RH_NRF24::DataRate2Mbps, RH_NRF24::TransmitPower0dBm))
    Serial.println("setRF failed");
}

void loop()
{
  Serial.println("Sending to nrf24_server");
  // Send a message to nrf24_server
  uint8_t data[] = "Hello World!";
  nrf24.send(data, sizeof(data));

  nrf24.waitPacketSent();
  // Now wait for a reply
  uint8_t buf[RH_NRF24_MAX_MESSAGE_LEN];
  uint8_t len = sizeof(buf);

  if (nrf24.waitAvailableTimeout(500))
  {
    // Should be a reply message for us now
    if (nrf24.recv(buf, &len))
    {
      Serial.print("got reply: ");
      Serial.println((char*)buf);
    }
    else
    {
      Serial.println("recv failed");
    }
  }
  else
  {
    Serial.println("No reply, is nrf24_server running?");
  }
  delay(400);
}
Of course, the sketch above is useless without a server so load this to another Arduino NRF24L01 circuit.
nrf24_server:
#include <SPI.h>
#include <RH_NRF24.h>

// Singleton instance of the radio driver
RH_NRF24 nrf24;

void setup()
{
  Serial.begin(9600);
  while (!Serial)
    ; // wait for serial port to connect. Needed for Leonardo only
  if (!nrf24.init())
    Serial.println("init failed");
  // Defaults after init are 2.402 GHz (channel 2), 2Mbps, 0dBm
  if (!nrf24.setChannel(1))
    Serial.println("setChannel failed");
  if (!nrf24.setRF(RH_NRF24::DataRate2Mbps, RH_NRF24::TransmitPower0dBm))
    Serial.println("setRF failed");
}

void loop()
{
  if (nrf24.available())
  {
    // Should be a message for us now
    uint8_t buf[RH_NRF24_MAX_MESSAGE_LEN];
    uint8_t len = sizeof(buf);
    if (nrf24.recv(buf, &len))
    {
//      NRF24::printBuffer("request: ", buf, len);
      Serial.print("got request: ");
      Serial.println((char*)buf);

      // Send a reply
      uint8_t data[] = "And hello back to you";
      nrf24.send(data, sizeof(data));
      nrf24.waitPacketSent();
      Serial.println("Sent a reply");
    }
    else
    {
      Serial.println("recv failed");
    }
  }
}
The client device sends a "Hello World" to the server to which the server responds with "And hello back to you". You can see everything if you open Serial Monitor for both the client Arduino and the receiver Arduino.
Here is a cool remote-control project on using the Arduino NRF24L01.
Was this post useful? Drop a comment below!

