

RFID technology has been around for quite a while. But it was only recently that hobbyist and makers was able to utilize this technology through the Mifare RC522 RFID module. In this article, I will show you how you can easily use cards as keys for anything, from attendance systems, to electronic locks and even arcade gaming!
Mifare RC522 RFID Module
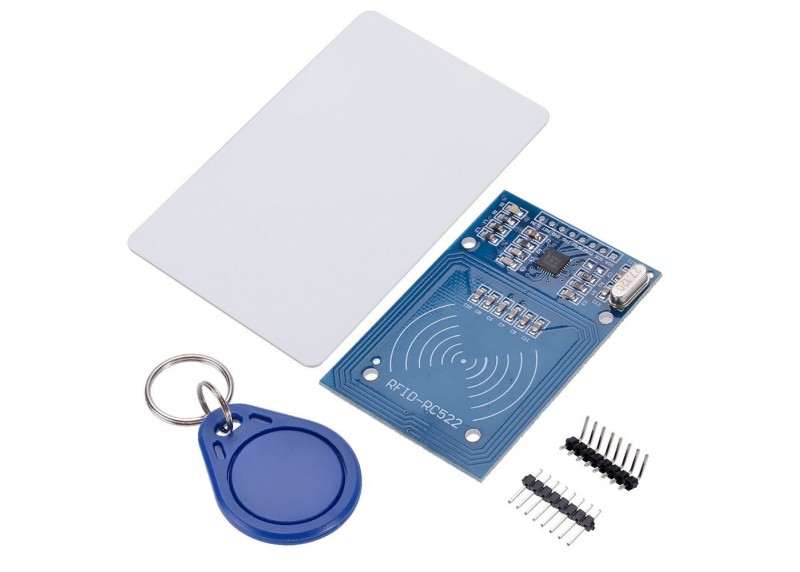
Upon purchasing the module, you will have the RFID reader board, an RFID card and tag and two eight-pin headers: one straight and one bent to 90 degrees. Obviously, you need to solder any one of those pins into the eight holes on the reader board. The choice as to which header to use depends on your project.
Here is the pinout of the RFID reader board:

If you have been working with embedded and microcontroller systems, you’ll immediately know that this module works with SPI and I2C. The module runs on 3.3V but thankfully don’t consume too much power so you can just connect it to the Arduino’s power pin.
Building an Arduino RFID Reader
Fortunately, even though the module is powered through 3.3V, the rest of the pins are 5V tolerant. This means, we can just connect the RC522 module directly to an Arduino like this:

------------------------------------------

         MFRC522               Arduino

          Reader                 Uno

  Signal          Pin            Pin

  ----------------------------------------

  RST/Reset       RST              9

  SPI SS          SDA(SS)          10

  SPI MOSI        MOSI             11

  SPI MISO        MISO             12

  SPI SCK         SCK              13
The wiring I presented above uses SPI communication rather than I2C. If you want to use I2C, you need to modify the module to make the chip go to I2C mode. This is discussed in the last part of this article.
Arduino RFID Library
The most popular RFID library for Arduino is the one by Miguel Balboa. You can download it in his repository.
After installing the library, you’ll get access to a number of examples via File > Examples > MFRC522.

For our first try, we’ll be using the DumpInfo sketch. Upload this sketch into your Arduino board and then tap your RFID card or tag to the reader. This should be what you’ll see on the serial monitor:
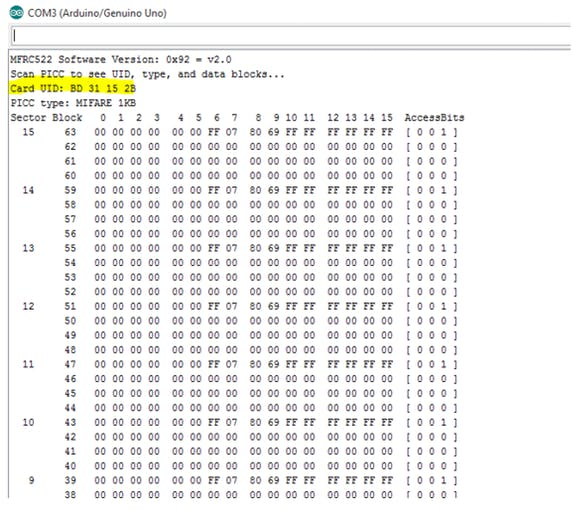
Here you’ll see the contents of your RFID card or tag. The card or tag contains a unique UID and 1 KB of storage space (btw, there are also 4 KB cards available for purchase ). The 1 KB of space is divided into 16 sectors. The sectors are further divided into 4 blocks each with 2 bytes of data.
Reading the UID Only of RFID Card
You can use the UID of the card to identify it! You can modify the included ReadNUID sketch so that only the UID will be displayed every time you tap the card or tag to the RFID reader.
#include <SPI.h>
#include <MFRC522.h>

#define SS_PIN 10
#define RST_PIN 9

MFRC522 rfid(SS_PIN, RST_PIN); // Instance of the class

MFRC522::MIFARE_Key key;

// Init array that will store UID
byte uid[4];

void setup() {
  Serial.begin(9600);
  SPI.begin(); // Init SPI bus
  rfid.PCD_Init(); // Init MFRC522
  for (byte i = 0; i < 6; i++) {
    key.keyByte[i] = 0xFF;
  }
}

void loop() {
if (rfid.PICC_IsNewCardPresent() && rfid.PICC_ReadCardSerial()){
 for (byte i = 0; i < 4; i++) {
      uid[i] = rfid.uid.uidByte[i];
 }
 printHex(rfid.uid.uidByte, rfid.uid.size);
 Serial.println();
 rfid.PICC_HaltA();
 rfid.PCD_StopCrypto1();
}

void printHex(byte *buffer, byte bufferSize) {
  for (byte i = 0; i < bufferSize; i++) {
    Serial.print(buffer[i] < 0x10 ? " 0" : " ");
    Serial.print(buffer[i], HEX);
  }
}
[the_ad id="3059"]
The sketch above will be your starting point if you want to build RFID access or locking/unlocking projects. All you have to do is take note of your card’s UID and then check if the tapped card’s UID matches that of the one you noted.
Using the RFID Card Memory
As mentioned above, the included RFID card contains 1 KB of memory space. We can use that memory to write data into the card. The rfid_write_personal_data sketch demonstrates how you can write your name to the card:
#include <SPI.h>
#include <MFRC522.h>
#define RST_PIN             9               // Configurable, see typical pin layout above
#define SS_PIN              10              // Configurable, see typical pin layout above

MFRC522 mfrc522(SS_PIN, RST_PIN);   // Create MFRC522 instance

void setup() {
  Serial.begin(9600);            // Initialize serial communications with the PC
  SPI.begin();                   // Init SPI bus
  mfrc522.PCD_Init();            // Init MFRC522 card
  Serial.println(F("Write personal data on a MIFARE PICC "));
}

void loop() {
  // Prepare key - all keys are set to FFFFFFFFFFFFh at chip delivery from the factory.
  MFRC522::MIFARE_Key key;
  for (byte i = 0; i < 6; i++) key.keyByte[i] = 0xFF;
  // Look for new cards
  if ( ! mfrc522.PICC_IsNewCardPresent()) {
        return;
  }

  // Select one of the cards
  if ( ! mfrc522.PICC_ReadCardSerial()) {
        return;
  }
  Serial.print(F("Card UID:"));        //Dump UID
  for (byte i = 0; i < mfrc522.uid.size; i++) {
        Serial.print(mfrc522.uid.uidByte[i] < 0x10 ? " 0" : " ");
        Serial.print(mfrc522.uid.uidByte[i], HEX);
  }
  Serial.print(F(" PICC type: "));   // Dump PICC type
  MFRC522::PICC_Type piccType = mfrc522.PICC_GetType(mfrc522.uid.sak);
  Serial.println(mfrc522.PICC_GetTypeName(piccType));

  byte buffer[34];
  byte block;
  MFRC522::StatusCode status;
  byte len;

  Serial.setTimeout(20000L) ;         // wait until 20 seconds for input from serial

  // Ask personal data: Family name
  Serial.println(F("Type Family name, ending with #"));
  len = Serial.readBytesUntil('#', (char *) buffer, 30) ; // read family name from serial
  for (byte i = len; i < 30; i++) buffer[i] = ' ';         // pad with spaces

  block = 1;
  //Serial.println(F("Authenticating using key A..."));
  status = mfrc522.PCD_Authenticate(MFRC522::PICC_CMD_MF_AUTH_KEY_A, block, &key, &(mfrc522.uid));
  if (status != MFRC522::STATUS_OK) {
        Serial.print(F("PCD_Authenticate() failed: "));
        Serial.println(mfrc522.GetStatusCodeName(status));
        return;
  }

  else Serial.println(F("PCD_Authenticate() success: "));
  // Write block
  status = mfrc522.MIFARE_Write(block, buffer, 16);
  if (status != MFRC522::STATUS_OK) {
        Serial.print(F("MIFARE_Write() failed: "));
        Serial.println(mfrc522.GetStatusCodeName(status));
        return;
  }

  else Serial.println(F("MIFARE_Write() success: "));

  block = 2;
  //Serial.println(F("Authenticating using key A..."));
  status = mfrc522.PCD_Authenticate(MFRC522::PICC_CMD_MF_AUTH_KEY_A, block, &key, &(mfrc522.uid));
  if (status != MFRC522::STATUS_OK) {
        Serial.print(F("PCD_Authenticate() failed: "));
        Serial.println(mfrc522.GetStatusCodeName(status));
        return;
  }
  // Write block
  status = mfrc522.MIFARE_Write(block, &buffer[16], 16);
  if (status != MFRC522::STATUS_OK) {
        Serial.print(F("MIFARE_Write() failed: "));
        Serial.println(mfrc522.GetStatusCodeName(status));
        return;
  }
  else Serial.println(F("MIFARE_Write() success: "));
  // Ask personal data: First name
  Serial.println(F("Type First name, ending with #"));
  len = Serial.readBytesUntil('#', (char *) buffer, 20) ; // read first name from serial
  for (byte i = len; i < 20; i++) buffer[i] = ' ';         // pad with spaces

  block = 4;
  //Serial.println(F("Authenticating using key A..."));
  status = mfrc522.PCD_Authenticate(MFRC522::PICC_CMD_MF_AUTH_KEY_A, block, &key, &(mfrc522.uid));
  if (status != MFRC522::STATUS_OK) {
        Serial.print(F("PCD_Authenticate() failed: "));
        Serial.println(mfrc522.GetStatusCodeName(status));
        return;
  }
  // Write block
  status = mfrc522.MIFARE_Write(block, buffer, 16);
  if (status != MFRC522::STATUS_OK) {
        Serial.print(F("MIFARE_Write() failed: "));
        Serial.println(mfrc522.GetStatusCodeName(status));
        return;
  }
  else Serial.println(F("MIFARE_Write() success: "));

  block = 5;
  //Serial.println(F("Authenticating using key A..."));
  status = mfrc522.PCD_Authenticate(MFRC522::PICC_CMD_MF_AUTH_KEY_A, block, &key, &(mfrc522.uid));
  if (status != MFRC522::STATUS_OK) {
        Serial.print(F("PCD_Authenticate() failed: "));
        Serial.println(mfrc522.GetStatusCodeName(status));
        return;
  }
  // Write block
  status = mfrc522.MIFARE_Write(block, &buffer[16], 16);
  if (status != MFRC522::STATUS_OK) {
        Serial.print(F("MIFARE_Write() failed: "));
        Serial.println(mfrc522.GetStatusCodeName(status));
        return;
  }
  else Serial.println(F("MIFARE_Write() success: "));
  Serial.println(" ");
  mfrc522.PICC_HaltA(); // Halt PICC
  mfrc522.PCD_StopCrypto1();  // Stop encryption on PCD
}
Using I2C to Communicate with RFID Reader
As mentioned above, it is possible to use I2C instead of SPI in communicating with the RC522 RFID reader module. To enable I2C, we must cut the connection of the trace on the board to pin 1 on the IC. This can be done by drilling a hole on a board as shown by user Renate-USB of the Arduino community.
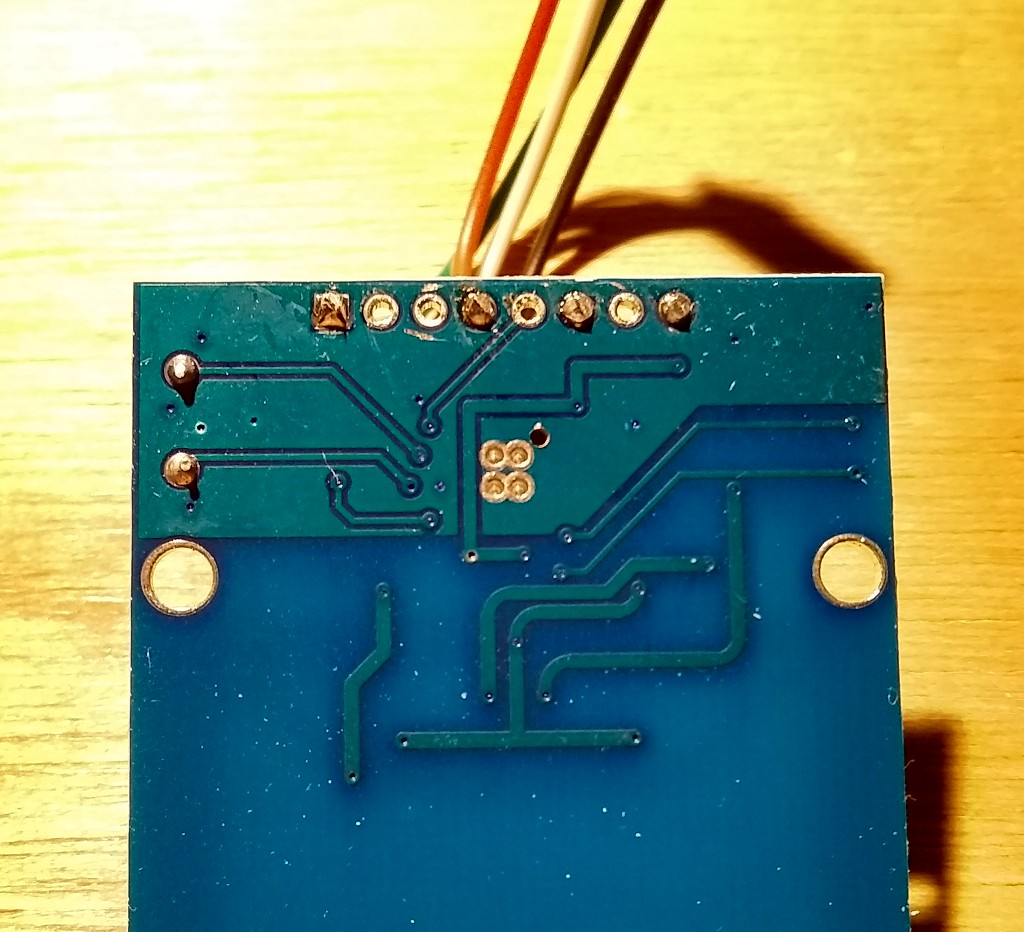
After doing this, the RC522 will enter I2C mode with an address of 0x3C.
Since we’re now using I2C, we need to connect the SDA and SCL pins of the RFID module to the I2C pins of the Arduino UNO:

------------------------------------------

         MFRC522               Arduino

           Reader                Uno

  Signal          Pin            Pin

  ----------------------------------------

  RST/Reset       RST              3

  I2C SDA         SDA(SS)         A4

  I2C SCL         MISO            A5
As for the sketch, we can no longer use Miguel Balboa’s library for I2C. We will now be using arozcan’s RFID library. Here is a sketch that uses this library (credits to Manuauto):
#include <Wire.h>
#include "MFRC522_I2C.h"

#define RST 3

MFRC522 mfrc522(0x3C, RST);   // Create MFRC522 instance.

void setup() {
  Serial.begin(9600);               // Initialize serial communications with the PC
  Wire.begin();                       // Initialize I2C
  mfrc522.PCD_Init();                 // Init MFRC522
  ShowReaderDetails();                // Show details of PCD - MFRC522 Card Reader details
  Serial.println(F("Scan PICC to see UID, type, and data blocks..."));
}

void loop() {
  // Look for new cards, and select one if present
  if ( ! mfrc522.PICC_IsNewCardPresent() || ! mfrc522.PICC_ReadCardSerial() ) {
        delay(50);
        return;
  }
  // Now a card is selected. The UID and SAK is in mfrc522.uid.
  // Dump UID
  Serial.print(F("Card UID:"));
  for (byte i = 0; i < mfrc522.uid.size; i++) {
        Serial.print(mfrc522.uid.uidByte[i] < 0x10 ? " 0" : " ");
        Serial.print(mfrc522.uid.uidByte[i], HEX);
  }
  Serial.println();
}

void ShowReaderDetails() {
  // Get the MFRC522 software version
  byte v = mfrc522.PCD_ReadRegister(mfrc522.VersionReg);
  Serial.print(F("MFRC522 Software Version: 0x"));
  Serial.print(v, HEX);
  if (v == 0x91)
        Serial.print(F(" = v1.0"));
  else if (v == 0x92)
        Serial.print(F(" = v2.0"));
  else
        Serial.print(F(" (unknown)"));

  Serial.println("");
  // When 0x00 or 0xFF is returned, communication probably failed
  if ((v == 0x00) || (v == 0xFF)) {
        Serial.println(F("WARNING: Communication failure, is the MFRC522 properly connected?"));
  }
}
The sketch above is similar to the DumpInfo sketch from Miguel Balboa's library.
The obvious advantage of using I2C over SPI is reduced pin usage.
That’s it! Hopefully, I opened the way for you to build cool Arduino RFID RC522 projects. If you did, kindly place your comments below!

