
In Arduino programming, we learn about functions setup() and loop(). Any code inside setup() executes once while code inside loop() executes again and again until the next reset.
Now what if while inside the loop(), something went wrong either in code or in hardware? Normally we just press the reset button. But what if we can’t press that button? You can reset the Arduino via software using the watchdog timer.
A watchdog timer is an internal timer whose primary purpose is to “watch” the operation of the microcontroller. In Arduino, specifically on ATMega micro’s, the watchdog timer runs on an internal 1 MHz oscillator. This means it is unaffected by any external oscillators (recall that Arduino UNO’s have a 16 MHz oscillator) and thus by the instruction cycle.
In a program, the watchdog timer resets for every completed main loop. If ever something happens and the loop is not completed, the watchdog timer starts to run and resets the microprocessor. You can also configure the watchdog timer to trigger an interrupt when it overflows.
Using the Watchdog Timer in Code
The watchdog timer is normally disabled in an Arduino sketch. To enable it, we use the function:
wdt_enable(WDT Reset Timer)
Where WDT Reset Timer is a constant describing the time before the watchdog resets. Here are the possible values:
| Timeout | WDT Reset Timer |
|---|---|
| 15 ms | WDTO_15MS |
| 30 ms | WDTO_30MS |
| 60 ms | WDTO_60MS |
| 120 ms | WDTO_120MS |
| 250 ms | WDTO_250MS |
| 500 ms | WDTO_500MS |
| 1 s | WDTO_1S |
| 2 s | WDTO_2S |
| 4 s | WDTO_4S |
| 8 s | WDTO_8S |
Note that this function is an AVR function so you must include this before invoking it:
#include <avr/wdt.h>
Now consider this code:
#include <avr/wdt.h>

void setup() {
  wdt_enable(WDTO_2S);
  Serial.begin(9600);
  Serial.println("Reset!");
}

void loop() {
}
As you know, anything inside setup() executes once. But if you run this on an Arduino UNO, the serial monitor will show “Reset!” every two seconds. This is thanks to the watchdog timer.
Here, we enabled to watchdog and have it reset the system every two seconds:
wdt_enable(WDTO_2S);
Then we enable the serial port and print “Reset!”:
Serial.begin(9600);
Serial.println("Reset!");
The system resets every two seconds, hence “Reset!” prints every two seconds.
Waking Up the Arduino from Sleep
Probably the biggest use of the watchdog timer is saving power. Say you are interfacing with a modem like the SIM800L through serial. Your application involves waiting for the SIM800L to send data when a SMS arrives. To save power, you want your microcontroller to go to sleep when nothing is coming from the SIM800L.
Your code could be like this:
#include <avr/wdt.h>

void setup() {
// watchdog resets system every 8 seconds
  wdt_enable(WDTO_8S);
// other setups...

void loop(){
//wait for data from SIM800L
  while (sim800l.available()) {
    //do something with data...
  }
//if no data, the program exits the while loop and goes to sleep
  set_sleep_mode(SLEEP_MODE_PWR_DOWN);
}
Here, the watchdog timer is set to reset every 8 seconds. In between this time, the Arduino is either receiving data from the SIM800L or in sleep mode where it consumes less power.
Watchdog Timer Interrupt
The watchdog timer can also trigger an interrupt when it overflows. This requires manipulating the register WDTCSR.
The WDTCSR has the following bits:
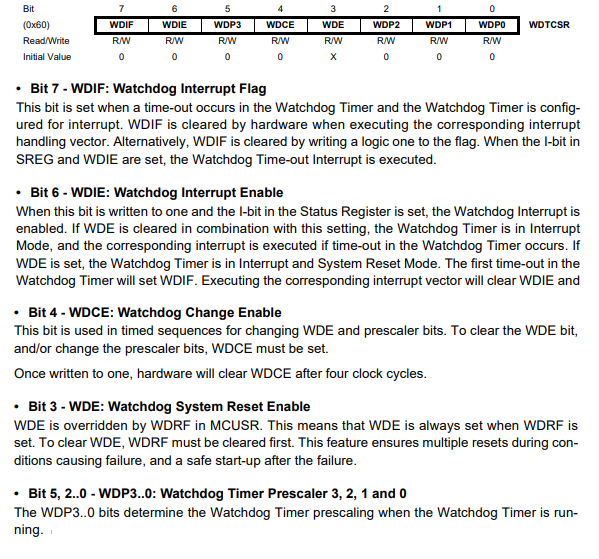
The first thing to do is to enable the interrupt, then configure how long before that interrupt triggers.
According to the datasheet, the watchdog timer interrupt enables if WDE is either low or high and WDIE is high:
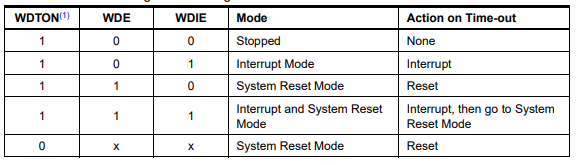
WDTON is a fuse configured during program flashing and is high by default.
The amount of time before the watchdog triggers is configured using bits WDP3, WDP2, WPD1 and WDP0:
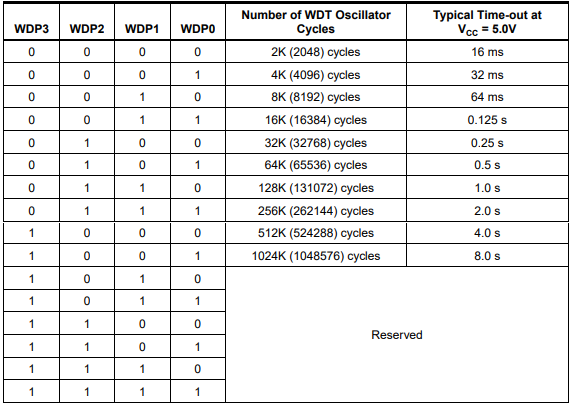
So for example, we want the interrupt to trigger every 2 seconds, the code would be:
#include <avr/wdt.h>

int count = 0;
void setup() {
  cli();
  WDTCSR = (1 << WDCE) | (1 << WDE);
  WDTCSR = (1<<WDIE)| (1<<WDP2) | (1<<WDP1) | (1<<WDP0);
  sei();
  Serial.begin(9600);
}

void loop() {
  Serial.println(count);
}

ISR(WDT_vect) { // WDT interrupt vector
  count++;
}
Here I have a variable count that increments every time the watchdog timer interrupt triggers. We configure the watchdog to enter interrupt and system reset mode:
WDTCSR = (1 << WDCE) | (1 << WDE);
This ensures that the watchdog resets after interrupt.
Then we set the prescale to 2 seconds according to the table:
WDTCSR = (1<<WDIE)| (1<<WDP2) | (1<<WDP1) | (1<<WDP0);
Note that these should be inside cli() (disable all interrupts) and sei() (enable to all interrupts) to avoid triggering any other interrupt that the Arduino platform might be using.
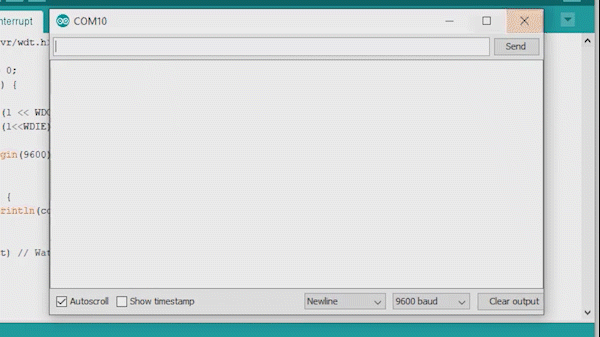
Once this sketch is uploaded, the serial monitor should show a number incrementing every two seconds.
Note that this code offers no significant advantage over using, say, timer interrupts.
That’s it for this tutorial. If you have any questions, kindly drop a comment below!

