
The ESP8266 has been a blessing to makers who need to connect their Arduino to the Internet on the cheap. In fact, boards like the NodeMCU and WeMos which feature the ESP module have become overly popular. This is unsurprising given that these boards can replace the Arduino without a steep learning curve.
So if you’re comfortable with Arduino programming and want to send or receive data via the Internet, I recommend using the NodeMCU. Actually, I have already written various articles on how to do this:
- Intro to NodeMCU and Arduino IDE
- Creating a Simple NodeMCU Web Server
- Display Sensor Data to NodeMCU Web Server
- Log Data with NodeMCU and Google Sheets
- NodeMCU Ajax: Dynamic Sensor Data on Web Page
- NodeMCU MQTT Tutorial
- Web Server with NodeMCU WebSocket
- Creating NodeMCU WiFi Access Point
- NodeMCU Pinout Reference
However, if you don’t want to purchase the NodeMCU and just want to stick with the classic ESP8266 module, then this Arduino WiFi tutorial is for you.
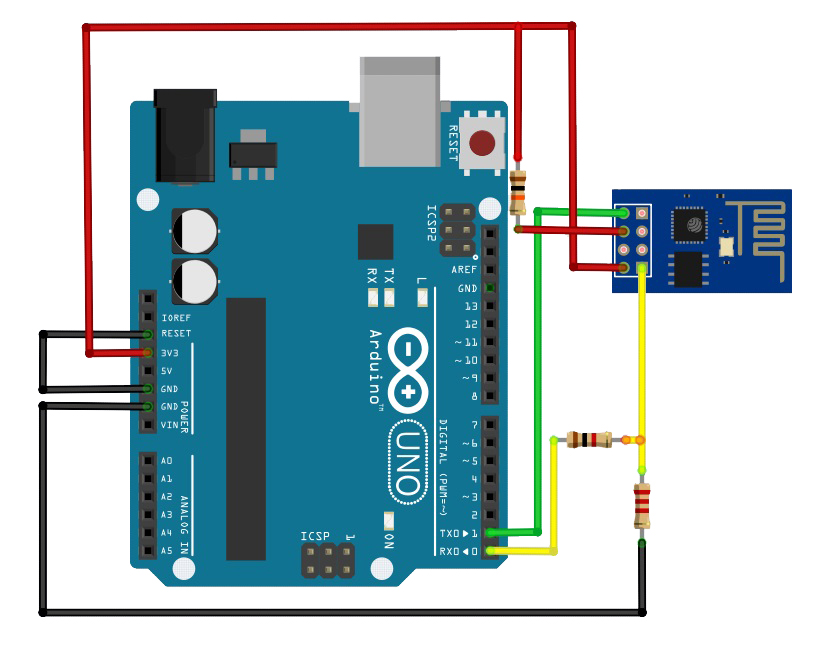
Wiring the Arduino to the ESP8266
As you know, the Arduino UNO, Mega or Nano doesn’t have any networking capabilities. To make the Arduino connect to the Internet, it needs a modem. The ESP8266 module will act as our modem, establishing a connection to your WiFi router in order to send/receive data to/from the web.

The ESP8266 module, specifically the ESP-01 module, runs on 3.3 V. Thus, we must not connect the Arduino output pins to the ESP8266 pins directly. In the diagram above, I used a simple voltage divider to reduce the 5 V logic levels. Also note that for the ESP8266 module to run correctly, it must have its own 3.3V, 250 mA power supply. This presents another disadvantage of this setup: you must have an extra supply instead of just using your computer’s USB port.
AT Commands
Now that we’ve connected the ESP8266 module to the Arduino, it’s time to send out special commands through the Arduino’s (software) serial port. These AT or Hayes commands are a set of commands not only used by the ESP8266 but also by other modems like GSM, Bluetooth, and GPRS.
The whole list of AT commands is overwhelming. For our purpose, which is to connect to the Internet, we need only a specific set of AT commands. A more thorough explanation of each command may be found on our ESP8266 AT commands list.
| AT+CIPMUX = 1 | Enable single (0) or multiple connections (1) to the web server. Multiple connection is a good option if you are repeatedly sending out or reading data from the Internet. |
| AT+CWMODE = 3 | Set WiFi mode: 1 is station mode (ESP8266 is client), 2 is AP mode (ESP8266 acts like a WiFi router where your phone or PC can connect), 3 is AP+station mode (make the ESP8266 do both) |
| AT+CWJAP = “<your-ssid>”,”<your-pw>” | Connect to your WiFi. Provide your SSID name and password inside the double quotes. |
| AT+CIFSR | This returns the IP address of the module, indicating that it has successfully connected to your WiFi router. |
| AT+CIPSTART=0,"TCP",
"www.teachmemicro.com","80” |
Start TCP or UDP connection. Here, the first parameter (0) is the id of the connection, “TCP” means we’re using TCP instead of UDP, then followed by the address (or IP) of the web server and then the port number. |
| AT+CIPSEND=0,16 | Command to tell the module data is ready to be sent. “0” here is the connection ID, and 16 is the length of the data to be sent. After this command, the ESP8266 will reply with the “>” character to tell us that it will be waiting for the data to be sent. If successful, the module will reply with “SEND OK”.“0” here is the connection ID, and 16 is the length of the data to be sent. After this command, the ESP8266 will reply with the “>” character to tell us that it will be waiting for the data to be sent. If successful, the module will reply with “SEND OK”. |
| “Data to be sent” | The string data to be sent. |
Note that these commands must be sent in the correct order from the Arduino to the ESP8266 module.
Arduino WiFi Sketch Example
Using the AT commands above, we can now make a simple HTTP request that will retrieve a web page from a server. Here is the full sketch:
#include <SoftwareSerial.h>

SoftwareSerial ESP8266(10, 11);  //RX,TX

void setup()
{
    Serial.begin(9600);

    // Start the software serial for communication with the ESP8266
    ESP8266.begin(9600);  //this assumes default baud rate is used by the module

    Serial.println("");
    Serial.println("Ready");
}

void loop()
{
    Serial.println(“Establishing connection type…”);
    ESP8266.println(“AT+CIPMUX=1”);
    delay(1000);
    Serial.println(“Setting WiFI mode…”);
    ESP8266.println(“AT+CWMODE=3”);
    delay(1000);
    Serial.println(“Connecting to WiFi”);
    ESP8266.println(“<your-ssid>”,”<your-pw>”); //insert your own SSID and password here
    delay(1000);
    Serial.println(“Establishing TCP connection”);
    ESP8266.println(“AT+CIPSTART=0,"TCP","www.teachmemicro.com","80”);
    delay(1000);
    Serial.println(“Sending out data…”);
    ESP8266.println(“AT+CIPSEND=0,16”);
    ESP8266.println(“GET / HTTP/1.1”);
    ESP8266.println()    //some extra carriage return
    if ( ESP8266.available() )   {  Serial.write( mySerial.read() );  } //wait for the response and
//print it out

}
Note that this is a very simple sketch that sends out AT commands in succession to establish a WiFi connection. We can improve this sketch further by waiting for the ESP8266 module to reply to each command, making sure that it really did receive the command.
Send Data to a Web Page
To send data to be posted on a web page, we need a PHP script that will “catch” the data sent through the ESP8266 module. There are a hundred ways to do this, but this how I implemented it:
On a server, I created a “read.php” file that contains this:
<?php

$value = $_POST['value'];

$textfile = "values.txt"; // Declares the name and location of the .txt file
$fileLocation = "$textfile";
$fh = fopen($fileLocation, 'w') or die("Something went wrong!"); // Opens up the .txt file for writing and replaces any previous content
fwrite($fh, $value); // Writes it to the .txt file
fclose($fh);

?>
What this script does is acquire a $_POST variable value and write it on a dynamically created text file. POST is one of the ways to send data to an HTTP server. Here is an example POST request that a web browser may send:
POST /read.php HTTP/1.1
Host: localhost
User-Agent: Mozilla
Content-Type: application/x-www-form-urlencoded
Content-length: 9

value=500
Next, we need to make the Arduino send this POST request via the ESP8266 module. Here’s how I did it:
Sending Data via POST Request
#include <SoftwareSerial.h>

SoftwareSerial ESP8266(10, 11);  //RX,TX

void setup()
{

    Serial.begin(9600);

    // Start the software serial for communication with the ESP8266
    ESP8266.begin(9600);  //this assumes default baud rate is used by the module

    Serial.println("");
    Serial.println("Ready");
}

void loop()
{
    int adcval = analogRead(A0);
    Serial.println(“Establishing connection type…”);
    ESP8266.println(“AT+CIPMUX=1”);
    delay(1000);
    Serial.println(“Setting WiFI mode…”);
    ESP8266.println(“AT+CWMODE=3”);
    delay(1000);
    Serial.println(“Connecting to WiFi”);
    ESP8266.println(“<your-ssid>”,”<your-pw>”); //insert your own SSID and password here
    delay(1000);
    Serial.println(“Establishing TCP connection”);
    ESP8266.println(“AT+CIPSTART=0,"TCP","www.teachmemicro.com","80”);
    delay(1000);
    Serial.println(“Sending out data…”);
    ESP8266.println(“AT+CIPSEND=0,16”);
    ESP8266.println(“POST /read.php HTTP/1.1”);
    ESP8266.println(“Host: <your site address or IP>”);    //insert your own site address or IP here
    ESP8266.println(“User-Agent: Mozilla”); //We need this so that the server can identify the sender
    ESP8266.println(“Content-Type: application/x-www-form-urlencoded”);
    ESP8266.println(“Content-length: 9”); //make sure this matches the content that follows
    ESP8266.print(“Value=”);
    ESP8266.println(adcval);
    ESP8266.println();
    ESP8266.println();
}
What this sketch does is read the A0 analog port and have whatever value is sent as a POST request. Notice that the first part of the sketch is similar to the previous sketch I presented. Also, this sketch is not that efficient because it would take around 4 seconds to send the value.
We’re not done yet! We need another PHP file to be able to display the values sent by the Arduino:
<!doctype html>

<html lang="en">
<head>
  <title>Display Data from Arduino to Web</title>
 <meta http-equiv="refresh" content="5" >
</head>

<body>
<?php
$textfile = "values.txt"; // Declares the name and location of the .txt file
//$fileLocation = "$textfile";
$fh = fopen($textfile, 'r') or die("Something went wrong!"); // Opens up the .txt file for writing and replaces any previous content
$value = fread($fh,3);
fclose($fh);
printf("Value is: %s",$value);
?>
</body>
</html>
You can name this file <whatever-you-like>.php. This page should refresh every 5 seconds, updating the value sent by the Arduino.
That's It!
Hopefully, you’ve learned how to use Arduino with the ESP8266 module to connect to the Internet. Then again, I will still suggest that you use a NodeMCU if you're building a more complicated Arduino WiFi project. The ESP8266 Arduino core is very simple to use and contains a lot of example sketches that will make your work faster.
But if you still insist on using the generic ESP8266 module, there is a way to use it with the Arduino core mentioned above without using an Arduino. However, that would be a separate tutorial so hopefully, you’ll come back for that.

