
The 28BYJ-48 stepper motor is a cheap and robust stepper motor, suitable for use on robotics and other slow-speed applications. In this tutorial, I will guide you on how to use this stepper motor with Arduino.
How Do Stepper Motors Work?
Before I continue, I find it necessary to review the basics of stepper motors.
The 28BYJ-48 motor is a permanent magnet (PM) type stepper and thus share similar characteristics with other PM steppers.
A PM stepper motor has a rotating part (rotor) made out of permanent magnet and a stationary part (stator) of electromagnets. A single motor rotation is divided into steps, hence the name. The number of steps per revolution depends on the number of teeth of the rotor.

To rotate a stepper motor, the electromagnets must be energized in a circular pattern. The rotor, attracted to an energized electromagnet, follows that rotation. Thus, the speed of the stepper motor depends on the speed of the switching of the electromagnets.
Stepper Motor Polarity
There are bipolar and unipolar stepper motors. In a bipolar stepper motor, the electromagnets are alternately energized:
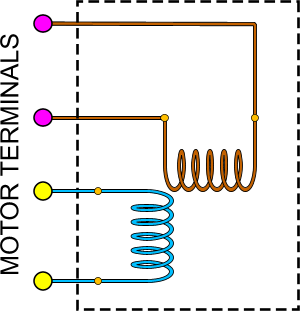
Note that while only two coils (electromagnets) are shown, there could be four coils with the vertical (up and down) and horizontal (left and right) coils each connected in series.
A bipolar stepper motor requires two separate power sources, one for each electromagnet. Because of this, bipolar steppers are not popular with Arduino users. Most high speed stepper motors are bipolar, however.
A unipolar stepper motor follows this diagram:
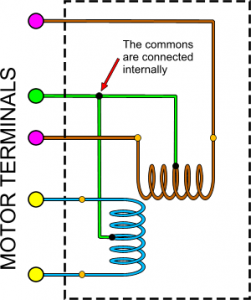
Since the two electromagnets have a common wire, only one power source is necessary for a unipolar stepper motor. The common wire is usually connected to ground.
The 28BYJ-48 is a unipolar stepper motor, with five pins as shown:
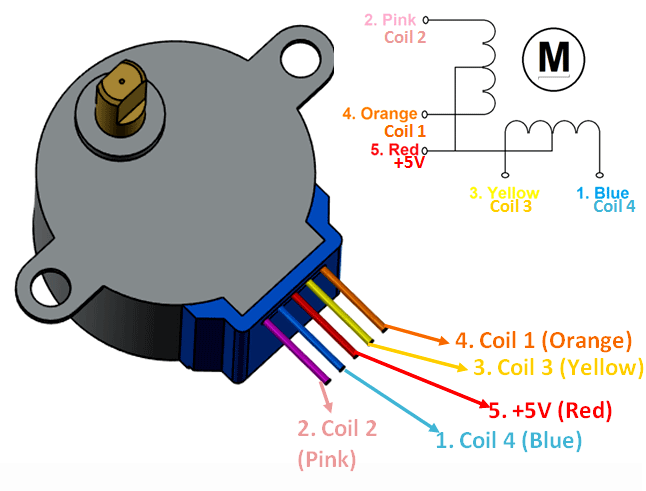
For a unipolar motor, the number of coils is equal to its phase. The 28BYJ-48 has four coils hence, it is a four-phase stepper motor.
More information about this motor is found on its datasheet.
Making a Stepper Motor Rotate
Rotating a stepper motor is often called driving and can be a wave drive, full-step drive, half-step drive or microstep. The last one is complicated and less common so it will not be discussed here.
In a wave drive, one electromagnet or coil is excited at a time:

In a full-step drive, two coils are excited at a time:

Since the full-step drive energizes two coils at a time, it requires more current than a wave step. In exchange of the higher current is higher torque.
A half-step combines a wave and a full-step:

Half-step increases the number of steps per revolution. As you can see in the wave and full-step drives, one revolution takes four steps. In a half-step drive, one revolution takes eight steps. Thus, a half-step drive is recommended for more precise movements.
Note that the animations shown are somewhat simplified. While the 28BYJ-48 is a four-phase stepper, it doesn’t take 8 steps in one revolution for half-step driving. It actually takes 64 steps, according to its datasheet. This is because the rotor of this stepper is not just one magnet.
Using a Driver Board for the 28BYJ-48
In this tutorial, we will be using the ULN2003 driver board with the 28BYJ-48.
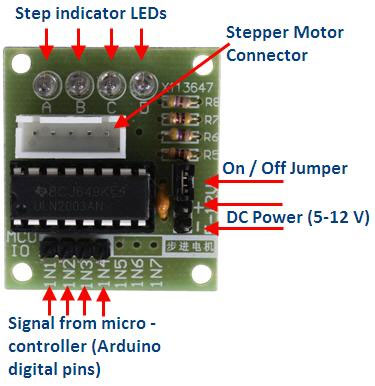
The board has 7 input pins IN1 to IN7 but only IN1 to IN4 are usable.
It also has pins for power and switching. This allows you to use a separate power supply with a rating of 5 V to 12 V for the motor.
Upon testing, we found out that the 28BYJ-48 still works at 12 V although the stepper motor is labeled 5 V. It seems higher rotation speeds need higher voltages.
Programming the Arduino
The Arduino platform contains a built-in stepper library which actually works for the 28BYJ-48. Here is a simple sketch that rotates the stepper in one direction then to the other direction:
#include <Stepper.h>

const int stepsPerRevolution = 64;  // change this to fit the number of steps per revolution
// for your motor

// initialize the stepper library on pins 8 through 11:
Stepper myStepper(stepsPerRevolution, 8, 9, 10, 11);

void setup() {
  // set the speed at 60 rpm:
  myStepper.setSpeed(60);
  // initialize the serial port:
  Serial.begin(9600);
}

void loop() {
  // step one revolution  in one direction:
  Serial.println("clockwise");
  myStepper.step(stepsPerRevolution);
  delay(500);

  // step one revolution in the other direction:
  Serial.println("counterclockwise");
  myStepper.step(-stepsPerRevolution);
  delay(500);
}
To use the sketch, connect the stepper motor to the ULN2003 board, then follow this connection to Arduino.
| Controller Board | Arduino |
|---|---|
| IN1 | 8 |
| IN2 | 9 |
| IN3 | 10 |
| IN4 | 11 |
I suggest you use a separate power supply for the motor since it may draw current beyond the power pins of the Arduino can provide. (I actually did use the Arduino power pins to power the stepper and got one damaged Arduino as a result).
Using a Better Stepper Motor Library
The disadvantage of using the built-in stepper library is that there’s no option to change the stepping mode as it defaults to wave drive only. Also, the built-in library is limited to one stepper motor.
A better library for controlling stepper motors is the AccelStepper library by AirSpayce.
Besides support for half-step driving and multiple motors, the library also offers acceleration and deceleration functions, among other things.
The following sketch rotates the 28BYJ-48 in one direction with a predetermined number of steps:
#include <AccelStepper.h>

// Motor pin definitions
#define motorPin1  8         // IN1 on the ULN2003 driver 1
#define motorPin2  9         // IN2 on the ULN2003 driver 1
#define motorPin3  10         // IN3 on the ULN2003 driver 1
#define motorPin4  11        // IN4 on the ULN2003 driver 1

// Initialize with pin sequence IN1-IN3-IN2-IN4 for using the AccelStepper with 28BYJ-48
AccelStepper stepper(HALF4WIRE , motorPin1, motorPin3, motorPin2, motorPin4);

void setup() {
  stepper.setMaxSpeed(2000.0);
  stepper.setAcceleration(100.0);
  stepper.setSpeed(200);
  stepper.moveTo(2000);
}//--(end setup )---

void loop() {
  stepper.runSpeedToPosition();
}
The stepper class is initialized in this line:
AccelStepper stepper(HALF4WIRE , motorPin1, motorPin3, motorPin2, motorPin4);
Here, the parameters are the interface (HALF4WIRE) followed by the pin names. The interface parameter accepts the following:
Since the 28BYJ-48 is a four-phase stepper and we want to use half-stepping for precise movements, we used HALF4WIRE as parameter.
As mentioned, one of the strengths of this library is the ability to set the motor acceleration:
stepper.setAcceleration(100.0);
This gives the motor an acceleration of 100 steps per second.
We can also set the maximum speed of the motor:
stepper.setMaxSpeed(2000.0);
And the actual speed:
stepper.setSpeed(200);
Moreover, this line:
stepper.moveTo(2000);
Will make the stepper motor turn until it reaches 2,000 steps. However, the motor will not move unless this line is placed in the main loop:
stepper.runSpeedToPosition();
The library is very extensive and contains a number of functions to use. As we can't cover everything in this tutorial, I suggest you check the library's reference page.
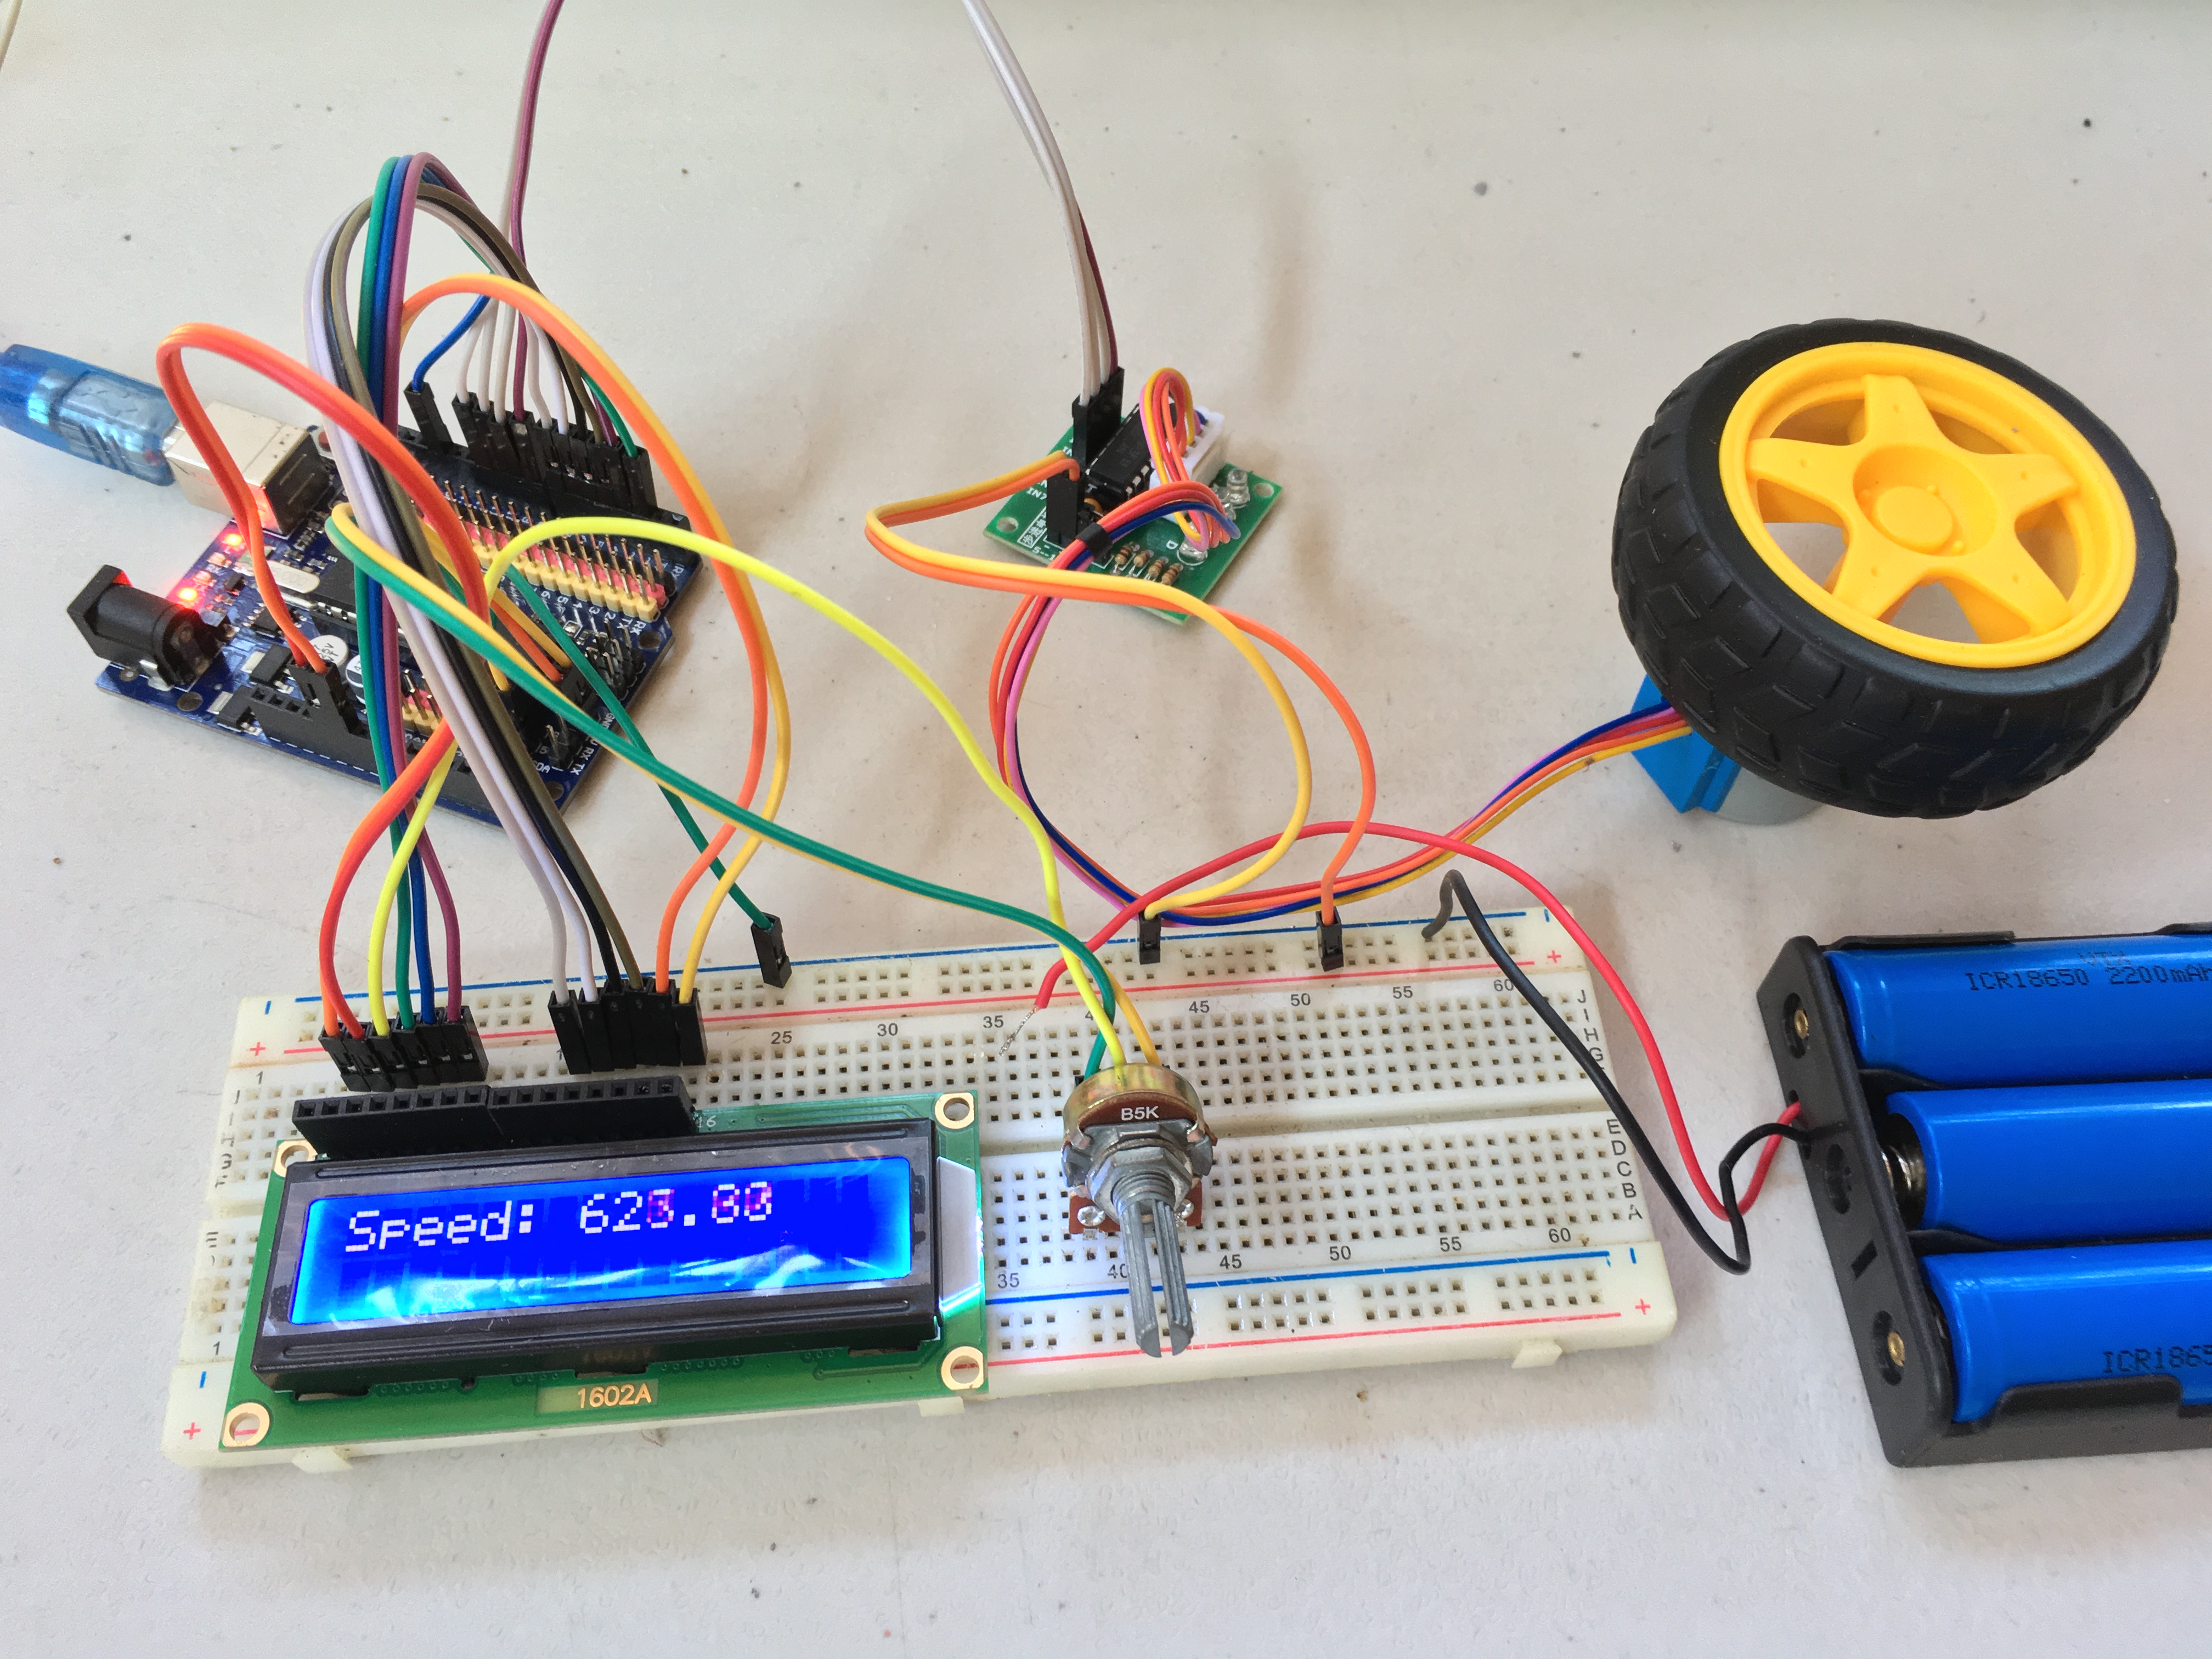
An Example Project
I created another sketch where I display the speed and the steps of the stepper motor in a 16x2 LCD:
#include <AccelStepper.h>

// Motor pin definitions
#define motorPin1  8         // IN1 on the ULN2003 driver 1
#define motorPin2  9         // IN2 on the ULN2003 driver 1
#define motorPin3  10         // IN3 on the ULN2003 driver 1
#define motorPin4  11        // IN4 on the ULN2003 driver 1

// Initialize with pin sequence IN1-IN3-IN2-IN4 for using the AccelStepper with 28BYJ-48
AccelStepper stepper(HALF4WIRE, motorPin1, motorPin3, motorPin2, motorPin4);

#include <LiquidCrystal.h>

// initialize the library by associating any needed LCD interface pin
// with the arduino pin number it is connected to
const int rs = 2, en = 3, d4 = 7, d5 = 6, d6 = 5, d7 = 4;

LiquidCrystal lcd(rs, en, d4, d5, d6, d7);

void setup() {
  stepper.setMaxSpeed(2000.0);
  stepper.setAcceleration(100.0);
  stepper.setSpeed(200);
  stepper.moveTo(2000);
  lcd.begin(16, 2);

}//--(end setup )---

void loop() {
  //Change direction when the stepper reaches the target position
  stepper.run();
  lcd.setCursor(0,0);
  lcd.print("Speed:");
  lcd.setCursor(7,0);
  lcd.print(stepper1.speed());
  lcd.setCursor(0,1);
  lcd.print("Steps: ");
  lcd.print(2000 - stepper1.distanceToGo());
}
The following video shows the result of the above sketch:
Unfortunately, this stepper motor will not produce speeds higher than 15 RPM. NEMA17 stepper motors will produce higher RPMs and those will be the subject of my next tutorial.
Was this post useful? Kindly drop a comment below.

