
One of the strengths of the Arduino platform is its extensive library. Libraries make life simpler for coders; imagine how hard it would be if there's no LiquidCrystal or Servo library ready for use. In my experience, projects took shorter time because of the built-in and third-party Arduino library you can freely use.
The Arduino community has created a number of libraries over the years. These are the official libraries. But there are still applications that need their own libraries. This simple tutorial will outline the steps needed to create your own third party Arduino library.
Introduction to Arduino Library
Here I'll create a simple library that blinks a LED on a pin. Normally, you would code like this to blink a LED on a pin:
void setup()
{
     pinMode(13, OUTPUT);
}

void loop()
{
     digitalWrite(13, HIGH);
     delay(1000);
     digitalWrite(13, LOW);
     delay(1000);
}
With my library, you will be blinking a LED on a pin like this:
#include <blink.h>

Blink pin (13);

void setup()
{

}

void loop()
{
    pin.blink(ON, 1000);
}
Note that my library doesn't offer any advantage over the original method and was created just for demonstration.
A library needs two files to be valid: a header file and a source file. In my code above, the header file is Blink.h. It is added to the sketch by using the #include directive.
Blink.h:
/*
 blink.h - Simple example in creating your own Arduino Library
 Copyright (c) 2017 op of TMM. All right reserved.

 A pin is blinked automatically by one second intervals or by a specified interval
 Methods:

 Blink(pin) - Constructor. Specify pin to blink
 blink(value) - Enable blinking. Accepts 1, 0 or ON and OFF
 blink(value, length) - Enable blinking and specify interval of blinking.
*/

#ifndef Blink_h
#define Blink_h

#include <Arduino.h>

#define ON true
#define OFF false

class Blink
{
public:
	Blink(int pin);  //Constructor. attach pin to blink
	void blink(bool value);  //enable blinking with 1s duration
	void blink(bool value, int blinkLength);   //enable blinking with blink duration
	void blink(bool value, int blinkLength, int blinkLoops);  //enable blinking with blink duration and number of loops
private:
	uint8_t pinNumber;
};

#endif
The header file consists of a descriptive comment, constructs (the one with #ifndef Blink_h and #define Blink_h), needed include files (#include <Arduino.h>), constant definitions (#define ON true, etc.) and a class that contains the functions and variables to be used in your library. Let's examine each part one by one.
Descriptive Comment
/*
 blink.h - Simple example in creating your own Arduino Library
 Copyright (c) 2017 op of TMM. All right reserved.

 A pin is blinked automatically by one second intervals or by a specified interval and/or number of loops

 Methods:

 Blink(pin) - Constructor. Specify pin to blink
 blink(value) - Enable blinking. Accepts 1, 0 or ON and OFF
 blink(value, length) - Enable blinking and specify interval of blinking in milliseconds.
 blink(value, length, loops) - Enable blinking and specify interval in milliseconds and number of loops (max. 255 loops)
*/
This part explains what your library is supposed to be. When creating a library, think about other people that might use it someday, whether the library is free or paid. Write it in a way that is simple to understand. Here' I've even added the methods of my library with short explanations on each.
Construct
#ifndef Blink_h
#define Blink_h

...//#include and code here

#endif
The construct is just a simple way to prevent problems if ever the user adds the #include <Blink.h> twice on his/her code.
Include Files
#include <Arduino.h>
You can also add a header file inside another header file if there are functions that you need from that header. Here I include Arduino.h because I will be using some of its built-in functions.
Constant Definitions
#define ON true
#define OFF false
You can also give name to constants that can be used with your library. Here I have two constants ON and OFF which is equal to boolean true and false respectively.
Class
class Blink
{
public:
	Blink(int pin); //Constructor. attach pin to blink
	void blink(bool value);  //enable blinking with 1s duration
	void blink(bool value, int blinkLength);   //enable blinking with blink duration
	void blink(bool value, int blinkLength, int blinkLoops);  //enable blinking with blink duration and number of loops
private:
	uint8_t pinNumber;
};
The class contains the functions and variables to be used in your library. Note that the actual way to use the functions are not in the class (they are on the .cpp file). They are just listed here for reference.
Your functions and variables can either be public or private. Public ones are user accessible while privates ones are only used by the functions themselves. Here I have three public methods and the constructor Blink() which is required and should have the same name as your class.
Notice that I have three methods that are named blink(). This is acceptable as long as they don't have the same parameters. The first blink() method accepts boolean value only, the second method accepts both boolean value and integer blinkLength while the third method accepts boolean value, integer blinkLength and integer blinkLoops.
Here I only have one private variable: pinNumber.
Source File
That's it for the header file. Now let's look at the source file.
Blink.cpp
/*
blink.cpp - Simple example in creating your own Arduino Library
Copyright (c) op from TMM. All right reserved.

*/

#include <Arduino.h>
#include "blink.h"

Blink::Blink(int pin){
 pinMode(pin, OUTPUT);
 pinNumber = pin;
}

void Blink::blink(bool value){
 if(value == true){
 digitalWrite(pinNumber,HIGH);
 delay(1000);
 digitalWrite(pinNumber,LOW);
 delay(1000);
 }else{
 digitalWrite(pinNumber,LOW);
 }
}

void Blink::blink(bool value, int blinkLength ){
 if(value == true){
 digitalWrite(pinNumber,HIGH);
 delay(blinkLength);
 digitalWrite(pinNumber,LOW);
 delay(blinkLength);
 }else{
 digitalWrite(pinNumber,LOW);
 }
}

void Blink::blink(bool value, int blinkLength, int blinkLoops){
 if(value == true){
 for(int i=0;i<blinkLoops;i++){
 digitalWrite(pinNumber,HIGH);
 delay(blinkLength);
 digitalWrite(pinNumber,LOW);
 delay(blinkLength);
 }
 }else{
 digitalWrite(pinNumber,LOW);
 }
}
The actual use of the methods and variables on the header file is on this file. Notice that it includes two headers:
#include <Arduino.h>
#include "blink.h"
The Arduino.h is needed because I need to use some of the built-in Arduino functions. Of course, I also need a reference to the header file blink.h.
The part:
Blink::Blink(int pin){
 pinMode(pin, OUTPUT);
 pinNumber = pin;
}
is the constructor which also explains what should happen when someone creates and instance of my class. Here the user needs to specify which pin to blink.
Usable Functions:
void Blink::blink(bool value){
 if(value == true){
 digitalWrite(pinNumber,HIGH);
 delay(1000);
 digitalWrite(pinNumber,LOW);
 delay(1000);
 }else{
 digitalWrite(pinNumber,LOW);
 }
}

void Blink::blink(bool value, int blinkLength ){
 if(value == true){
 digitalWrite(pinNumber,HIGH);
 delay(blinkLength);
 digitalWrite(pinNumber,LOW);
 delay(blinkLength);
 }else{
 digitalWrite(pinNumber,LOW);
 }
}

void Blink::blink(bool value, int blinkLength, int blinkLoops){
 if(value == true){
 for(int i=0;i<blinkLoops;i++){
 digitalWrite(pinNumber,HIGH);
 delay(blinkLength);
 digitalWrite(pinNumber,LOW);
 delay(blinkLength);
 }
 }else{
 digitalWrite(pinNumber,LOW);
 }
}
I include three functions: one where the user can turn on a blink sequence with 1 second interval between on and off; another where the user can specify the interval in milliseconds and another where the user can also specify how many times the blink loop will occur.
Using the Library
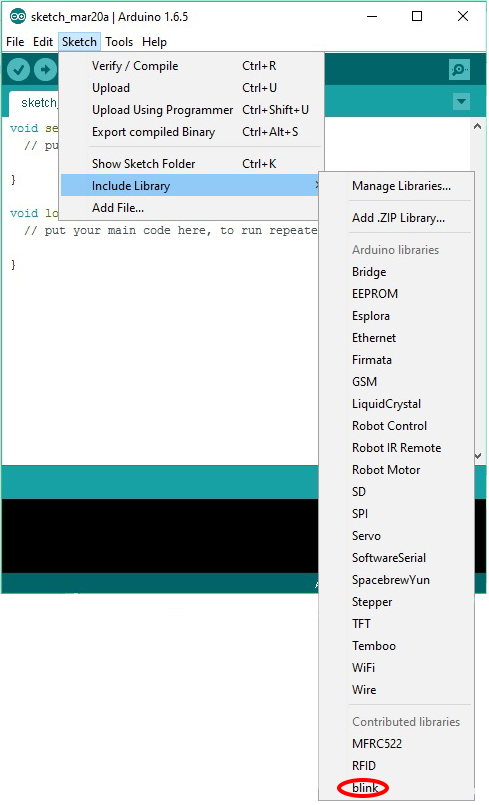
To use the library, you need to have the two files (blink.h and blink.cpp) inside a folder (let's say blink) and then that folder must be inside the Arduino libraries folder. On my computer, the libraries can be found on C:\Users\<User Name>\Documents\Arduino\libraries. (Replace <User Name> with your own computer user name). You can also add examples on how to use the library by including an examples folder containing the example sketches.
Once transferred, the library will now appear as pictured:
Assigning Keywords
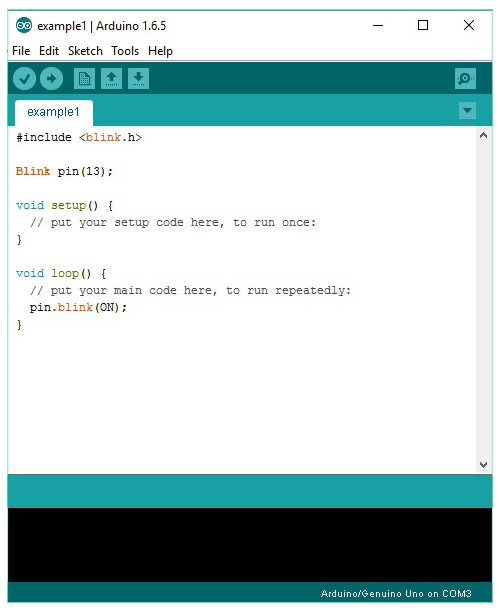
You can also assign keywords for your library. Once the IDE recognizes these keywords, they will automatically turn orange when in the sketch. To do this, create a keyword.txt file on the blink folder with content like this:
#######################################
# Syntax Coloring Map For Blink
#######################################

#######################################
# Datatypes (KEYWORD1)
#######################################

Blink KEYWORD1

#######################################
# Methods and Functions (KEYWORD2)
#######################################

blink KEYWORD2

#######################################
# Constants (LITERAL1)
#######################################
ON LITERAL1
OFF LITERAL1
There are three types of keywords you can have: Datatypes (KEYWORD1), Methods and Functions (KEYWORD2) and Constants (LITERAL1). With the keyword.txt file in place, my editor changes the color of my class name (Blink) and function (blink):
Library Properties
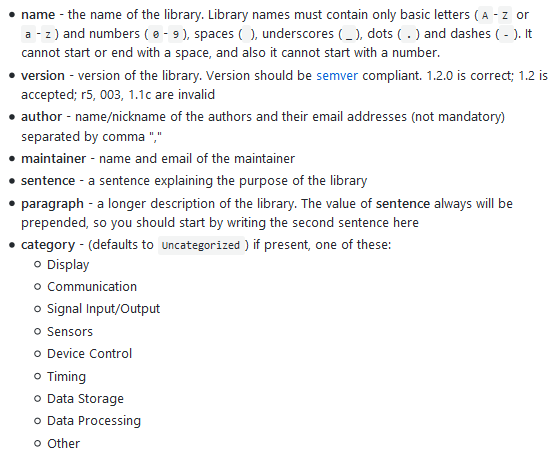
Since Arduino 1.5, a library.properties file can be included with the library that describes what the library is all about. This file is a UTF-8 text file that follows a specific format. Here is an example of a library.properties file for the library above:
name=blink
version=1.0
author=Roland <roland@teachmemicro.com>
maintainer=Roland <roland@teachmemicro.com>
sentence=An example for creating a library.
paragraph=Blink a pin without using digitalWrite.
category=Signal Input/Output
url=https://www.teachmemicro.com/create-arduino-library
architectures=* includes=Blink.h
Here are the explanation for each field:
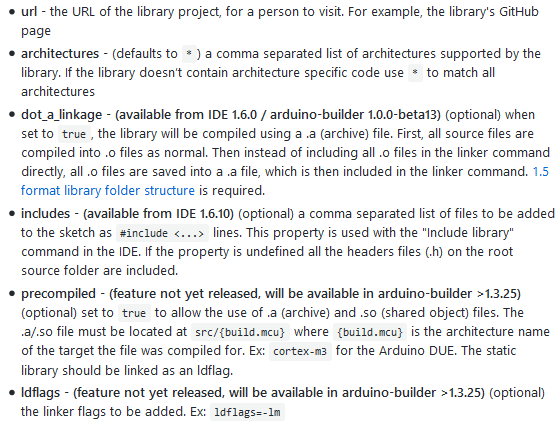
Create your own Arduino library now and be part of the Arduino open source community!
Found this post useful? Please drop a comment below!

