
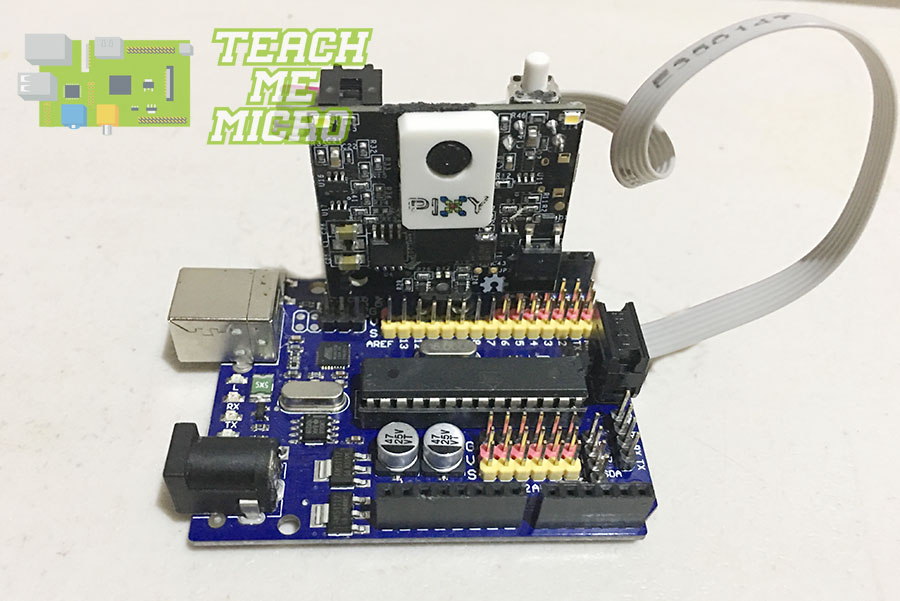
The basic Arduino boards are not powerful enough for image processing. Heck, they are not even good enough to capture photos without the help of a desktop computer. However, there is a special imaging device you can use to make an Arduino detect objects.
The special device I am referring to is the Pixy camera. This camera incorporates a microprocessor which does all the heavy image processing stuff and simplifies object detection. This tutorial shows you how to use the Pixy camera to build an Arduino object detection project.
Setting Up Object Signatures
The Pixy camera board comes with two cables: one to be connected to an Arduino and another to be connected to a desktop or laptop. See image below:
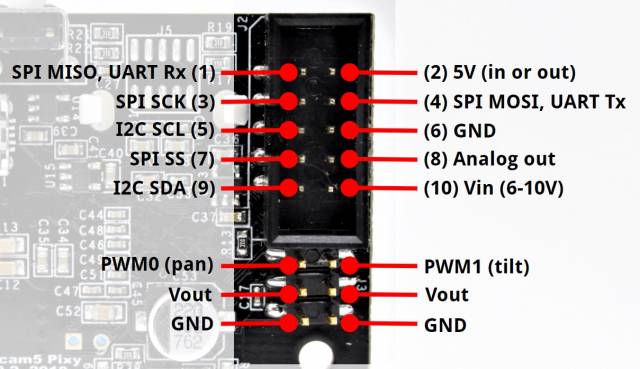
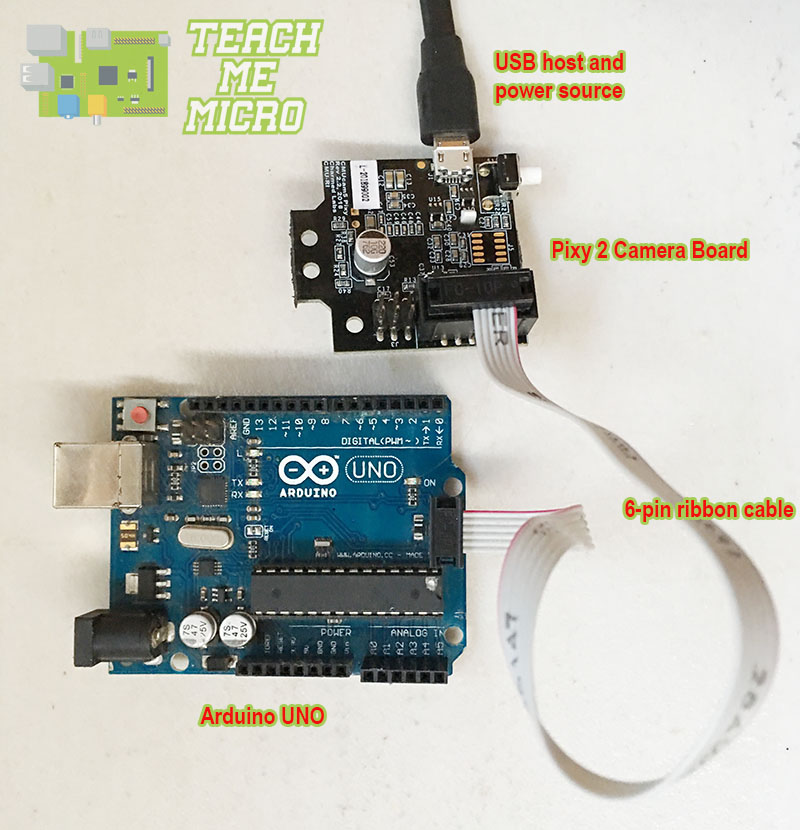 As you can see, the Pixy directly supports Arduino boards with ISP headers such as an Arduino UNO, Nano and Mega. Other boards may be used as well since the Pixy board uses SPI communication. Just take note of the following pin definitions:
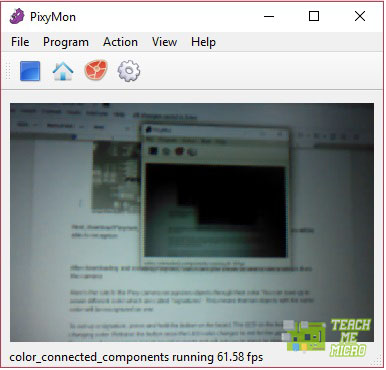
Next, download Pixymon, a desktop app that allows you to set which objects the camera will be able to recognize.
After downloading and installing Pixymon, start it and you should be able to see a stream from the camera.
Here’s the catch: the Pixy camera recognizes objects through their color. You can save up to seven different colors which are called “signatures”. This means that two objects with the same color will be recognized as one.
To set up a signature, press and hold the button on the board. The LED on the board should start changing color. Release the button once the LED color changes to red. Pixymon will now engage in signature setup mode and will ask you to place an object in front of the camera. If a color is distinct enough, it should appear to be shaded on the Pixymon screen.
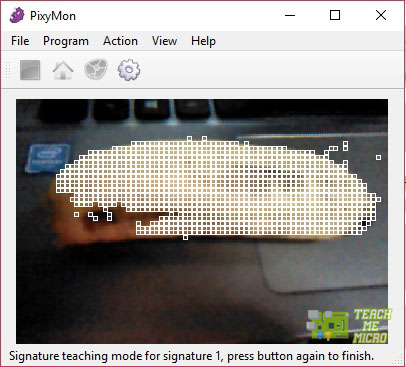
Press the on-board button again to save this color signature.
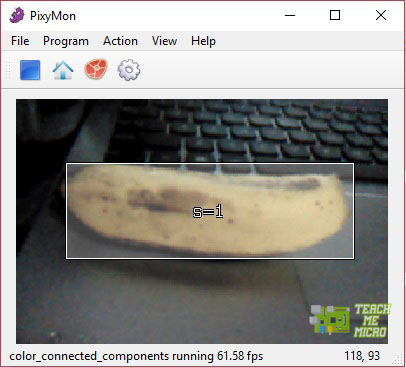
The Pixy camera should now be able to detect and track the object, wrapping the object in a rectangle with the text “s=1”.
You can add more signatures by repeating the process above except waiting for the red color on the LED. To setup a second color signature, release the button on the color immediately following red. Similarly, setup a third color signature by releasing the button on the color immediately following the color after red, and so on.
To learn more about using Pixymon, read its official wiki page.
Pixy and Arduino
First, download the Pixy library for Arduino. Then, open one of the examples provided on the
said library, ccc_hello_world.
#include <Pixy2.h>
// This is the main Pixy object
Pixy2 pixy;

void setup()
{
  Serial.begin(115200);
  Serial.print("Starting...\n");
  pixy.init();
}

void loop()
{
  int i;
  // grab blocks!
  pixy.ccc.getBlocks();
  // If there are detect blocks, print them!
  if (pixy.ccc.numBlocks)
  {
    Serial.print("Detected ");
    Serial.println(pixy.ccc.numBlocks);
    for (i=0; i<pixy.ccc.numBlocks; i++)
    {
      Serial.print(" block ");
      Serial.print(i);
      Serial.print(": ");
      pixy.ccc.blocks[i].print();
    }
  }
}
Upload this sketch and then open serial monitor with baud rate equal to 115200.
If the Pixy detects an object, the following text should appear on the serial monitor:
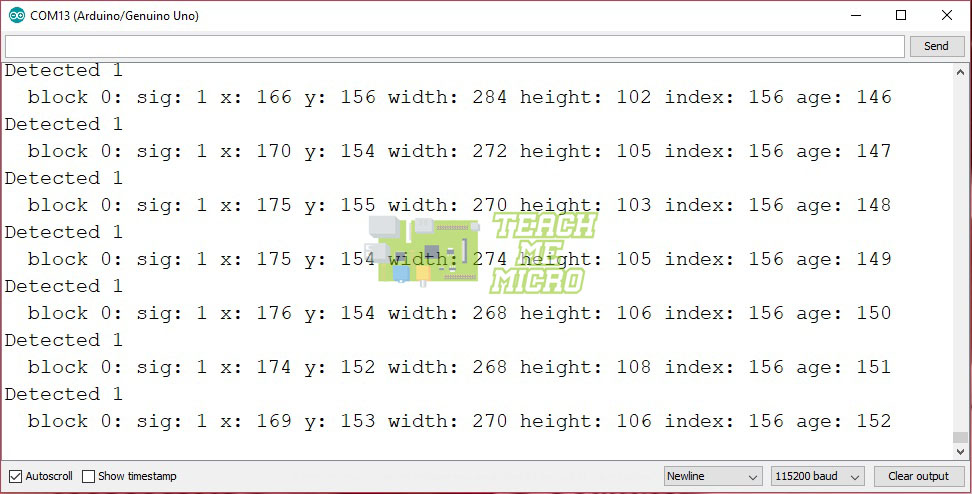
There are several pieces of information found here:
● block is the number of objects detected,
● x and y are the coordinates of the object in the frame,
● sig is the color signature,
● width and height are the dimensions of the rectangle which envelopes the object.
● index is the tracking index, which is a number assigned to a detected object. This number is useful for tracking certain objects with the same color signature in a single frame.
● Finally, age is the number of frames the camera has captured since starting.
Detecting a Specific Object
We can use the data on the serial monitor to determine specific objects. For example, we want to detect a pencil.
First, set the pencil as a color signature by following the setup above. A common pencil would have different colors for its body and eraser head. Thus, we will create two color signatures.
Next, we create a sketch based on the ccc_hello_world example above. We need to check the width and height of the detected signatures and determine which size suggests a pencil. With this technique, we can reduce the detectable objects to those with the same colors and size of a pencil.
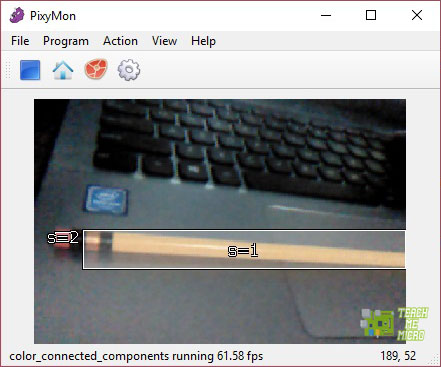
My serial monitor shows this when the pencil is captured inside the frame:

Signature 1 is the pencil body and signature 2 is the eraser head. According to the information above, signature 1 has a size of 254 x 30 while signature 2 has a size of 14 x 4. The actual width and height are irrelevant here; what we need is the difference between the sizes of each signature. With this, we can say that there is an object with a large rectangular yellow body and another object with a small rectangular red body.
We can also use the location of each object by looking at the x and y’s. If the image of the pencil is horizontal, the body and the eraser head should be at about the same level vertically. Here, both signatures lie within the 100 to 120 range.
Here’s now a sketch that detects a pencil using the Pixy camera:
#include <Pixy2.h>
// This is the main Pixy object
Pixy2 pixy;
int pencil_body_area; //size of detected pencil body
int eraser_head_area; //size of detected eraser head
int pencil_body_x; //location in x of pencil body
int pencil_body_y; //location in y of pencil body
int eraser_head_x; //location in x of eraser head
int eraser_head_y; //location in y of eraser head
bool isArea; //used to check if area category is justified
bool isLocation; //used to check if location category is justified
void setup()
{
  Serial.begin(115200);
  Serial.print("Starting...\n");
  isArea = false;
  isLocation = false;
  pixy.init();
}
void loop()
{
  int i;
  // grab blocks!
  pixy.ccc.getBlocks();
  // If there are detect blocks, print them!
  if (pixy.ccc.numBlocks)
  {
    pencil_body_area = pixy.ccc.blocks[0].m_height * pixy.ccc.blocks[0].m_width;
    eraser_head_area = pixy.ccc.blocks[1].m_height * pixy.ccc.blocks[1].m_width;
    pencil_body_x = pixy.ccc.blocks[0].m_x;
    pencil_body_y = pixy.ccc.blocks[0].m_y;
    eraser_head_x = pixy.ccc.blocks[1].m_x;
    eraser_head_y = pixy.ccc.blocks[1].m_y;
    int area_factor = pencil_body_area / eraser_head_area;
    if(area_factor > 100 && area_factor < 150){
      isArea = true;
    }else{
      isArea = false;
    }
    int loc_factor_x = pencil_body_x - eraser_head_x;
    int loc_factor_y = pencil_body_y - eraser_head_y;
    if(loc_factor_x < 20 || loc_factor_y < 20){
      isLocation = true;
    }else{
      isLocation = false;
    }
    if(isArea && isLocation){
      Serial.println("Pencil detected!");
    }
  }
}
Here, I used the area of the pencil’s body and eraser head and compare them with each other. Based on my initial tests, the pencil’s body is about 100 times the size of the eraser head, hence this statement:
int area_factor = pencil_body_area / eraser_head_area;
if(area_factor > 100 && area_factor < 150){
  isArea = true;
}else{
  isArea = false;
}
Next, the location of the pencil’s body and eraser head should be about the same level in x if the pencil is horizontal or in y if the pencil is vertical. Hence,
int loc_factor_x = pencil_body_x - eraser_head_x;
int loc_factor_y = pencil_body_y - eraser_head_y;
if(loc_factor_x < 20 || loc_factor_y < 20){
  isLocation = true;
}else{
  isLocation = false;
}
Only when both area and location is satisfied will we print that a pencil has been detected
if(isArea && isLocation){
  Serial.println("Pencil detected!");
}
That’s it! I will be building a lot of projects with the Pixy camera so I hope you come back!

