
We set up a simple NodeMCU web server in our previous tutorial. There we controlled an LED from a web page hosted by the NodeMCU ESP8266 board! This time, we'll be displaying data from a sensor connected to the NodeMCU's analog pin.
Video Tutorial
In this tutorial, I'll be displaying data coming from a light dependent resistor (LDR) to our NodeMCU web server. You can use any sensor available to you as long as its output voltage is not more than the recommended maximum of 3.3 V.
The ESP8266 itself accepts only up to 1 V on its analog pin. Thankfully, the NodeMCU board has a built-in voltage divider.
The ESP8266 (which is the main chip on the NodeMCU) uses a 10-bit ADC. This means the input voltage from 0 to 3.3 V will be equivalent to 0 to 1024.
Materials Needed
Wiring Diagram
Here's our simple circuit for this tutorial:
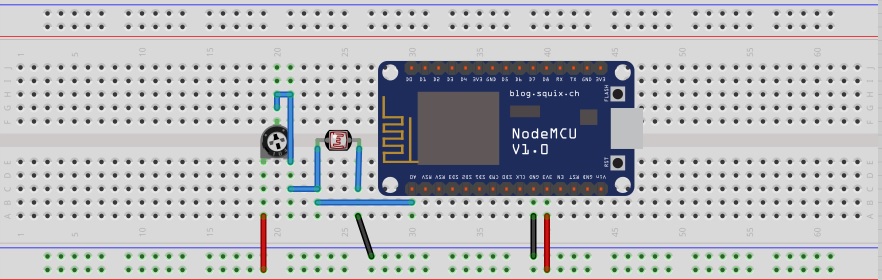
I used a trimmer together with the LDR for voltage division so that I can adjust the "sensitivity" of my sensor.
Code
#include <ESP8266WiFi.h>
#include <WiFiClient.h>
#include <ESP8266WebServer.h>

// Replace with your network credentials
const char* ssid = "<Your WiFI SSID>";
const char* password = "<Your WiFI Password>";

ESP8266WebServer server(80);   //instantiate server at port 80 (http port)

String page = "";
double data;
void setup(void){

  pinMode(A0, INPUT);

  delay(1000);
  Serial.begin(115200);
  WiFi.begin(ssid, password); //begin WiFi connection
  Serial.println("");

  // Wait for connection
  while (WiFi.status() != WL_CONNECTED) {
    delay(500);
    Serial.print(".");
  }
  Serial.println("");
  Serial.print("Connected to ");
  Serial.println(ssid);
  Serial.print("IP address: ");
  Serial.println(WiFi.localIP());
  server.on("/", [](){
    page = "<h1>Sensor to Node MCU Web Server</h1><h3>Data:</h3> <h4>"+String(data)+"</h4>";
    server.send(200, "text/html", page);
  });

  server.begin();
  Serial.println("Web server started!");
}

void loop(void){
  data = analogRead(A0);
  delay(1000);
  server.handleClient();
}
Basically, I used analogRead() to capture the voltage from the divider circuit setup by the trimmer and the LDR. The data is then embedded to the web server page.
Upload the code and open your browser to the address shown on the serial monitor (see previous tutorial for more on this).
Output
Here's what the web page should look like:
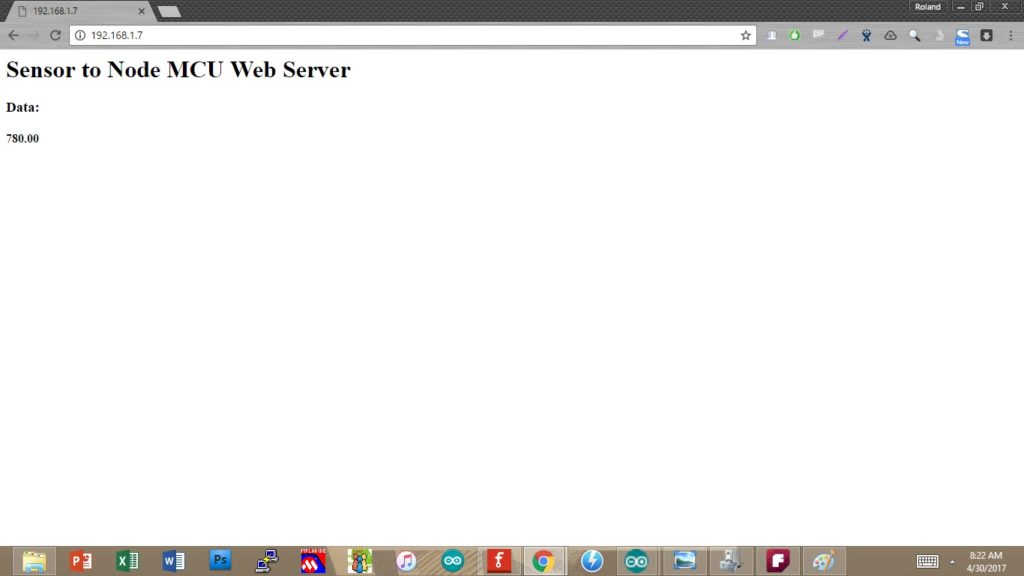
Try to cover the LDR and refresh the page. It should show a different value.
The disadvantage with this sketch is that you need to refresh the page to update the sensor values. With ajax, you can avoid refreshing the page manually.
That's it! Next up, we'll log our sensor data to a spreadsheet program like Google Sheets.

