
With its WiFi capabilities, the ESP32 can connect to API services and acquire useful (and sometimes useless) information from the web. Here’s a quick tutorial on how to connect to RESTful APIs using ESP32.
What is RESTful API
A RESTful API is an architectural style for exchanging information between servers typically using, but not exclusively, HTTP requests.

A client like a web browser normally uses HTTP requests when requesting data from a server. However, RESTful APIs make it much simpler as the requesting client only uses an URL specifying the requested resources to which the server responds.
Setup
For this tutorial, I am using the Chuck Norris API, which gives jokes about the famous action movie icon. The jokes (resource) are retrieved using GET requests through the URL: https://api.chucknorris.io/jokes/random.
The libraries I am using are the HTTPClient and ArduinoJson libraries. The HTTPClient is already included in the ESP32 core for Arduino.
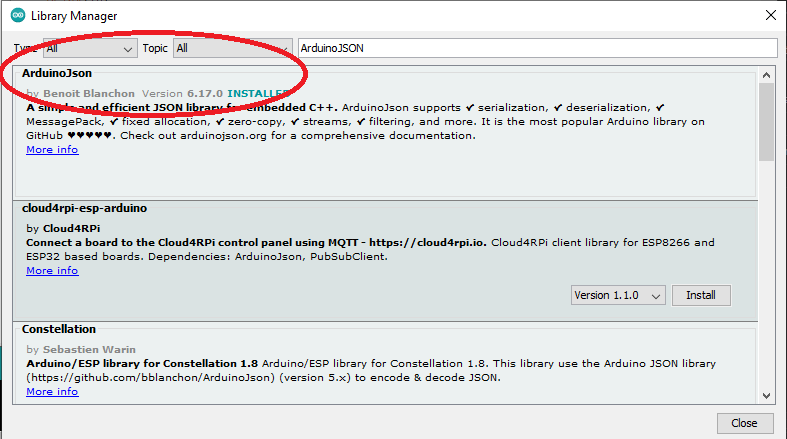
To install the ArduinoJson library, go to Sketch -> Include Library -> Manage Libraries in the Arduino IDE. Then type "ArduinoJSON" in the search field. The first search result is the library we need.
Much of the code here is from the WiFiClient example sketch and just modified to read the response from the API. Naturally, we must first establish a connection to the Internet. This is done by including this line inside the setup() routine:
WiFi.begin(ssid, password);
The variables ssid and password are both char array pointers declared just before setup() routine. For example, if your WiFi’s ssid is “Chuck” and your password is “Norris” then this is how you would declare them (again, outside or before setup());
const char* ssid = “Chuck”
const char* password = “Norris”
Next start connecting to the WiFi and wait until it’s connected. Here’s the code for that:
while (WiFi.status() != WL_CONNECTED) {
  delay(500);
  Serial.print(".");
}
Once connected, you can now send an API request using the HTTPClient library. Create a HTTPClient object like this:
HTTPClient http;
Other APIs need additional headers for the request. To do that, just use the addHeader function. For example:
http.addHeader("Content-Length",request.length());
http.addHeader("Content-Type", "application/json");
But for the Chuck Norris API, we don’t need additional headers so we skip these two lines. The only thing we need now is to execute the request.
The API request is executed through the following lines:
String request = “http://api.chucknorris.io/jokes/random”;
http.begin(request);
http.GET();
Then we wait for the API’s response:
String response = http.getString();
Parsing the Response
The API will send a response similar to this:
{"categories":[],"created_at":"2020-01-05 13:42:20.262289","icon_url":"https://assets.chucknorris.host/img/avatar/chuck-norris.png","id":"Ekw9zZkxQ1-WMgii7xv2ww","updated_at":"2020-01-05 13:42:20.262289","url":"https://api.chucknorris.io/jokes/Ekw9zZkxQ1-WMgii7xv2ww","value":"When Chuck Norris reads Creepypastas, he doesn't get scared. The creepypasta story gets scared by Chuck Norris."}
This is a JSON array which contains a number of information. What we want for now is to get the joke. That would be the value of the key “value”.
"value":"When Chuck Norris reads Creepypastas, he doesn't get scared. The creepypasta story gets scared by Chuck Norris."
To extract this part of the response, we need the ArduinoJSON library.
The library requires a JSON document with a specific size.
const size_t capacity = JSON_OBJECT_SIZE(3) + JSON_ARRAY_SIZE(2) + 60;
DynamicJsonDocument doc(capacity);
You can go to https://arduinojson.org/v6/assistant/ and paste an example JSON output from an API to know the correct size. However, it’s safer to just use a large number to cater API responses with varying lengths.
DynamicJsonDocument doc(2048);
Next, we parse the JSON string:
DeserializationError error = deserializeJson(doc, client);
if (error) {
  Serial.print(F("deserializeJson() failed: "));
  Serial.println(error.f_str());
  return;
}
The code above returns an error if the parsing fails. Errors are listed on https://arduinojson.org/v6/api/misc/deserializationerror/
Finally, we extract our target information using:
Serial.println(F("Response:"));
Serial.println(doc["value"].as<char*>());
To close the connection, we end the code with
http.end();
ESP32 Chuck Norris Full Code
Here’s the full code:
/*
  ESP32 Chuck Norris Jokes
  by R. Pelayo
  Tutorial: https://www.teachmemicro.com/esp32-restful-api

  V1.0 - 10/27/2020
*/

#include <WiFi.h>
#include <HTTPClient.h>
#include <ArduinoJson.h>

//Provide your own WiFi credentials
const char* ssid = "<Your WiFi SSID>";
const char* password = "<Your WiFi Password>";
//String for storing server response
String response = "";
//JSON document
DynamicJsonDocument doc(2048);


void setup(void) {
  //For displaying the joke on Serial Monitor
  Serial.begin(9600);
  //Initiate WiFi connection
  WiFi.mode(WIFI_STA);
  WiFi.begin(ssid, password);
  Serial.println("");

  // Wait for connection
  while (WiFi.status() != WL_CONNECTED) {
    delay(500);
    Serial.print(".");
  }
  Serial.print("WiFi connected with IP: ");
  Serial.println(WiFi.localIP());
}

void loop(void) {
  //Initiate HTTP client
  HTTPClient http;
  //The API URL
  String request = "https://api.chucknorris.io/jokes/random";
  //Start the request
  http.begin(request);
  //Use HTTP GET request
  http.GET();
  //Response from server
  response = http.getString();
  //Parse JSON, read error if any
  DeserializationError error = deserializeJson(doc, response);
  if(error) {
     Serial.print(F("deserializeJson() failed: "));
     Serial.println(error.f_str());
     return;
  }
  //Print parsed value on Serial Monitor
  Serial.println(doc["value"].as<char*>());
  //Close connection
  http.end();
  //Wait two seconds for next joke
  delay(2000);
}
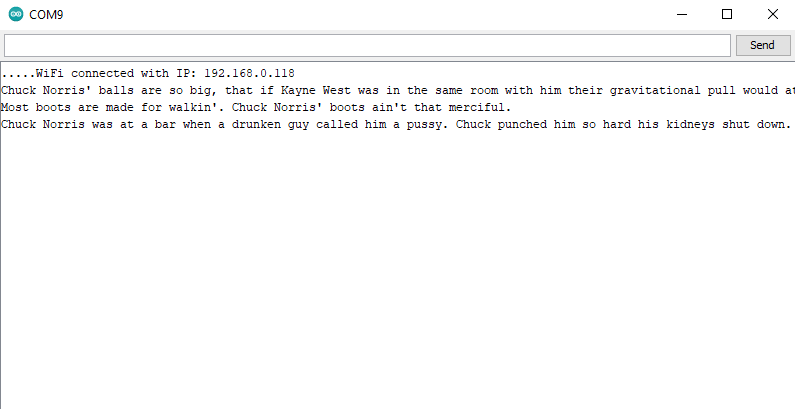
To view the Chuck Norris joke, just open the Arduino IDE’s serial monitor.
APIs with SSL
If your API of choice has added security like SSL, there are a few things you need to do.
First, download OpenSSL and install on your computer.
Then, issue the following command:
openssl s_client -connect strictapithatrequireshttps.com:443
Here, the API url is strictapithatrequireshttps.com. Change this to match your API.
Out of the many outputs of this command is the SSL certificate. It starts with
-----BEGIN CERTIFICATE-----
and ends with
----END CERTIFICATE-----
Copy the certificate, paste it on a text editor and save it as cert.perm. It’s easier if the location of this cert.perm is the same location as your current CMD directory.
Then, issue this command in openssl:
openssl x509 -noout -in ./cert.perm -fingerprint -sha1
This reads out the SHA1 from the certificate which we’ll need to add in our code/sketch. For example, the output of this command would be:
SHA1 Fingerprint=6F:15:94:C5:F9:75:54:E8:E1:DA:27:51:06:8A:32:03:75:E8:B2:A3
In the code, we add the SHA1 code in our http.begin() statement. Remember to replace the colons with a space.
String request = "https://api.somesecuresite.com/values";
http.begin(request,”6F 15 94 C5 F9 75 54 E8 E1 DA 27 51 06 8A 32 03 75 E8 B2 A3”);
http.GET();
You should now be able to use the API just like the first example.

