

The DHT22 temperature and humidity sensor is a common sensor; in fact, there are tons of tutorials out there teaching you how to use it with your Arduino, Raspberry Pi, or other microcontrollers. What prompted me to write about this sensor is my curiosity about how it gives out two sets of data using only one wire. And that is what this post is all about.
DHT22 Overview
The DHT22 module contains a capacitive humidity sensor, DS18B20 temperature sensor, and an unnamed 8-bit microcontroller. According to its datasheet, it is capable of detecting 0 to 100% relative humidity and temperatures from -40 to 125 degrees celsius. The resolution for both humidity and temperature is 0.1 (RH and degree Celsius) while the accuracy is +/ 2 for humidity and +/ 0.3 for temperature.
Compared to the DHT11, the DHT22 has a wider temperature range and better accuracy. Physically, the housing of this sensor is larger than the DHT11.
I own DFRobot’s DHT22:

The DHT22 is also called AM2302. Adafruit says that AM2302 is just the wired version of DHT22. Seeed also calls their DHT22 grove board as AM2302 temperature and humidity sensor pro with emphasis on "pro" since it is superio to the DHT11.
I discovered that AM2302 is really the DHT22 with an included pull-up resistor on its DOUT pin.
Anyway, if you own the same module as I do, note that there is already a pull-up resistor included in the module. The same is true for Seeed's DHT22 board.
DHT22 Operation
The DHT22 module from DFRobot has three pins as shown:

Data is read to the microcontroller from the S pin. Since there is no clock pin like in I2C and SPI, the DHT22 must be operating in asynchronous serial, like RS-232. The required pull-up resistor also means that the sensor can operate with both 3.3 V and 5 V sources.
Because of this communication protocol, called single-bus, you can connect the S pin of the module to any digital pin of a microcontroller.
Starting the Module
To begin asking the DHT22 for humidity and temperature data, the microcontroller must perform the start signal, which is a logic 0 (low) for at least 500 microseconds followed by a logic 1 (high). The DHT22 must then respond by pulling the bus low for 80 microseconds then pulling the bus high for another 80 microseconds before pulling it low again.
The starting timing diagram is illustrated below:
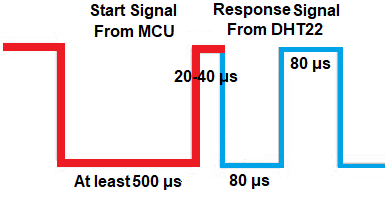
The red line is initiated by the microcontroller while the blue line is the signal from the DHT22. Only after a correct startup will the DHT22 start sending data.
Reading Temperature and Humidity Data
The DHT22 will send humidity values first followed by temperature values. Both are 16-bit data, but are sent 8 bits (1 byte) at a time. The most significant bit of the high-byte is sent first. The MSB of the temperature high byte is the sign bit; if this bit is high, the temperature is negative. Otherwise, the temperature is positive.
A logic 1 is a 50 microsecond-long low pulse followed by a 70 microsecond-long high pulse. Meanwhile, a logic 0 is a 50 microsecond-long low pulse followed by a 26 microsecond-long high pulse. The timing diagram is shown below:

Note that the actual pulse lengths might not be exactly the values I wrote. In fact, the datasheet says that the low pulse on both logic 0 and 1 (the 50 us) is between 48 to 55 us. Moreover, the logic 1 high pulse is between 68 to 75 us while the logic 0 high pulse is between 22 to 30 us.
After sending out the two bytes for humidity and two bytes for temperature, the device ends the transmission with a parity byte before pulling the bus high. The parity byte is just the sum of the four data bytes.
Parity byte = humidity high byte + humidity low byte + temp. high byte + temp. low byte
Below is an example timing diagram when a DHT22 sends out a single humidity and temperature reading:

Now if you do the math, one transmission would roughly take 5 milliseconds. However, it is recommended that you wait at least 2 seconds between transmissions because of the nature of the sensors used. Thus, the DHT22 is not recommended for fast temperature readings.
Using the DHT22
If you have the time, you can create your own library using the knowledge of its operation I just described. Otherwise, there are plenty of libraries you can use.
For the Arduino platform, I recommend the SimpleDHT library by winlinvip. Here is an example sketch from the library:
#include <SimpleDHT.h>

// for DHT22,
//      VCC: 5V or 3V
//      GND: GND
//      DATA: 2
int pinDHT22 = 2;
SimpleDHT22 dht22(pinDHT22);

void setup() {
  Serial.begin(115200);
}

void loop() {
  // start working...
  Serial.println("=================================");
  Serial.println("Sample DHT22...");

  // read without samples.
  // @remark We use read2 to get a float data, such as 10.1*C
  //    if user doesn't care about the accurate data, use read to get a byte data, such as 10*C.
  float temperature = 0;
  float humidity = 0;
  int err = SimpleDHTErrSuccess;
  if ((err = dht22.read2(&temperature, &humidity, NULL)) != SimpleDHTErrSuccess) {
    Serial.print("Read DHT22 failed, err="); Serial.println(err);delay(2000);
    return;
  }

  Serial.print("Sample OK: ");
  Serial.print((float)temperature); Serial.print(" *C, ");
  Serial.print((float)humidity); Serial.println(" RH%");

  // DHT22 sampling rate is 0.5HZ.
  delay(2500);
}
For the Raspberry Pi, there’s Adafruit’s DHT library for Python. You may need to update your packages first by issuing:
sudo apt-get update
sudo apt-get install python-pip
sudo python -m pip install --upgrade pip setuptools wheel
To download the library, just use:
sudo pip install Adafruit_DHT
Here is the example Python script from the library:
import Adafruit_DHT

# Sensor should be set to Adafruit_DHT.DHT11,
# Adafruit_DHT.DHT22, or Adafruit_DHT.AM2302.
sensor = Adafruit_DHT.DHT22

# Example using a Beaglebone Black with DHT sensor
# connected to pin P8_11.
#pin = 'P8_11'

# Example using a Raspberry Pi with DHT sensor
# connected to GPIO23.
pin = 23

# Try to grab a sensor reading.  Use the read_retry method which will retry up
# to 15 times to get a sensor reading (waiting 2 seconds between each retry).
humidity, temperature = Adafruit_DHT.read_retry(sensor, pin)

# Note that sometimes you won't get a reading and
# the results will be null (because Linux can't
# guarantee the timing of calls to read the sensor).
# If this happens try again!
if humidity is not None and temperature is not None:
    print('Temp={0:0.1f}*C  Humidity={1:0.1f}%'.format(temperature, humidity))
else:
    print('Failed to get reading. Try again!')
For PIC users, I will be writing a library for XC8 so stay tuned!
Hopefully I’ve helped you in any way with this article. If you have problems implementing your microcontroller project using DHT22, kindly create a thread on our newly started forum page!

