
A seven segment display has one pin for each of its seven segments. This means if directly interfaced with a microcontroller, you will need at least seven pins. Fortunately, there is a way to use four seven segment displays and using only four pins from your Arduino.
The TM1637 is a seven segment LED driver that communicates serially and can control up to six digits. Aside from power pins, it only requires a data pin and a clock pin.
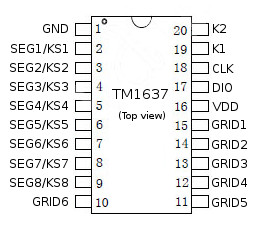
The segments connect to the SEGX pins as shown. The TM1637 supports only common anode displays and that anode pin connects to the GRIDX pins. The IC is also able to read eight keyboard pins and connects to the KSX pins.
How the TM1637 Works
One byte of data is sent to the TM1637 serially through its DIO pin. A start and stop sequence frames this data. A start sequence occurs when the DIO pin is low while the CLK pin goes from high to low. A stop sequence occurs when the DIO pin is low while the CLK pin goes from low to high.
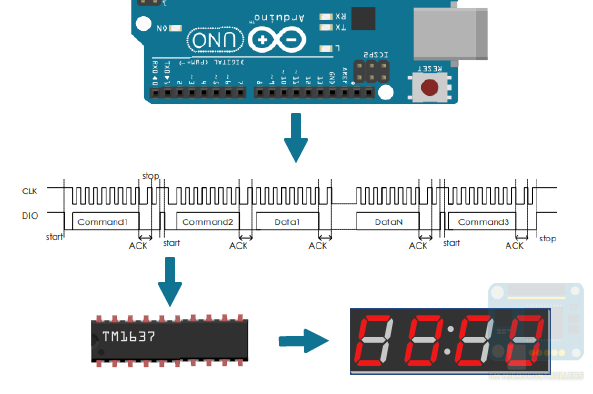
To display a digit, the TM1637 must receive 0x40 first (command 1) then a 0xCX (command 2) where X is the position indicating which display to use. For example, if a digit is to be on the 3rd display, then the second command should be 0xC2. The next byte is the encoded value of whatever character you want to display. Finally, the last byte is 0x8Y (command 3) where Y is the 4-bit brightness of the display.
Four Digit Seven Segment Display Module
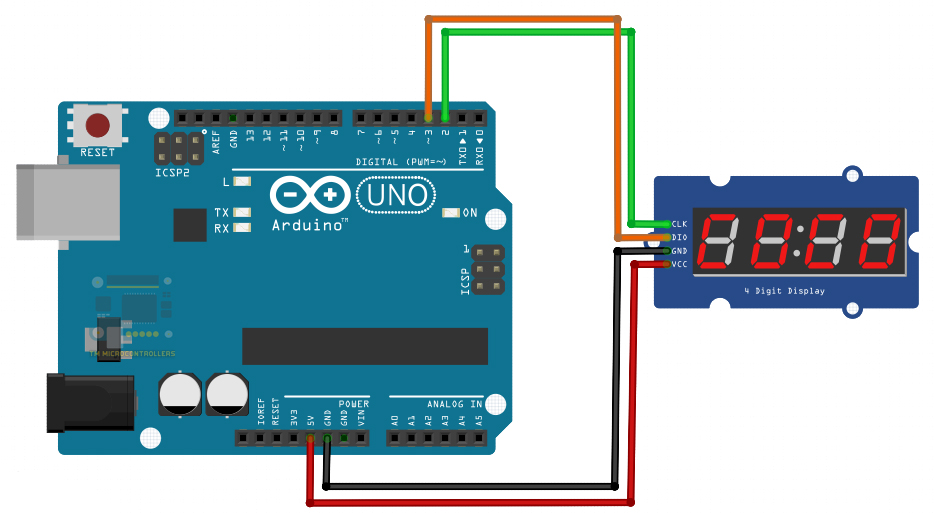
A module is available that contains a TM1637 and four mini seven-segment displays:

This module easily connects to an Arduino. Here’s an example wiring diagram:
To simplify programming, I recommend using the TM1637 library by avishorp. This library centers on four main functions:
`setSegments` - Set the raw value of the segments of each digit
`showNumberDec` - Display a decimal number
`showNumberDecEx` - Display a decimal number with decimal points or colon
`setBrightness` - Sets the brightness of the display
These functions are usable after installing the library, adding the header:
#include <TM1637Display.h>
and then initiating a TM1637 object
TM1637Display display(CLK, DIO);
Where CLK and DIO are user-defined Arduino pins.
After this, you can now call the functions above including setting the brightness of the display:
display.setBrightness(0x0F);
Here, 0x0F is the level for the brightest display while 0x00 is the dimmest.
Review on Seven Segment Displays
A digit displays on a seven segment if the correct LED segment receives power. Recall that each segment in a display is given a letter:
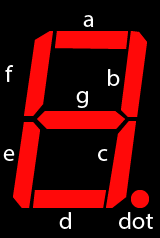
We can represent our characters as binary numbers, with the LSB as the ‘a’ segment and MSB as the ‘dot’.
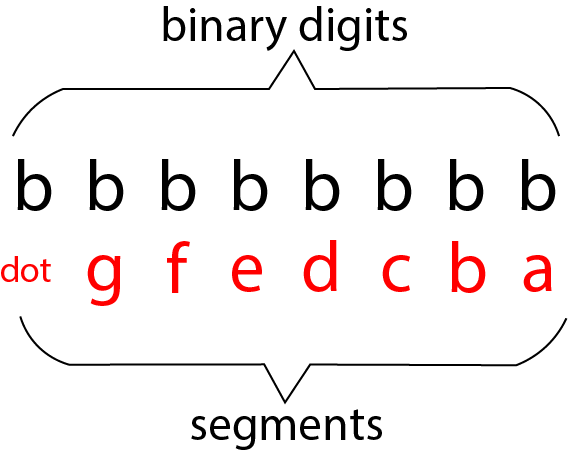
For example, for a common cathode display, the digit ‘0’ in binary number representation is 0b00111111.
Using the TM1637 Library
As mentioned, the TM1637 library centers around four functions: setSegments(), showNumberDec(), showNumberDexEx() and setBrightness(). And while the IC supports a common anode display, the library reads binary representations as common cathode.
The setSegments() function accepts an array of bytes, length of characters and position of the character.
For example:
uint8_t zeroes[] = {0b00111111,0b00111111,0b00111111,0b00111111};
display.setSegments(zeroes,2,0);
This code snippet will display two digit ‘0’ starting at the leftmost (position 0).
The colon in the middle is controllable through the second digit. We just need to set its ‘dot’ segment. So, this one displays two ‘0’ with a colon:
uint8_t zeroes[] = {0b00111111,0b00111111,0b00111111,0b00111111}; //the second element in the array has MSB set
display.setSegments(zeroes,2,0);
The showNumberDec() function has the following parameters:
showNumberDec(int num, bool leading_zero, uint8_t length, uint8_t pos)
Here, num is the digit to display, length is the number of digits to display and pos is the starting position. The leading_zero is either true or false; if true then zeroes are added to the left of the integer. If false, then the other leading numbers are left blank.
For example, this displays a 7, at position 3, with one leading zero.
display.showNumberDec(7,true,1,2);
This displays 32, starting at position 1, with no leading zero:
display.showNumberDec(32,false,2,1);
The showNumberDecEx() functions has the following parameters
showNumberDecEx(int num, uint8_t dots, bool leading_zero, uint8_t length, uint8_t pos)
The only difference of this function with that of showNumberDec() is the dots parameter. For our module, the colon directly connects with the 2nd digit. Thus, to turn it on, you can use:
display.showNumberDecEx(32,0x80,false,2,1);
Where 0x80 is the hexadecimal equivalent of 0b10000000. Recall that for binary representation of seven-segment displays, the MSB is the dot. Here, only the MSB is set hence it turns on.
However, this doesn’t turn on the dot:
display.showNumberDecEx(3,0x80,false,1,0);
This is because we are only using the 1st digit and since the colon is on the second digit, it doesn’t turn on.
You can display temperature values from a DHT11 to the seven segment module. You can also display a simple minute-second timer:
#include <Arduino.h>
#include <TM1637Display.h>

// Module connection pins (Digital Pins)
#define CLK 2
#define DIO 3

// The amount of time (in milliseconds) between tests
#define TEST_DELAY   1000

TM1637Display display(CLK, DIO);

int second_ones,second_tens,minute_ones,minute_tens;
bool dot = true;

void setup()
{
}

void loop()
{
  display.setBrightness(0x0F);
  second_ones++;
  if(second_ones > 9){
     second_tens++;
     second_ones = 0;
  }
  if(second_tens > 5){
    second_tens = 0;
    minute_ones++;
  }
  if(minute_ones > 9){
    minute_tens++;
    minute_ones = 0;
  }
  if(minute_tens > 5){
    minute_tens = 0;
  }
  int t = minute_tens * 1000 + minute_ones * 100 + second_tens * 10 + second_ones;
  dot = !dot;
  display.showNumberDecEx(t,(0x80 >> dot), true);
  delay(TEST_DELAY);
}
I hope you find this article useful. See my Arduino projects for more applications of the TM1637 and four-digit seven segment displays. For any questions, kindly drop a comment below!

