
With the 8 x 8 LEDs in a dot matrix, you can create several different characters and graphics. Imagine what you can do if you have a MAX7219 cascaded dot matrix module.
Introduction to Dot Matrices
A dot matrix is an array of LEDs controllable by addressing rows and columns.

For example, if we want to turn on the top right LED, we apply a high voltage at pin 9 and a low voltage at pin 16.
The number of pins to use makes it hard for the dot matrix to be connected directly to a microcontroller. Thus, there is a need for drivers such as the MAX7219.

The MAX7219 is a serial-input common-cathode display driver. This IC package usually drives common-cathode seven-segment displays but people found a way to also use it with dot matrices. More information on how to use the MAX7219 is on its datasheet.
Cascaded Dot Matrix
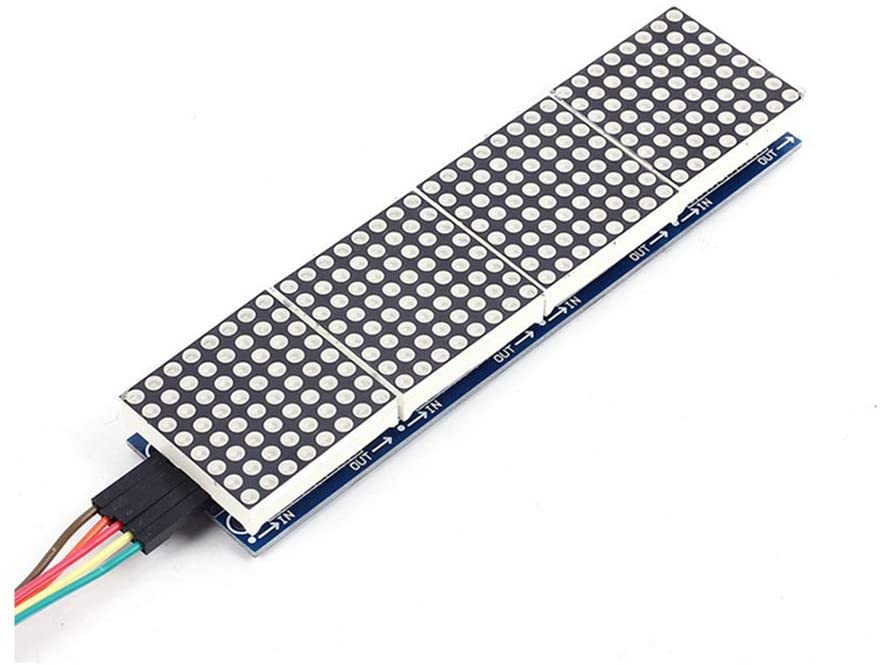
The cascaded dot matrix module connects four dot matrices in a daisy chain. Through POV, the human eye is tricked so that the LEDs seem to light up simultaneously. In reality, the LEDs are lit up one at a time at a rate that the human eye cannot catch up.
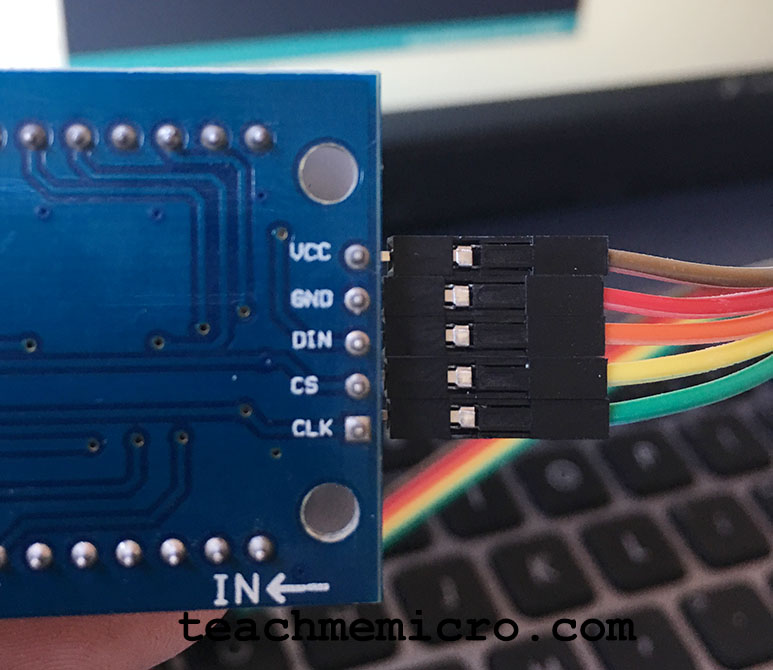
The cascaded dot matrix has five pins: VCC, GND, CS, DIN, and CLK. Experienced microcontroller guys will immediately know that these pins are SPI pins.
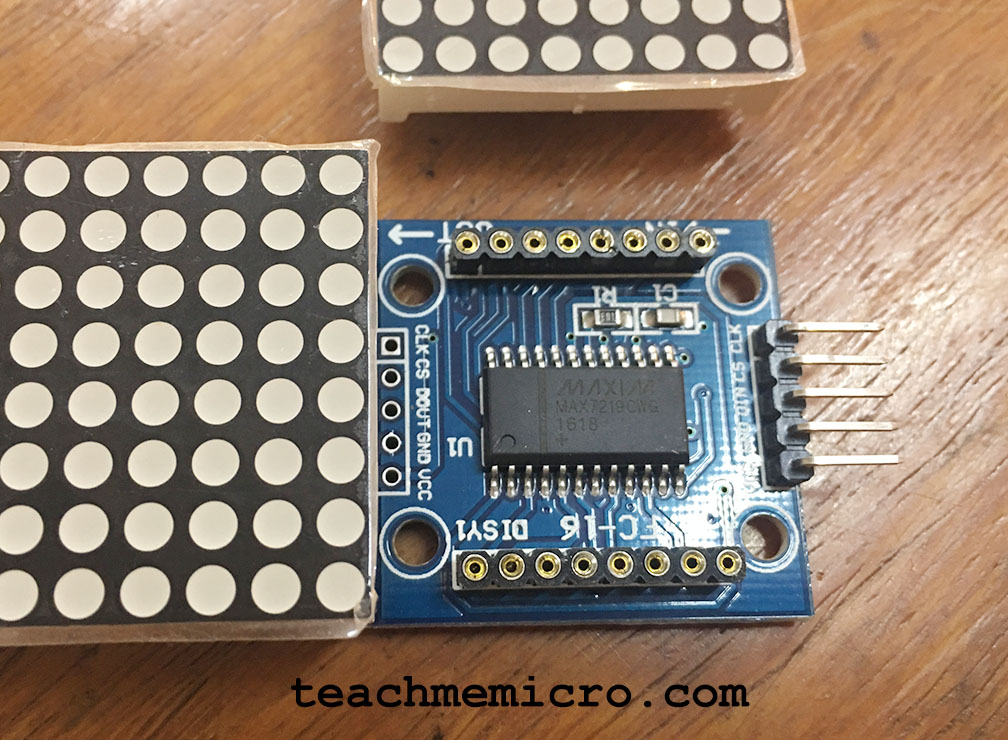
The dot matrix is removable and when removed will show each MAX7219 display driver underneath.
The LED Matrix Driver Library
Before we can use the cascaded dot matrix with an Arduino, we need a dedicated library. There are several libraries available but I found the LEDMatrixDriver library to be the easiest one to use.
The library uses the Arduino’s hardware SPI. Thus, the module must be connected to an Arduino (UNO or Nano) as follows:
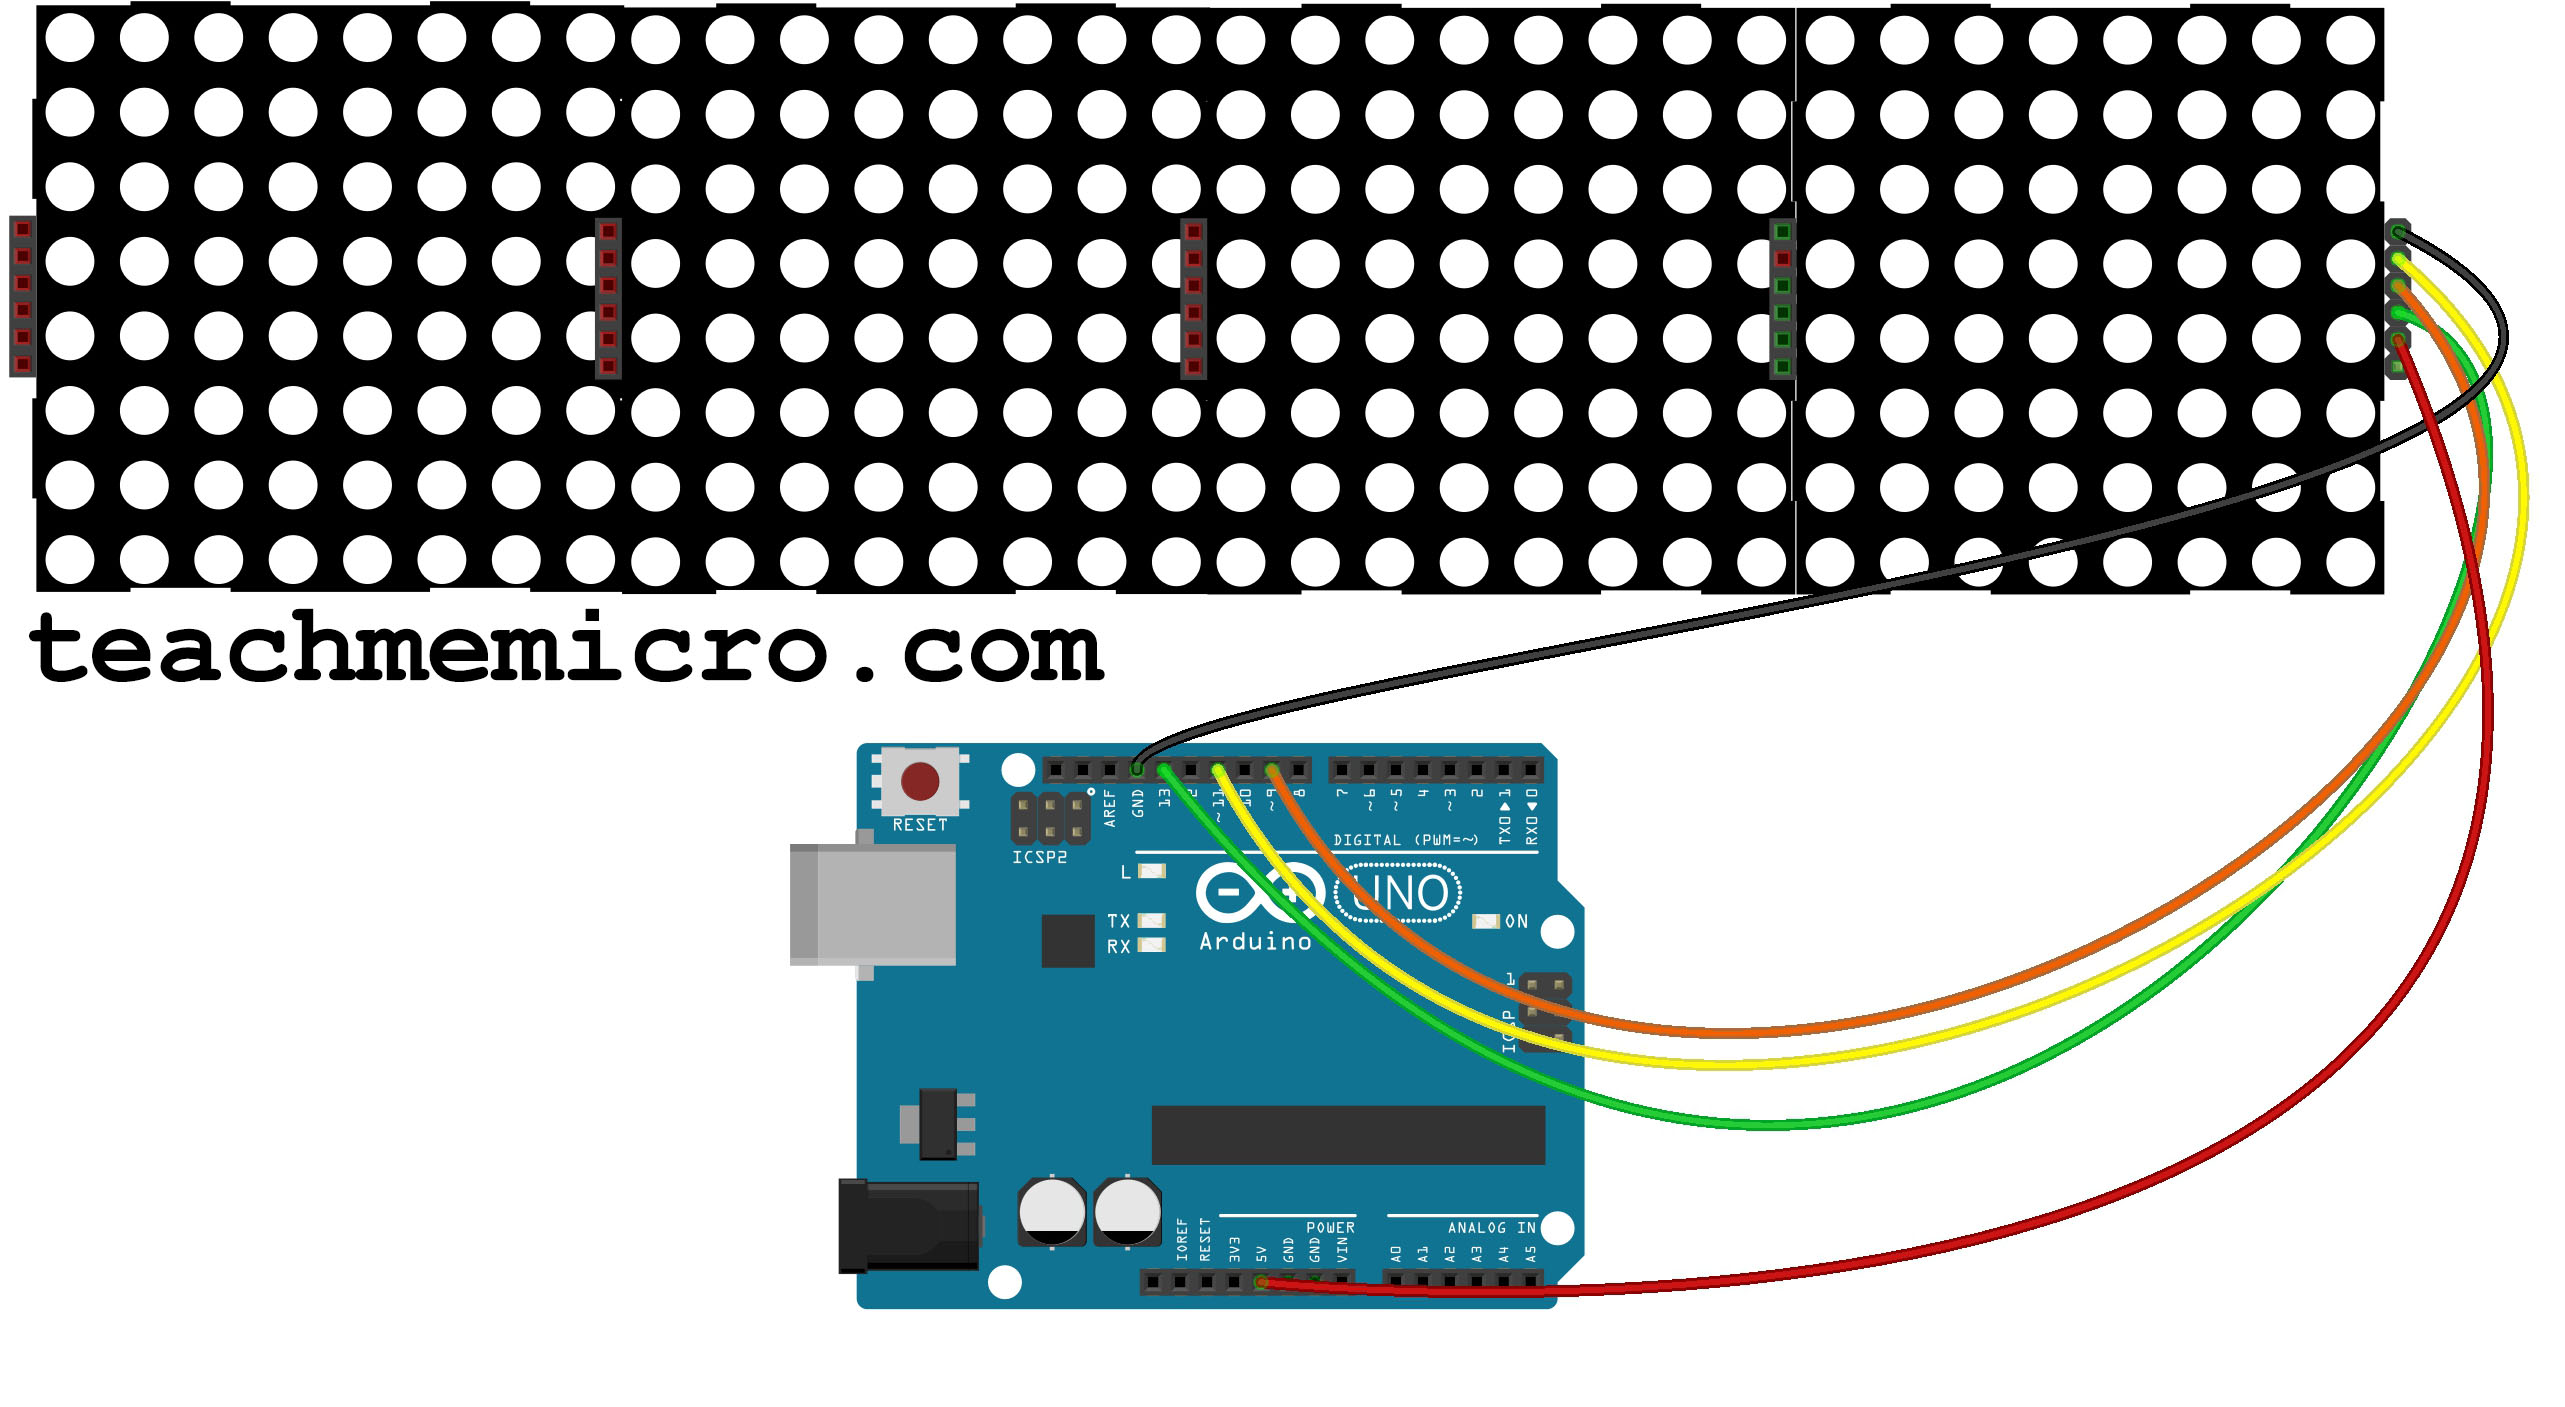
| Dot Matrix Module | Arduino UNO or Nano |
|---|---|
| VCC | 5V |
| GND | GND |
| DIN | 11 |
| CS | 9 |
| CLK | 13 |
The library contains a number of example sketches. One of them is the MarqueeText example which displays a scrolling text.
#include <LEDMatrixDriver.hpp>

// This sketch draw marquee text on your LED matrix using the hardware SPI driver Library by Bartosz Bielawski.
// Example written 16.06.2017 by Marko Oette, www.oette.info

// Define the ChipSelect pin for the led matrix (Dont use the SS or MISO pin of your Arduino!)
// Other pins are Arduino specific SPI pins (MOSI=DIN, SCK=CLK of the LEDMatrix) see https://www.arduino.cc/en/Reference/SPI
const uint8_t LEDMATRIX_CS_PIN = 9;

// Number of 8x8 segments you are connecting
const int LEDMATRIX_SEGMENTS = 4;
const int LEDMATRIX_WIDTH    = LEDMATRIX_SEGMENTS * 8;

// The LEDMatrixDriver class instance
LEDMatrixDriver lmd(LEDMATRIX_SEGMENTS, LEDMATRIX_CS_PIN);

// Marquee text
char text[] = "** LED MATRIX DEMO! ** (1234567890) ++ \"ABCDEFGHIJKLMNOPQRSTUVWXYZ\" ++ <$%/=?'.@,> --";

// Marquee speed (lower nubmers = faster)
const int ANIM_DELAY = 30;

void setup() {
  // init the display
  lmd.setEnabled(true);
  lmd.setIntensity(2);   // 0 = low, 10 = high
}

int x=0, y=0;   // start top left

// This is the font definition. You can use http://gurgleapps.com/tools/matrix to create your own font or sprites.
// If you like the font feel free to use it. I created it myself and donate it to the public domain.
byte font[95][8] = { {0,0,0,0,0,0,0,0}, // SPACE
                     {0x10,0x18,0x18,0x18,0x18,0x00,0x18,0x18}, // EXCL
                     {0x28,0x28,0x08,0x00,0x00,0x00,0x00,0x00}, // QUOT
                     {0x00,0x0a,0x7f,0x14,0x28,0xfe,0x50,0x00}, // #
                     {0x10,0x38,0x54,0x70,0x1c,0x54,0x38,0x10}, // $
                     {0x00,0x60,0x66,0x08,0x10,0x66,0x06,0x00}, // %
                     {0,0,0,0,0,0,0,0}, // &
                     {0x00,0x10,0x18,0x18,0x08,0x00,0x00,0x00}, // '
                     {0x02,0x04,0x08,0x08,0x08,0x08,0x08,0x04}, // (
                     {0x40,0x20,0x10,0x10,0x10,0x10,0x10,0x20}, // )
                     {0x00,0x10,0x54,0x38,0x10,0x38,0x54,0x10}, // *
                     {0x00,0x08,0x08,0x08,0x7f,0x08,0x08,0x08}, // +
                     {0x00,0x00,0x00,0x00,0x00,0x18,0x18,0x08}, // COMMA
                     {0x00,0x00,0x00,0x00,0x7e,0x00,0x00,0x00}, // -
                     {0x00,0x00,0x00,0x00,0x00,0x00,0x06,0x06}, // DOT
                     {0x00,0x04,0x04,0x08,0x10,0x20,0x40,0x40}, // /
                     {0x00,0x38,0x44,0x4c,0x54,0x64,0x44,0x38}, // 0
                     {0x04,0x0c,0x14,0x24,0x04,0x04,0x04,0x04}, // 1
                     {0x00,0x30,0x48,0x04,0x04,0x38,0x40,0x7c}, // 2
                     {0x00,0x38,0x04,0x04,0x18,0x04,0x44,0x38}, // 3
                     {0x00,0x04,0x0c,0x14,0x24,0x7e,0x04,0x04}, // 4
                     {0x00,0x7c,0x40,0x40,0x78,0x04,0x04,0x38}, // 5
                     {0x00,0x38,0x40,0x40,0x78,0x44,0x44,0x38}, // 6
                     {0x00,0x7c,0x04,0x04,0x08,0x08,0x10,0x10}, // 7
                     {0x00,0x3c,0x44,0x44,0x38,0x44,0x44,0x78}, // 8
                     {0x00,0x38,0x44,0x44,0x3c,0x04,0x04,0x78}, // 9
                     {0x00,0x18,0x18,0x00,0x00,0x18,0x18,0x00}, // :
                     {0x00,0x18,0x18,0x00,0x00,0x18,0x18,0x08}, // ;
                     {0x00,0x10,0x20,0x40,0x80,0x40,0x20,0x10}, // <
                     {0x00,0x00,0x7e,0x00,0x00,0xfc,0x00,0x00}, // =
                     {0x00,0x08,0x04,0x02,0x01,0x02,0x04,0x08}, // >
                     {0x00,0x38,0x44,0x04,0x08,0x10,0x00,0x10}, // ?
                     {0x00,0x30,0x48,0xba,0xba,0x84,0x78,0x00}, // @
                     {0x00,0x1c,0x22,0x42,0x42,0x7e,0x42,0x42}, // A
                     {0x00,0x78,0x44,0x44,0x78,0x44,0x44,0x7c}, // B
                     {0x00,0x3c,0x44,0x40,0x40,0x40,0x44,0x7c}, // C
                     {0x00,0x7c,0x42,0x42,0x42,0x42,0x44,0x78}, // D
                     {0x00,0x78,0x40,0x40,0x70,0x40,0x40,0x7c}, // E
                     {0x00,0x7c,0x40,0x40,0x78,0x40,0x40,0x40}, // F
                     {0x00,0x3c,0x40,0x40,0x5c,0x44,0x44,0x78}, // G
                     {0x00,0x42,0x42,0x42,0x7e,0x42,0x42,0x42}, // H
                     {0x00,0x7c,0x10,0x10,0x10,0x10,0x10,0x7e}, // I
                     {0x00,0x7e,0x02,0x02,0x02,0x02,0x04,0x38}, // J
                     {0x00,0x44,0x48,0x50,0x60,0x50,0x48,0x44}, // K
                     {0x00,0x40,0x40,0x40,0x40,0x40,0x40,0x7c}, // L
                     {0x00,0x82,0xc6,0xaa,0x92,0x82,0x82,0x82}, // M
                     {0x00,0x42,0x42,0x62,0x52,0x4a,0x46,0x42}, // N
                     {0x00,0x3c,0x42,0x42,0x42,0x42,0x44,0x38}, // O
                     {0x00,0x78,0x44,0x44,0x48,0x70,0x40,0x40}, // P
                     {0x00,0x3c,0x42,0x42,0x52,0x4a,0x44,0x3a}, // Q
                     {0x00,0x78,0x44,0x44,0x78,0x50,0x48,0x44}, // R
                     {0x00,0x38,0x40,0x40,0x38,0x04,0x04,0x78}, // S
                     {0x00,0x7e,0x90,0x10,0x10,0x10,0x10,0x10}, // T
                     {0x00,0x42,0x42,0x42,0x42,0x42,0x42,0x3e}, // U
                     {0x00,0x42,0x42,0x42,0x42,0x44,0x28,0x10}, // V
                     {0x80,0x82,0x82,0x92,0x92,0x92,0x94,0x78}, // W
                     {0x00,0x42,0x42,0x24,0x18,0x24,0x42,0x42}, // X
                     {0x00,0x44,0x44,0x28,0x10,0x10,0x10,0x10}, // Y
                     {0x00,0x7c,0x04,0x08,0x7c,0x20,0x40,0xfe}, // Z
                      // (the font does not contain any lower case letters. you can add your own.)
                  };    // {}, //


void loop()
{
	// Draw the text to the current position
	int len = strlen(text);
	drawString(text, len, x, 0);
	// In case you wonder why we don't have to call lmd.clear() in every loop: The font has a opaque (black) background...

	// Toggle display of the new framebuffer
	lmd.display();

	// Wait to let the human read the display
	delay(ANIM_DELAY);

	// Advance to next coordinate
	if( --x < len * -8 ) {
		x = LEDMATRIX_WIDTH;
	}
}


/**
 * This function draws a string of the given length to the given position.
 */
void drawString(char* text, int len, int x, int y )
{
  for( int idx = 0; idx < len; idx ++ )
  {
    int c = text[idx] - 32;

    // stop if char is outside visible area
    if( x + idx * 8  > LEDMATRIX_WIDTH )
      return;

    // only draw if char is visible
    if( 8 + x + idx * 8 > 0 )
      drawSprite( font[c], x + idx * 8, y, 8, 8 );
  }
}

/**
 * This draws a sprite to the given position using the width and height supplied (usually 8x8)
 */
void drawSprite( byte* sprite, int x, int y, int width, int height )
{
  // The mask is used to get the column bit from the sprite row
  byte mask = B10000000;

  for( int iy = 0; iy < height; iy++ )
  {
    for( int ix = 0; ix < width; ix++ )
    {
      lmd.setPixel(x + ix, y + iy, (bool)(sprite[iy] & mask ));

      // shift the mask by one pixel to the right
      mask = mask >> 1;
    }

    // reset column mask
    mask = B10000000;
  }
}
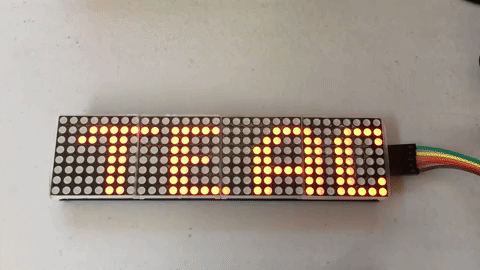
To change the text, we can edit line 18. For example, I changed that line to this:
char text[] = "TEACHMEMICRO.COM";
Note that only capital letters are possible with this sketch. This is because of the defined fonts in lines 33 to 93.
Creating Graphics
The same library can create graphics in a 4 x 8 x 8-pixel arrangement. The example DrawSprite sketch demonstrates this.
#include <LEDMatrixDriver.hpp>

// This draw a moving sprite on your LED matrix using the hardware SPI driver Library by Bartosz Bielawski.
// Example written 16.06.2017 by Marko Oette, www.oette.info

// Define the ChipSelect pin for the led matrix (Dont use the SS or MISO pin of your Arduino!)
// Other pins are Arduino specific SPI pins (MOSI=DIN, SCK=CLK of the LEDMatrix) see https://www.arduino.cc/en/Reference/SPI
const uint8_t LEDMATRIX_CS_PIN = 9;

// Number of 8x8 segments you are connecting
const int LEDMATRIX_SEGMENTS = 4;
const int LEDMATRIX_WIDTH    = LEDMATRIX_SEGMENTS * 8;

// The LEDMatrixDriver class instance
LEDMatrixDriver lmd(LEDMATRIX_SEGMENTS, LEDMATRIX_CS_PIN);

void setup() {
  // init the display
  lmd.setEnabled(true);
  lmd.setIntensity(2);   // 0 = low, 10 = high
}

int x=-1, y=0;   // start top left
bool s = true;  // start with led on

byte a[8]={ B00011000,
            B00100100,
            B00100100,
            B00011000,
            B01111110,
            B00011000,
            B00100100,
            B01000010};

byte b[8]={ B00011000,
            B00100100,
            B00100100,
            B00011010,
            B01111100,
            B00011000,
            B01100100,
            B00000010};

byte c[8]={ B00011000,
            B00100100,
            B00100100,
            B00011010,
            B00111100,
            B01011000,
            B00110100,
            B00000100};

byte d[8]={ B00011000,
            B00100100,
            B00100100,
            B00011010,
            B00111100,
            B01011000,
            B00011000,
            B00011000};

byte e[8]={ B00011000,
            B00100100,
            B00100100,
            B00011010,
            B00111100,
            B01011000,
            B00010100,
            B00010000};

byte f[8]={ B00011000,
            B00100100,
            B00100100,
            B00011000,
            B00111110,
            B01011000,
            B00010100,
            B00010100};


const int ANIM_DELAY = 100;

void loop() {

  drawSprite( (byte*)&a, x++, 0, 8, 8 );
  lmd.display();
  delay(ANIM_DELAY);

  lmd.clear();
  drawSprite( (byte*)&b, x++, 0, 8, 8 );
  lmd.display();
  delay(ANIM_DELAY);

  lmd.clear();
  drawSprite( (byte*)&c, x++, 0, 8, 8 );
  lmd.display();
  delay(ANIM_DELAY);

  lmd.clear();
  drawSprite( (byte*)&d, x++, 0, 8, 8 );
  lmd.display();
  delay(ANIM_DELAY);

  lmd.clear();
  drawSprite( (byte*)&e, x++, 0, 8, 8 );
  lmd.display();
  delay(ANIM_DELAY);

  lmd.clear();
  drawSprite( (byte*)&f, x++, 0, 8, 8 );
  lmd.display();
  delay(ANIM_DELAY);

  if( x > LEDMATRIX_WIDTH )
    x= -1;
}

void drawSprite( byte* sprite, int x, int y, int width, int height )
{
  byte mask = B10000000;
  for( int iy = 0; iy < height; iy++ )
  {
    for( int ix = 0; ix < width; ix++ )
    {
      lmd.setPixel(x + ix, y + iy, (bool)(sprite[iy] & mask ));
      mask = mask >> 1;
    }
    mask = B10000000;
  }
}
The example DrawSprite sketch displays a running stick figure.
The stick figure is from six arrays of bytes corresponding to six frames or movements. Edit the following lines if you want to create your own sprite.
byte a[8]={ B00011000,
            B00100100,
            B00100100,
            B00011000,
            B01111110,
            B00011000,
            B00100100,
            B01000010};

byte b[8]={ B00011000,
            B00100100,
            B00100100,
            B00011010,
            B01111100,
            B00011000,
            B01100100,
            B00000010};

byte c[8]={ B00011000,
            B00100100,
            B00100100,
            B00011010,
            B00111100,
            B01011000,
            B00110100,
            B00000100};

byte d[8]={ B00011000,
            B00100100,
            B00100100,
            B00011010,
            B00111100,
            B01011000,
            B00011000,
            B00011000};

byte e[8]={ B00011000,
            B00100100,
            B00100100,
            B00011010,
            B00111100,
            B01011000,
            B00010100,
            B00010000};

byte f[8]={ B00011000,
            B00100100,
            B00100100,
            B00011000,
            B00111110,
            B01011000,
            B00010100,
            B00010100};
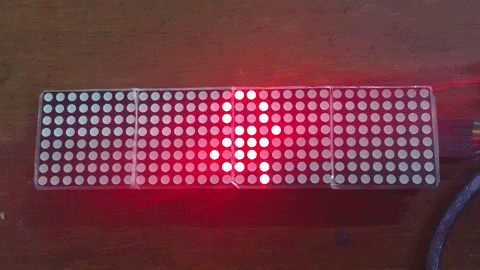
You can also set which dot in the matrix you want to light up using the setPixel() function. The example SetPixel sketch shows this:
#include <LEDMatrixDriver.hpp>

// This sketch will 'flood fill' your LED matrix using the hardware SPI driver Library by Bartosz Bielawski.
// Example written 16.06.2017 by Marko Oette, www.oette.info

// Define the ChipSelect pin for the led matrix (Dont use the SS or MISO pin of your Arduino!)
// Other pins are Arduino specific SPI pins (MOSI=DIN, SCK=CLK of the LEDMatrix) see https://www.arduino.cc/en/Reference/SPI
const uint8_t LEDMATRIX_CS_PIN = 9;

// Number of 8x8 segments you are connecting
const int LEDMATRIX_SEGMENTS = 4;
const int LEDMATRIX_WIDTH    = LEDMATRIX_SEGMENTS * 8;

// The LEDMatrixDriver class instance
LEDMatrixDriver lmd(LEDMATRIX_SEGMENTS, LEDMATRIX_CS_PIN);

void setup() {
	// init the display
	lmd.setEnabled(true);
	lmd.setIntensity(2);   // 0 = low, 10 = high
}

int x=0, y=0;   // start top left
bool s = true;  // start with led on

void loop() {
	// toggle current pixel in framebuffer
	lmd.setPixel(x, y, s);

	// move to next pixel
	if( x++ >= LEDMATRIX_WIDTH )
	{
		// Return to left
		x=0;

		// start new line
		if( y++ >= 8)
		{
			y = 0;  // need to return to start
			s = !s; // toggle led state
		}
	}


	// Flush framebuffer
	lmd.display();

	delay(10);
}
The SetPixel sketch turns on each dot starting from the top left down to the bottom right then turns them off again following the same sequence.
![]() To create your own font or graphics, visit this site. I hope you found this tutorial helpful!
To create your own font or graphics, visit this site. I hope you found this tutorial helpful!

