
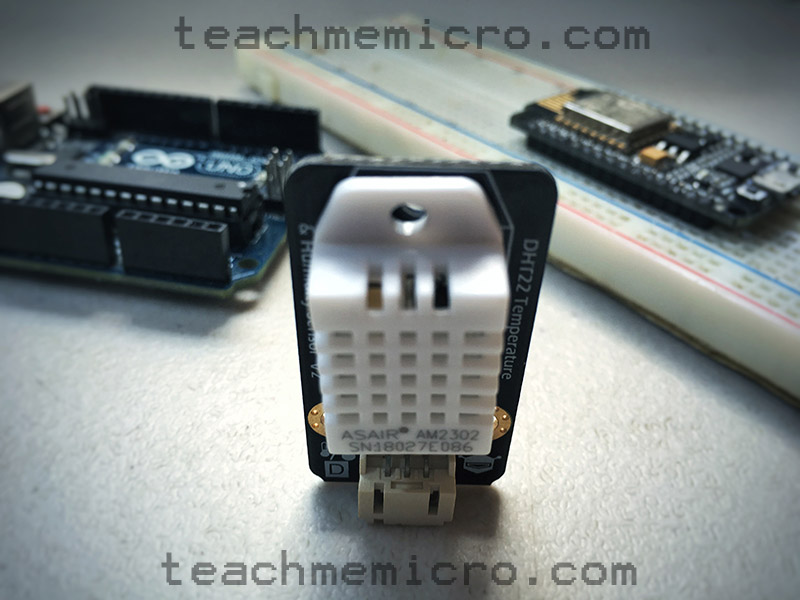

The DHT22 is a temperature and humidity sensor in one package. It is widely used mainly due to its price but also because of it being robust and user-friendly. In this NodeMCU DHT22 interfacing tutorial, I will guide you in creating an IoT-based weather monitoring project with ESP8266.
Introduction
The DHT22 is an upgrade over the DHT11. The upgrade, in this sense, is on the temperature and humidity range and sampling rate. The table below summarizes the difference between the DHT11 and DHT22.
| Parameter | DHT11 | DHT22 |
|---|---|---|
| Temperature Range | 0 to 50°C | -40 to 125°C |
| Humidity Range | 20 to 80% | 0 to 100% |
| Sampling Rate | Once a second | Twice a second |
| Dimension | 15.5mm x 12mm x 5.5mm | 15.1mm x 25mm x 7.7mm |
Like its predecessor, the DHT22 contains only three usable pins: VCC, DOUT and GND.
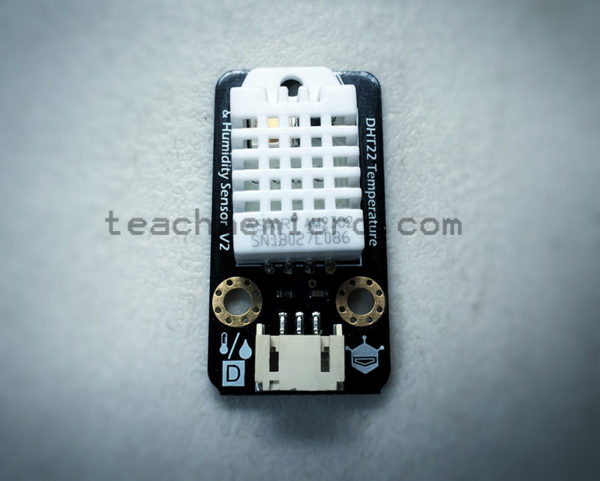
Depending on your chosen module, the DHT22 requires a pull-up resistor of 10k on its DOUT pin. The DHT22 module by DFRobot as pictured does not require any pull-up resistor. See more information about the DHT22.
NodeMCU DHT22 Interfacing
The DOUT pin connects to any digital pin of the NodeMCU. As mentioned, a 10k pull-up resistor on the DOUt pin is necessary except if you own DFRobot’s module. The VCC pin and GND pin connect to the 3.3V pin and GND pin of the NodeMCU respectively.
We will use the following diagram for the rest of the tutorial:
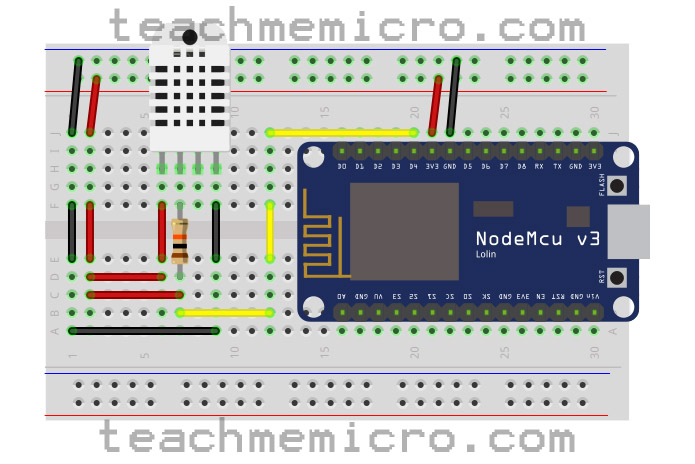
| DHT22 Pin | NodeMCU Pin |
|---|---|
| VCC | 3.3V |
| DOUT | D2 |
| GND | GND |
We will be using the Arduino IDE to program our NodeMCU. As for the sketch, using the Simple DHT library makes our work shorter. The library comes with a basic example which we can use to test if the DHT22 to NodeMCU interface is correct:
#include <SimpleDHT.h>

// for DHT11,
//      VCC: 5V or 3V
//      GND: GND
//      DATA: 2
int pinDHT22 = 2;
SimpleDHT11 dht11(pinDHT11);

void setup() {
  Serial.begin(115200);
}

void loop() {
  // start working...
  Serial.println("=================================");
  Serial.println("Sample DHT11...");

  // read without samples.
  byte temperature = 0;
  byte humidity = 0;
  int err = SimpleDHTErrSuccess;
  if ((err = dht11.read(&temperature, &humidity, NULL)) != SimpleDHTErrSuccess) {
    Serial.print("Read DHT11 failed, err="); Serial.println(err);delay(1000);
    return;
  }

  Serial.print("Sample OK: ");
  Serial.print((int)temperature); Serial.print(" *C, ");
  Serial.print((int)humidity); Serial.println(" H");

  // DHT11 sampling rate is 1HZ.
  delay(1500);
}
Upload the sketch, open the serial monitor and the humidity and temperature readings should appear.
IoT Weather Monitor
Now that we have successfully read both temperature and humidity from the DHT22, it is time to make a simple IoT weather monitor.
We will modify the sketch in the NodeMCU AJAX tutorial to display both temperature and humidity in a web page. Using AJAX here would be great because we want the temperature and humidity in real-time.
#include <ESP8266WiFi.h>
#include <WiFiClient.h>
#include <ESP8266WebServer.h>
#include <SimpleDHT.h>

int pinDHT22 = 2;
SimpleDHT11 dht11(pinDHT11);

// Replace with your network credentials
const char* ssid = "<Your-WiFi-SSID>";
const char* password = "<Your-WiFi-Password>";
ESP8266WebServer server(80);   //instantiate server at port 80 (http port)

String page = "";
String text = "";
double data;

void setup(void){
 pinMode(A0, INPUT);
 delay(1000);
 Serial.begin(115200);
 WiFi.begin(ssid, password); //begin WiFi connection
 Serial.println("");

 // Wait for connection
 while (WiFi.status() != WL_CONNECTED) {
 delay(500);
 Serial.print(".");
}

 Serial.println("");
 Serial.print("Connected to ");
 Serial.println(ssid);
 Serial.print("IP address: ");
 Serial.println(WiFi.localIP());
 server.on("/data.txt", [](){
   text = (String)data;
   server.send(200, "text/html", text);
 });
 server.on("/", [](){
   page = "<h1>NodeMCU IoT Weather Monitor</h1><h1>Data:</h1> <h1 id=\"data\">""</h1>\r\n";
   page += "<script>\r\n";
   page += "var x = setInterval(function() {loadData(\"data.txt\",updateData)}, 1000);\r\n";
   page += "function loadData(url, callback){\r\n";
   page += "var xhttp = new XMLHttpRequest();\r\n";
   page += "xhttp.onreadystatechange = function(){\r\n";
   page += " if(this.readyState == 4 && this.status == 200){\r\n";
   page += " callback.apply(xhttp);\r\n";
   page += " }\r\n";
   page += "};\r\n";
   page += "xhttp.open(\"GET\", url, true);\r\n";
   page += "xhttp.send();\r\n";
   page += "}\r\n";
   page += "function updateData(){\r\n";
   page += " document.getElementById(\"data\").innerHTML = this.responseText;\r\n";
   page += "}\r\n";
   page += "</script>\r\n";
   server.send(200, "text/html", page);
});

 server.begin();
 Serial.println("Web server started!");
}

void loop(void){
 byte temperature = 0;
 byte humidity = 0;
 int err = SimpleDHTErrSuccess;
 if ((err = dht11.read(&temperature, &humidity, NULL)) != SimpleDHTErrSuccess) {
    Serial.print("Read DHT11 failed, err="); Serial.println(err);delay(1000);
    return;
 }

 data += (int)temperature + " *C " + (int)humidity + " H";

 delay(1500);
 server.handleClient();
}
Upload the sketch above to your NodeMCU and open the serial monitor to acquire the IP address of your device. Don’t forget to supply your own WiFi SSID and password on lines 10 and 11.
Using your preferred browser, visit the IP address as seen on the serial monitor. The temperature and humidity are now visible and updated in real-time.

