
This project demonstrates how to send data to ThingSpeak using a SIM800L breakout board. The data will be coming from a BMP085 atmospheric pressure sensor and will be using the SIM800L GPRS connection to publish this data to ThingSpeak.
Setting up ThingSpeak
First, you need to sign-up for a free account on ThingSpeak. After successfully signing-up, you will be prompted to create a channel. Here is a screenshot of the channel I created:
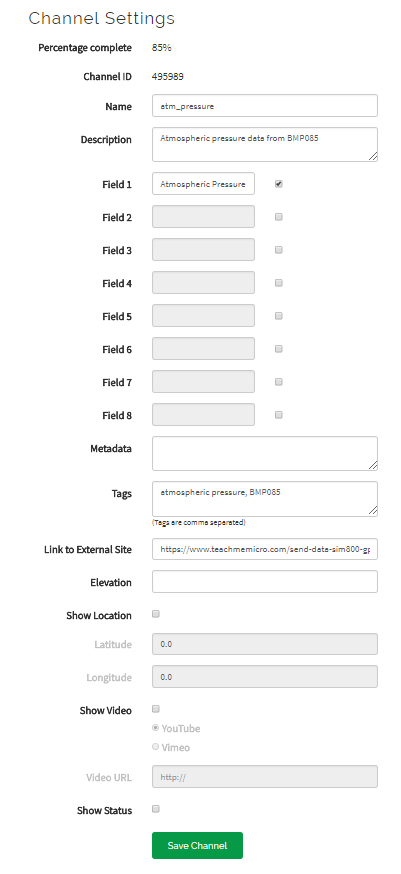
Here I only have one field named Atmospheric Pressure. You can have up to 8 fields.
Once the channel is created, go to the API keys tab:
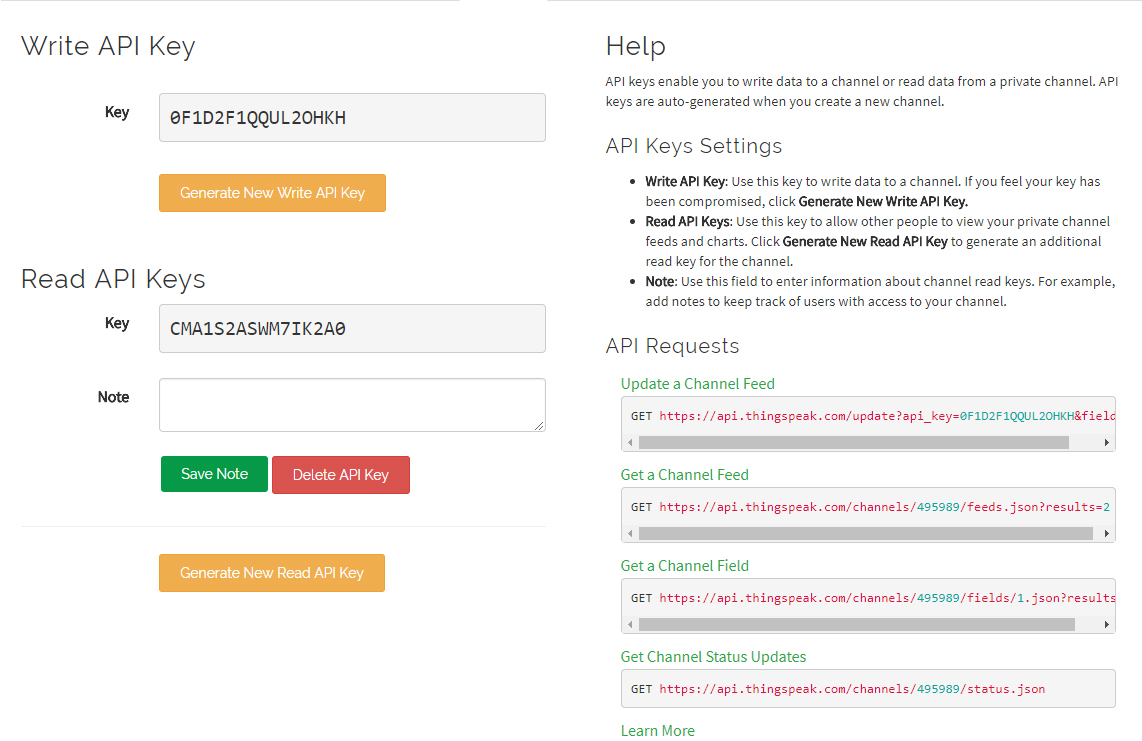
On the lower right, you have the API requests fields. Copy the URL for “Update a Channel Feed”. For example, mine is:
https://api.thingspeak.com/update?api_key=0F1D2F1QQUL2OHKH&field1=0This is the url used to update data on the channel. The last value on the url is the value to be sent to the channel. Here it says zero.
You can paste the url above on your browser and change the last number. For example, I paste this url:
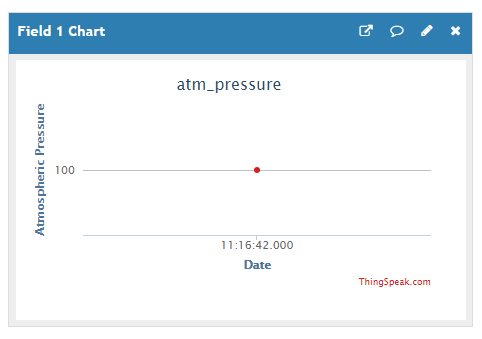
https://api.thingspeak.com/update?api_key=0F1D2F1QQUL2OHKH&field1=100When I go see the Private View tab, the chart has now been updated:
Using Putty for Testing
Of course, we will not be using a browser to update the channel on ThingSpeak. We need to create HTTP requests via GPRS. But before that, we must know the correct HTTP request. For that we can simulate using Putty.
Open Putty, select Raw connection type and use api.thingspeak.com for Host Name and 80 for Port:
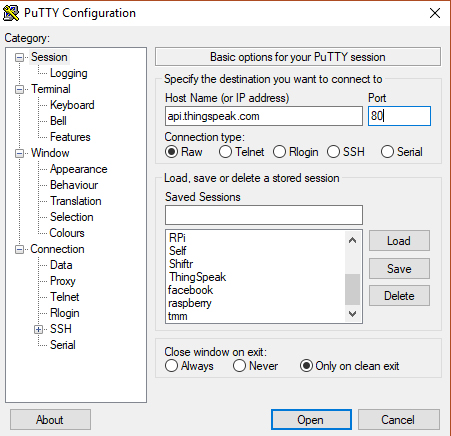
Open the session and type the following:
GET /update?api_key=0F1D2F1QQUL2OHKH&field1=2.8 HTTP/1.0Press enter three times; The Putty terminal window should close itself.
After that, check the Private View tab again on ThingSpeak. The chart should now be updated:
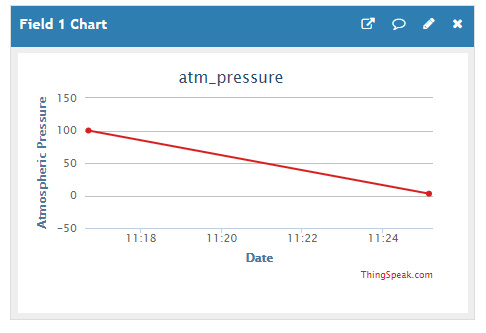
The line drops from 100 to almost 0. This is because the data value written using Putty is 2.8.
Sending Data via GPRS Connection with SIM800L
Now that we’ve confirmed that the HTTP request works, we start using an Arduino and SIM800L. I will still be using Adafruit’s FONA library just like my other SIM800L articles. Also, since I’m using the BMP085, I used Adafruit’s library as detailed in my BMP085 tutorial.
Wiring Diagram
This is how I connected the Arduino, SIM800L and BMP085:
| SIM800L TX | D8 |
| SIM800L RX | D9 |
| SIM800L RST | D7 |
| SIM800L VCC | 3.7V BAT |
| SIM800L GND | 3.7V GND / Arduino GND |
| BMP085 SDA | A4 |
| BMP085 SCL | A5 |
| BMP085 VCC | Arduino 3.3V |
| BMP085 GND | Arduino GND |
| Arduino 5V | 3.7V BAT+ |
Here’s the Fritzing diagram:

Arduino Sketch:
Sketch: Sending Atmospheric Pressure Data to ThingSpeak via SIM800L GPRS

By Roland Pelayo

Wiring:

  SIM800L TX -> D8
  SIM800L RX -> D9
  SIM800L RST -> D7
  SIM800L VCC -> 3.7V BAT+
  SIM800L GND -> 3.7V GND / Arduino GND
  BMP085 SDA -> A4
  BMP085 SCL -> A5
  BMP085 VCC -> Arduino 3.3V
  BMP085 GND - > Arduino GND
  Arduino 5V -> 3.7V BAT+

Full tutorial on: https://www.teachmemicro.com/send-data-sim800-gprs-thingspeak

*/

#include <Wire.h>
#include <Adafruit_BMP085.h>
#include <SoftwareSerial.h>
#include "Adafruit_FONA.h"

#define FONA_RX 9
#define FONA_TX 8
#define FONA_RST 7

SoftwareSerial SIM800ss = SoftwareSerial(FONA_TX, FONA_RX);
Adafruit_FONA SIM800 = Adafruit_FONA(FONA_RST);
Adafruit_BMP085 bmp;


int LED = 13;

char http_cmd[80];
char url_string[] = "api.thingspeak.com/update?api_key=0F1D2F1QQUL2OHKH&field1";
char atm_pressure_string[20];
double atm_pressure;
int net_status;

uint16_t statuscode;
int16_t length;
String response = "";
char buffer[512];

boolean gprs_on = false;
boolean tcp_on = false;

void setup() {
  pinMode(LED, OUTPUT);
  while (!Serial);

  Serial.begin(115200);

  Serial.println("Atmospheric Data to ThingSpeak");
  Serial.println("Initializing SIM800L....");

  SIM800ss.begin(4800); // if you're using software serial

  if (! SIM800.begin(SIM800ss)) {
    Serial.println("Couldn't find SIM800L");
    while (1);
  }

  Serial.println("SIM800L is OK");
  delay(1000);

  if (!bmp.begin()) {
    Serial.println("Could not find a valid BMP085 sensor, check wiring!");
    while(1);
  }

  Serial.println("Waiting to be registered to network...");
  net_status = SIM800.getNetworkStatus();
  while(net_status != 1){
     net_status = SIM800.getNetworkStatus();
     delay(2000);
  }
  Serial.println("Registered to home network!");
  Serial.print("Turning on GPRS... ");
  delay(2000);
  while(!gprs_on){
    if (!SIM800.enableGPRS(true)){
        Serial.println("Failed to turn on GPRS");
        Serial.println("Trying again...");
        delay(2000);
        gprs_on = false;
    }else{
        Serial.println("GPRS now turned on");
        delay(2000);
        gprs_on = true;
    }
  }
}

void loop() {
    digitalWrite(LED, LOW);
    atm_pressure = bmp.readPressure();
    dtostrf(atm_pressure, 5, 0, atm_pressure_string);
    sprintf(http_cmd,"%s=%s",url_string,atm_pressure_string);
    delay(2000);
    while(!tcp_on){
      if (!SIM800.HTTP_GET_start(http_cmd, &statuscode, (uint16_t *)&length)) {
           Serial.println("Failed!");
           Serial.println("Trying again...");
           tcp_on = false;
      }else{
        tcp_on = true;
        digitalWrite(LED, HIGH);
        while (length > 0) {
           while (SIM800.available()) {
             char c = SIM800.read();
             response += c;
             length--;
           }
        }
        Serial.println(response);
        if(statuscode == 200){
          Serial.println("Success!");
          tcp_on = false;
        }
        digitalWrite(LED, LOW);
      }
      delay(2000);
    }
    delay(2000);
}
The sketch follows a specific sequence to be able to send data to ThingSpeak successfully. First, the SIM800L must be turned on. This is checked here:
if (! SIM800.begin(SIM800ss)) {
   Serial.println("Couldn't find SIM800L");
   while (1);
}

Serial.println("SIM800L is OK");
delay(1000);
If the SIM800L is not connected, the sketch goes to the while(1) loop and will not proceed.
Next, we check if the BMP085 is connected:
if (!bmp.begin()) {
  Serial.println("Could not find a valid BMP085 sensor, check wiring!");
  while(1);
}
Similarly, the sketch will not continue down if there is no BMP085 connected.
Next, we must make sure the SIM800L is connected to the network. I created a loop that checks the network status until it is registered to the home network:
Serial.println("Waiting to be registered to network...");
net_status = SIM800.getNetworkStatus();
while(net_status != 1){
   net_status = SIM800.getNetworkStatus();
   delay(2000);
}
Serial.println("Registered to home network!");
When the SIM800L is now connected to the home network, it’s time to turn on GPRS:
Serial.print("Turning on GPRS... ");
delay(2000);
while(!gprs_on){
  if (!SIM800.enableGPRS(true)){
      Serial.println("Failed to turn on GPRS");
      Serial.println("Trying again...");
      delay(2000);
      gprs_on = false;
  }else{
      Serial.println("GPRS now turned on");
      delay(2000);
      gprs_on = true;
  }
}
Again, this is looped to make sure that GPRS is on before proceeding.
Inside the loop() function, the pressure data is read and then converted to char array:
atm_pressure = bmp.readPressure();
dtostrf(atm_pressure, 5, 0, atm_pressure_string);
The dtostrf() function accepts the double number, whole number precision, fraction precision and the char array to which the converted value is stored.
Next, the pressure value is concatenated to the API URL:
sprintf(http_cmd,"%s=%s",url_string,atm_pressure_string);To make an HTTP request, we use the HTTP_GET_start function:
SIM800.HTTP_GET_start(http_cmd, &statuscode, (uint16_t *)&length)The http_cmd is a char array that contains the API URL and the pressure value. Statuscode is an integer that stores the server response and length is the length of the response. I placed this function inside a loop:
  while(!tcp_on){
      if (!SIM800.HTTP_GET_start(http_cmd, &statuscode, (uint16_t *)&length)) {
           Serial.println("Failed!");
           Serial.println("Trying again...");
           tcp_on = false;
      }else{
        tcp_on = true;
        digitalWrite(LED, HIGH);
        while (length > 0) {
           while (SIM800.available()) {
             char c = SIM800.read();
             response += c;
             length--;
           }
        }
        Serial.println(response);
        if(statuscode == 200){
          Serial.println("Success!");
          tcp_on = false;
        }
        digitalWrite(LED, LOW);
      }
      delay(2000);
    }
The string Success! Is printed on the serial monitor when a status code of 200 is received, which is the OK status.
The project continues to send data to the ThingSpeak server unless the GPRS connection is cut off.
Here’s a video of the project:
I hope this project is useful to you! Please drop a comment below!

