
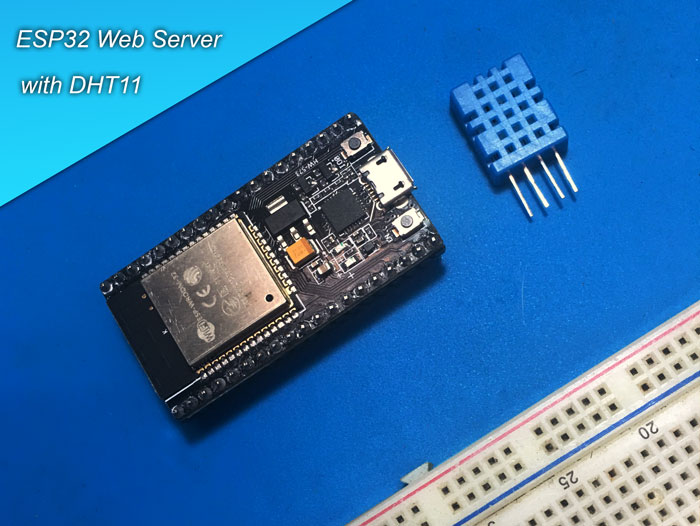
Last time, I showed you how to setup the ESP32 development board with the Arduino programming environment. This time, I will be building a simple ESP32 web server where data from a sensor is displayed on a web page.

For this tutorial, I will be using the DHT11 Humidity and Temperature sensor. This is a widely available sensor so I think a lot of you can reproduce the outputs of this tutorial. For those interested, I’ve shown how the similar DHT22 sensor works.
Wiring the DHT11 ESP32 Web Server
The DHT11 doesn’t produce a time varying signal so there’s no need for an analog-to-digital pin. This gives us a lot of flexibility when using it. There are three usable out of its four pins:
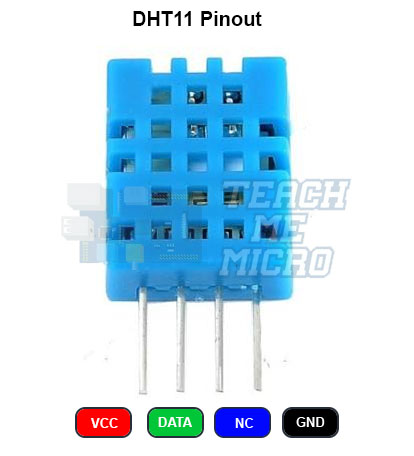
The temperature and humidity are serially read through the DATA pin. Also, the DHT11’s VCC pin can accept either 3.3 V or 5 V.
Meanwhile, here’s the pinout for the ESP-32S development board we are using:
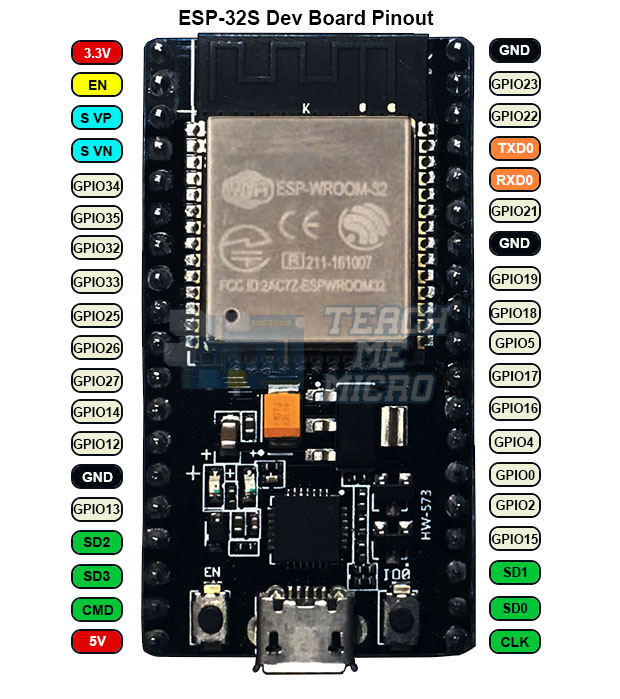
Make sure you have the same board as I do when following this tutorial. I’m saying this because there are similar looking boards out there that follow different pin arrangements.
We can connect the DHT11’s data pin to any of the ESP32 dev board’s GPIO pins. Here’s the circuit connection I used:

Testing the DHT11
Now that we’ve wired the DHT11 sensor to the ESP32 board, it’s time to test if we can really read temperature and humidity from the sensor. We can do this by uploading a simple sketch that is known to work with Arduino boards. Make sure you’ve followed the instructions from the previous post so that you can use the Arduino IDE to program the ESP32.
First, we need to download some libraries for the DHT11. Fire up the Arduino IDE and open Library Manager via Sketch > Include Library > Manage Libraries or shortcut key CTRL+SHIFT+I.
Type "DHT" on the search field and look for Adafruit’s DHT Sensor library then install it:

You will be prompted to install Adafruit’s Unified Sensor library. Click yes.
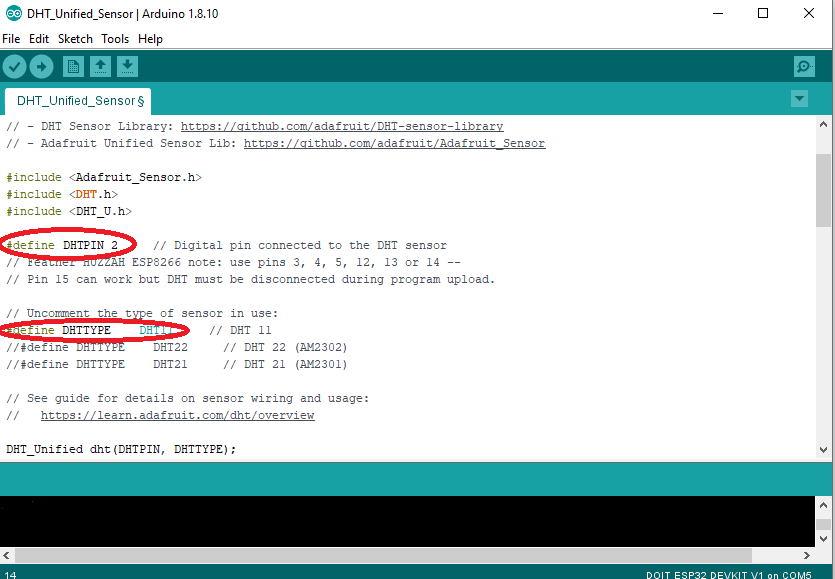
Once the library is installed, you’ll have access to the DHT_Unified_Sensor example sketch:

Once the sketch open, make sure that the data pin (line 14) and type of sensor (line 19) is correct:
Upload the sketch (don’t forget to press and hold the BOOT button while uploading and then press EN if uploading is done) and open serial monitor (baud rate at 9600). The ambient temperature and humidity are now shown:

If you are having problems uploading the sketch, try to remove the wire from the ESP32's 5V to DHT11 and try uploading again.
The DHT11 ESP32 Web Server Sketch, Finally
Now we can read temperature and humidity from the DHT11. The next step is to create a sketch where the data is visible on a web page.
I’ll go directly to the sketch:
#include <WiFi.h>
#include <WiFiClient.h>
#include <WebServer.h>
#include <Adafruit_Sensor.h>
#include <DHT.h>
#include <DHT_U.h>

const char* ssid = "<your WiFi SSID>";
const char* password = "<your WiFi password>";

WebServer server(80);

String text= "";
double temp;
double hum;

#define DHTPIN 2
#define DHTTYPE    DHT11

DHT_Unified dht(DHTPIN, DHTTYPE);

const String page PROGMEM = "<head>"
            " <script src=\"https://ajax.googleapis.com/ajax/libs/jquery/3.4.1/jquery.min.js\"></script>"
            " </head>"
            " <body>"
            " <h1>Sensor to ESP32 Web Server</h1><h2>Temperature:</h2> <h2 id=\"temp\">""</h2>\r\n"
            " <h2>Humidity:</h2><h2 id=\"hum\">""</h2>\r\n"
            " <script>\r\n"
            " $(document).ready(function(){\r\n"
            " setInterval(getData,1000);\r\n"
            " function getData(){\r\n"
            " $.ajax({\r\n"
            "  type:\"GET\",\r\n"
            "  url:\"data\",\r\n"
            "  success: function(data){\r\n"
            "  var s = data.split(\'-\');\r\n"
            "  $('#temp').html(s[0]);\r\n"
            "  $('#hum').html(s[1]);\r\n"
            "}\r\n"
            "}).done(function() {\r\n"
            "  console.log('ok');\r\n"
            "})\r\n"
            "}\r\n"
            "});"
            "</script>\r\n"
            "</body>";

void setup(void) {
  Serial.begin(9600);
  WiFi.mode(WIFI_STA);
  WiFi.begin(ssid, password);
  Serial.println("");
  dht.begin();
  sensor_t sensor;
  // Wait for connection
  while (WiFi.status() != WL_CONNECTED) {
    delay(500);
    Serial.print(".");
  }
  Serial.println("");
  Serial.print("Connected to ");
  Serial.println(ssid);
  Serial.print("IP address: ");
  Serial.println(WiFi.localIP());

  server.on("/data", [](){
    sensors_event_t event;
    dht.temperature().getEvent(&event);
    if(isnan(event.temperature)){
      temp = 0;
    }else{
      temp =  (double)event.temperature;
    }
    delay(1000);
    dht.humidity().getEvent(&event);
    if(isnan(event.relative_humidity)){
      hum = 0;
    }else{
      hum =  (double)event.relative_humidity;
    }
    delay(1000);
    text = (String)temp;
    text += "-";
    text += (String)hum;
    Serial.println(text);
    server.send(200, "text/plain", text);
  });

  server.on("/", []() {
   server.send(200, "text/html", page);
  });

  server.begin();
  Serial.println("HTTP server started");
}

void loop(void) {
  server.handleClient();
}
Upload this sketch (again, don’t forget to press and hold the BOOT button and when successful, press the EN button on the board).
If you open the serial monitor, you should see this:

It shows the IP address of the server. Using your favorite browser, visit that IP address and you should see this:

What’s good about my sketch is that you don’t need to refresh the page to update the sensor values. This is through the help of asynchronous javascript or AJAX as shown on this tutorial. However, I used JQuery AJAX instead of the older method.
Explaining the Sketch
What I did is utilize the ESP32's WiFi station mode so it connects to my router. And as long as I am on a computer or smartphone connected to the same router, I can access the ESP32 via its IP address.
The first part of the sketch is just a bunch of declarations:
#include <WiFi.h>
#include <WiFiClient.h>
#include <WebServer.h>
#include <Adafruit_Sensor.h>
#include <DHT.h>
#include <DHT_U.h>

const char* ssid = "<your WiFI SSID";
const char* password = "<your WiFi password>";

WebServer server(80);

String text= "";
double temp;
double hum;

#define DHTPIN 2
#define DHTTYPE    DHT11

DHT_Unified dht(DHTPIN, DHTTYPE);
Here I included all the needed libraries including the DHT11 library from Adafruit.
Don’t forget to change lines 8 and 9 to your own WiFi SSID and password!
Then, I wrote the HTML root page of the server as one multiline string and store it in flash memory:
const String page PROGMEM = "<head>"
            " <script src=\"https://ajax.googleapis.com/ajax/libs/jquery/3.4.1/jquery.min.js\"></script>"
            " </head>"
            " <body>"
            " <h1>Sensor to ESP32 Web Server</h1><h2>Temperature:</h2> <h2 id=\"temp\">""</h2>\r\n"
            " <h2>Humidity:</h2><h2 id=\"hum\">""</h2>\r\n"
            " <script>\r\n"
            " $(document).ready(function(){\r\n"
            " setInterval(getData,1000);\r\n"
            " function getData(){\r\n"
            " $.ajax({\r\n"
            "  type:\"GET\",\r\n"
            "  url:\"data\",\r\n"
            "  success: function(data){\r\n"
            "  var s = data.split(\'-\');\r\n"
            "  $('#temp').html(s[0]);\r\n"
            "  $('#hum').html(s[1]);\r\n"
            "}\r\n"
            "}).done(function() {\r\n"
            "  console.log('ok');\r\n"
            "})\r\n"
            "}\r\n"
            "});"
            "</script>\r\n"
            "</body>";
Again, AJAX allows me to get data without refreshing the page. The AJAX part of the page is this part (minus the extra characters):
function getData(){
$.ajax({
  type:"GET",
  url:"data",
  success: function(data){
    var s = data.split('-');
    $('#temp').html(s[0]);
    $('#hum').html(s[1]);
  }
}).done(function() {
    console.log('ok');
  })
}
Here, the type of request is specified (GET), the url of the data source (data), and what to do when the data retrieval is successful. This function triggers every second through the javascript setInterval() function. Of course this won't work without the jquery library hence this part:
<script src="https://ajax.googleapis.com/ajax/libs/jquery/3.4.1/jquery.min.js"></script>
Web developers might have better methods but this one does the job.
Inside setup() we initialize the serial port for debugging and then we make ESP32 a WiFi station:
Serial.begin(9600);
WiFi.mode(WIFI_STA);
WiFi.begin(ssid, password);
Serial.println("");
dht.begin();
sensor_t sensor;
// Wait for connection
while (WiFi.status() != WL_CONNECTED) {
   delay(500);
   Serial.print(".");
}
Serial.println("");
Serial.print("Connected to ");
Serial.println(ssid);
Serial.print("IP address: ");
Serial.println(WiFi.localIP());
Then we define what the server does when a client accesses the data page:
server.on("/data", [](){
   sensors_event_t event;
   dht.temperature().getEvent(&event);
   if(isnan(event.temperature)){
      temp = 0;
   }else{
      temp = (double)event.temperature;
   }
   delay(1000);
   dht.humidity().getEvent(&event);
   if(isnan(event.relative_humidity)){
      hum = 0;
   }else{
      hum = (double)event.relative_humidity;
   }
   delay(1000);
   text = (String)temp;
   text += "-";
   text += (String)hum;
   Serial.println(text);
   server.send(200, "text/plain", text);
});
This part is from the DHT_Unified_Sensor sketch earlier. Here, we acquire the temperature and humidity values from the DHT11 and then concatenate these values using ‘-‘ as a delimiter. The client gets this string for every request of the server page data.
Now if we go back to the ajax function:
success: function(data){
  var s = data.split('-');
  $('#temp').html(s[0]);
  $('#hum').html(s[1]);
}
This catches the sensor values, split it according to the delimiter (the character ‘-’) and then place them inside the divs with id’s temp and hum.
Finally, we pass the page string (the one where the HTML of the web page is) for every request of the root of the server, and then start the server:
server.on("/", []() {
   server.send(200, "text/html", page);
});

server.begin();
Serial.println("HTTP server started");
The loop() function is just a call to handle the client:
void loop(void) {
   server.handleClient();
}
Of course, we need the ESP32 to work continuously so putting this inside the loop is important.
The page looks very simple as it doesn’t contain any styling whatsoever. But if you are familiar with web design, you can surely improve its appearance.
Closing
That’s it! Now we have a simple ESP32 web server. If there’s something in this tutorial that you can’t understand, kindly drop it as a comment below.
I’ll be exploring the Bluetooth functions of the ESP32 on the next part of this series.

