
I made this project because it seems a lot of people are having trouble with interfacing the SIM800L with an Arduino, particularly in connecting to a network. Here, I made a simple setup where I was able to display the signal level and the network status on an LCD. This would be helpful in troubleshooting your SIM800L-based project.
Materials
- SIM800L Breakout Board (w/ antenna)
- Arduino Nano
- 3.7 V LiPo Battery
-
- TP4056 Module (Optional)
- Nokia 3310/5110 LCD (Optional)
- Connecting wires
- Breadboard
Wiring Diagram

Arduino Nano and SIM800L Connection:
| SIM800L | Arduino Nano |
| VCC | -- (Connect directly to 3.7V LiPo) |
| RST | D4 |
| RX | D5 |
| TX | D6 |
| GND | GND |
Arduino Nano and Nokia 3310 LCD Connection:
| Nokia 3310 LCD | Arduino Nano |
| VCC | 3.3V |
| GND | GND |
| DIN | D11 |
| CLK | D13 |
| DC | D9 |
| CE | D8 |
| RST | D7 |
It goes without saying that the SIM800L breakout board is very particular to the power applied to it. The best power source is a 3.7 V LiPo battery with at least 1000 mAh rating. The breakout board absorbs 2 A at peak but I found out that a 1000 mAh battery works. This is after a lot of tests, including using regulators, variable power supplies, etc. I decided to buy a battery online and it works wonderfully.
If the power to the SIM800L is enough, the on-board LED starts blinking. If it is blinking every second, this means it is searching for a network. You will know if it's connected to the network when it blinks every three seconds. If the LED blinks very fast, this means it's connected through GPRS.
The Nokia 3310 LCD breakout board runs on 3.3 V and not on 3.7 V! My solution is to connect its VCC pin to the 3.3 V of the Arduino Nano and it works. If you don't own a Nokia 3310 LCD and is not planning to buy one, you can use the serial port instead. Just replace display.print() on the sketch below with Serial.print(). Of course, you need to initialize the serial port first.
The Arduino Nano is powered by the 3.7 V battery connected to the 5 V pin. The TP4056 is completely optional for this project, but it is very useful in charging up the LiPo battery.
Arduino Sketch
The FONA library from Adafruit contains a lot of functions that simplifies interfacing with the SIM800L. I have created some Arduino sketches for SMS and calls by using the functions in this library. For this project, I utilized these two:
getRSSI()
getNetworkStatus()
Both returns integers indicating the received signal strength indication (RSSI) and network status.
For getRSSI(), these are the possible return numbers:
0 -- -115 dBm
1 -- -111 dBm
31 -- -52 dBm
2 to 30 -- -110 dBm to -54 dBm
dBm is short for decibel per milliwatt and is a common unit for signal strength. -115 dbm is the lowest signal strength value and would typically mean that the SIM800L is on a network blind spot. -111 dBm is also a bad number for signal reception. I was able to connect to a network at -70 dBm. Here is a handy list of dBm levels and what they mean:
RSSI Condition
-109 Marginal
-107 Marginal
-105 Marginal
-103 Marginal
-101 Marginal
-99 Marginal
-97 Marginal
-95 Marginal
-93 OK
-91 OK
-89 OK
-87 OK
-85 OK
-83 Good
-81 Good
-79 Good
-77 Good
-75 Good
-73 Excellent
-71 Excellent
-69 Excellent
-67 Excellent
-65 Excellent
-63 Excellent
-61 Excellent
-59 Excellent
-57 Excellent
-55 Excellent
-53 Excellent
If you will compare this to smartphones, marginal is one bar, OK is two bars, good is three bars and excellent is four bars.
The getNetworkStatus() function returns six possible numbers:
0 -- Not registered
1 -- Registered (home)
2 -- Not registered (searching)
3 -- Denied
4 -- Unknown
5 -- Registered Roaming
Out of these six, I only experienced 0, 1 and 2 so I can’t tell you why 3, 4, and 5 comes up.
Full Sketch:
/* SIM800L Network Test for Troubleshooting
 *
 *  By Roland
 *
 *  from https://www.teachmemicro.com/sim800-network-test-troubleshoot
 */

#include <SPI.h>
#include <Adafruit_GFX.h>
#include <Adafruit_PCD8544.h>
#include <SoftwareSerial.h>
#include "Adafruit_FONA.h"

Adafruit_PCD8544 display = Adafruit_PCD8544(9, 8, 7);

#define FONA_TX 6
#define FONA_RX 5
#define FONA_RST 4

// this is a large buffer for replies
char replybuffer[255];

SoftwareSerial fonaSS = SoftwareSerial(FONA_TX, FONA_RX);

Adafruit_FONA fona = Adafruit_FONA(FONA_RST);

void setup() {
  display.begin();
  display.setContrast(50);
  display.display();

  display.setTextSize(1);
  display.setTextColor(BLACK);
  display.setCursor(0,0);

  display.println("Signal test");
  display.println("Initializing..");

  fonaSS.begin(4800);

  if (! fona.begin(fonaSS)) {
    display.println(F("Couldn't find FONA"));
    while (1);
  }
  display.println(F("SIM800L is OK"));
  display.display();
  delay(2000);
  display.clearDisplay();

}

void loop() {

  display.clearDisplay();
  uint8_t n = fona.getRSSI();
  int8_t r;

  display.print("RSSI=");
        if (n == 0) r = -115;
        if (n == 1) r = -111;
        if (n == 31) r = -52;
        if ((n >= 2) && (n <= 30)) {
          r = map(n, 2, 30, -110, -54);
        }
  display.print(r); display.println(F(" dBm"));
  display.println();
  uint8_t t = fona.getNetworkStatus();
  display.print(F("Netwrk status:"));
  if (t == 0) display.println(F("Not registered"));
  if (t == 1) display.println(F("Registered (home)"));
  if (t == 2) display.println(F("Not registered (searching)"));
  if (t == 3) display.println(F("Denied"));
  if (t == 4) display.println(F("Unknown"));
  if (t == 5) display.println(F("Registered roaming"));
  display.display();
  delay(1000);
}
Project Image and Video
Here’s an image of my actual setup:
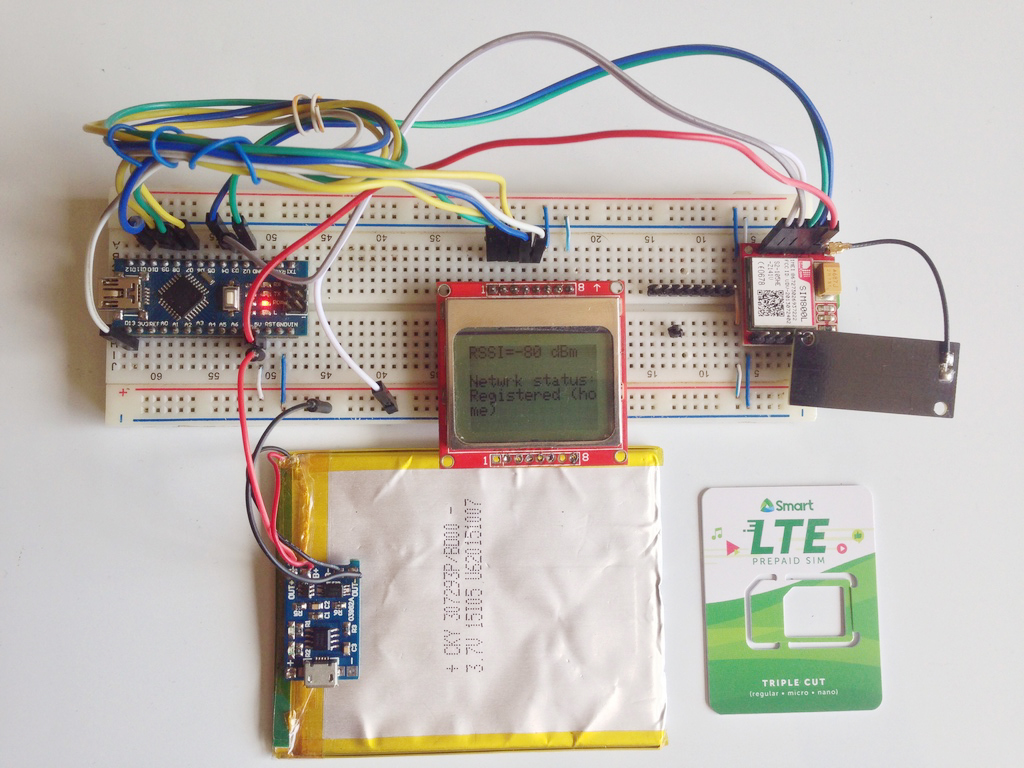
I am using an LTE sim and while the SIM800L is basically for GSM only, there is no issue as of now since GSM is still supported in our area.
Another important factor to consider is the antenna. Here you can see the antenna I’m using for my module. This antenna came with my module. If yours doesn’t have one, you can purchase it here.
A video of the project:
Here you can see that it goes from not registered, to searching then to registered. Obviously, only when you the SIM800L is registered can you proceed with other functions like sending a SMS, making a call, or connecting to the internet via GPRS.
Summary
So these are the common problems with the SIM800L breakout board:
Problem #1: Wrong voltage / not enough current / not enough power
Solution: Get a 3.7V LiPo battery with at least 1000 mAh rating. Use the schematic for this project.
Problem #2: SIM not registered
Solution: Make sure your country still has GSM infrastructure. Then, make sure you are getting enough coverage. Use this project to test if your SIM800L is connected to the network.
Problem #3: Not connecting to network
Solution: Purchase a decent antenna. Then again, use this project for testing.
I hope you found this project useful. If you have encountered other problems with the SIM800L, kindly comment below!

