
The ADXL345 is an integrated circuit that measures acceleration in 3 axes. Like most sensors, this device comes with an easy-to-use breakout board and is usable through SPI or I2C. This tutorial aims to show how you can interface this accelerometer with an Arduino.
Introduction to ADXL345
In reality, the ADXL345 is capable of measuring acceleration forces in the x, y and z axes.

Acceleration force is the force that causes an object to move. If an object is at rest, only the force of gravity is acting on it. Hence, the ADXL345 gives acceleration forces in g units, g being the acceleration due to gravity equal to 9.8 m/s2.
The ADXL345 can measure acceleration in as much as ±2g with an option to change the maximum to ±4g, ±8g and ±16g. The acceleration forces can be static (due to gravity only) or dynamic (due to motion and gravity).
A more in-depth look at the ADXL345 is accessible via its datasheet:
[wpdm_package id='3554']
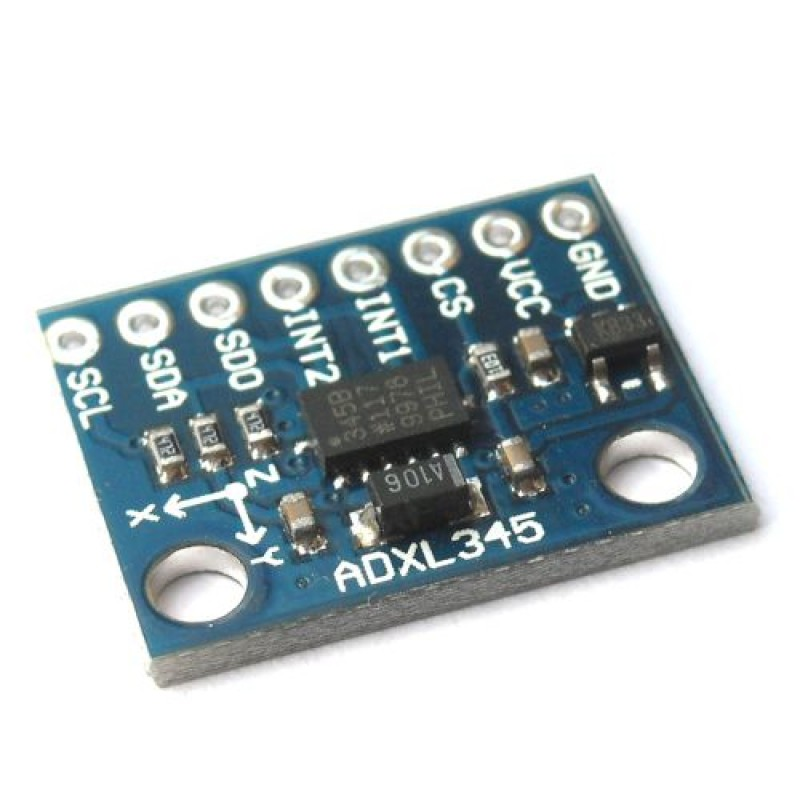
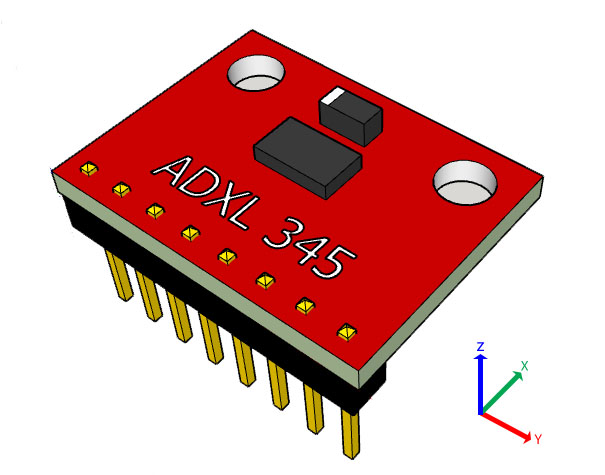
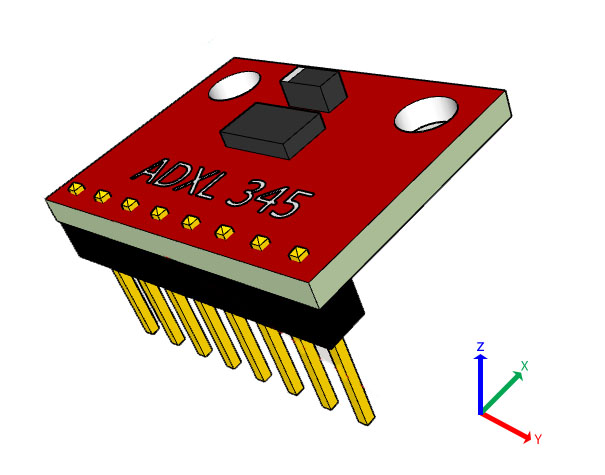
This tutorial will focus on the ADXL345 breakout board as shown:

If you own a different board, rest assure that the sketches in this tutorial will still work as long as the correct wiring is followed.
[the_ad id="3059"]
Setting Up Arduino IDE
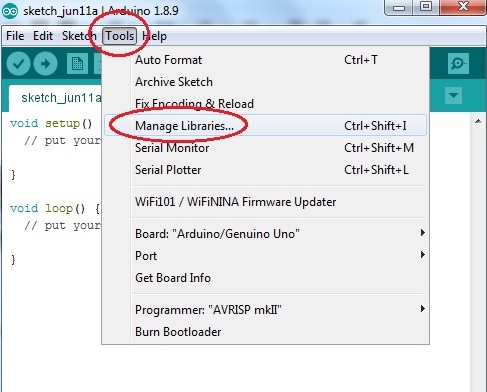
First, we need the ADXL345 Arduino library. Open Arduino IDE (ver. 1.8.9) then go to Tools > Manage Libraries…
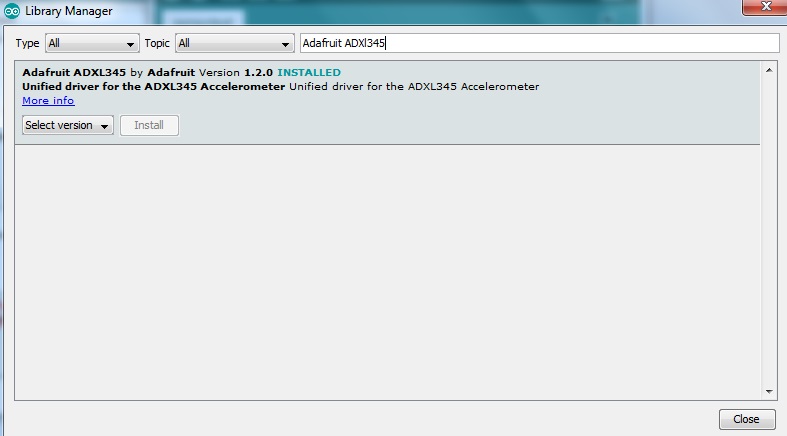
The Library Manager now appears. On the search field, type "Adafruit ADXL345", press enter and the library should appear.
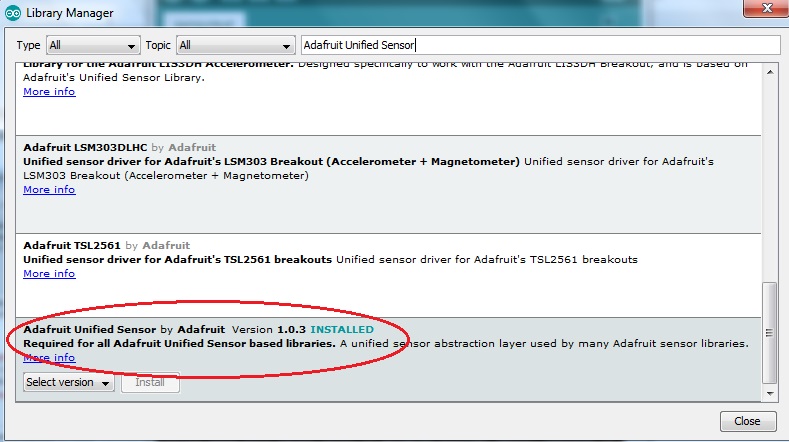
We also need to install the Unified Sensor library:
Using the ADXL345 with Arduino
After installation of the libraries, go to Files > Examples > Adafruit ADXL345 > sensortest. The example sketch is as shown:
#include <Wire.h>
#include <Adafruit_Sensor.h>
#include <Adafruit_ADXL345_U.h>

/* Assign a unique ID to this sensor at the same time */
Adafruit_ADXL345_Unified accel = Adafruit_ADXL345_Unified(12345);

void displaySensorDetails(void)
{
  sensor_t sensor;
  accel.getSensor(&sensor);
  Serial.println("------------------------------------");
  Serial.print  ("Sensor:       "); Serial.println(sensor.name);
  Serial.print  ("Driver Ver:   "); Serial.println(sensor.version);
  Serial.print  ("Unique ID:    "); Serial.println(sensor.sensor_id);
  Serial.print  ("Max Value:    "); Serial.print(sensor.max_value); Serial.println(" m/s^2");
  Serial.print  ("Min Value:    "); Serial.print(sensor.min_value); Serial.println(" m/s^2");
  Serial.print  ("Resolution:   "); Serial.print(sensor.resolution); Serial.println(" m/s^2");
  Serial.println("------------------------------------");
  Serial.println("");
  delay(500);
}

void displayDataRate(void)
{
  Serial.print  ("Data Rate:    ");

  switch(accel.getDataRate())
  {
    case ADXL345_DATARATE_3200_HZ:
      Serial.print  ("3200 ");
      break;
    case ADXL345_DATARATE_1600_HZ:
      Serial.print  ("1600 ");
      break;
    case ADXL345_DATARATE_800_HZ:
      Serial.print  ("800 ");
      break;
    case ADXL345_DATARATE_400_HZ:
      Serial.print  ("400 ");
      break;
    case ADXL345_DATARATE_200_HZ:
      Serial.print  ("200 ");
      break;
    case ADXL345_DATARATE_100_HZ:
      Serial.print  ("100 ");
      break;
    case ADXL345_DATARATE_50_HZ:
      Serial.print  ("50 ");
      break;
    case ADXL345_DATARATE_25_HZ:
      Serial.print  ("25 ");
      break;
    case ADXL345_DATARATE_12_5_HZ:
      Serial.print  ("12.5 ");
      break;
    case ADXL345_DATARATE_6_25HZ:
      Serial.print  ("6.25 ");
      break;
    case ADXL345_DATARATE_3_13_HZ:
      Serial.print  ("3.13 ");
      break;
    case ADXL345_DATARATE_1_56_HZ:
      Serial.print  ("1.56 ");
      break;
    case ADXL345_DATARATE_0_78_HZ:
      Serial.print  ("0.78 ");
      break;
    case ADXL345_DATARATE_0_39_HZ:
      Serial.print  ("0.39 ");
      break;
    case ADXL345_DATARATE_0_20_HZ:
      Serial.print  ("0.20 ");
      break;
    case ADXL345_DATARATE_0_10_HZ:
      Serial.print  ("0.10 ");
      break;
    default:
      Serial.print  ("???? ");
      break;
  }
  Serial.println(" Hz");
}

void displayRange(void)
{
  Serial.print  ("Range:         +/- ");

  switch(accel.getRange())
  {
    case ADXL345_RANGE_16_G:
      Serial.print  ("16 ");
      break;
    case ADXL345_RANGE_8_G:
      Serial.print  ("8 ");
      break;
    case ADXL345_RANGE_4_G:
      Serial.print  ("4 ");
      break;
    case ADXL345_RANGE_2_G:
      Serial.print  ("2 ");
      break;
    default:
      Serial.print  ("?? ");
      break;
  }
  Serial.println(" g");
}

void setup(void)
{
#ifndef ESP8266
  while (!Serial); // for Leonardo/Micro/Zero
#endif
  Serial.begin(9600);
  Serial.println("Accelerometer Test"); Serial.println("");

  /* Initialise the sensor */
  if(!accel.begin())
  {
    /* There was a problem detecting the ADXL345 ... check your connections */
    Serial.println("Ooops, no ADXL345 detected ... Check your wiring!");
    while(1);
  }

  /* Set the range to whatever is appropriate for your project */
  accel.setRange(ADXL345_RANGE_16_G);
  // accel.setRange(ADXL345_RANGE_8_G);
  // accel.setRange(ADXL345_RANGE_4_G);
  // accel.setRange(ADXL345_RANGE_2_G);

  /* Display some basic information on this sensor */
  displaySensorDetails();

  /* Display additional settings (outside the scope of sensor_t) */
  displayDataRate();
  displayRange();
  Serial.println("");
}

void loop(void)
{
  /* Get a new sensor event */
  sensors_event_t event;
  accel.getEvent(&event);

  /* Display the results (acceleration is measured in m/s^2) */
  Serial.print("X: "); Serial.print(event.acceleration.x); Serial.print("  ");
  Serial.print("Y: "); Serial.print(event.acceleration.y); Serial.print("  ");
  Serial.print("Z: "); Serial.print(event.acceleration.z); Serial.print("  ");Serial.println("m/s^2 ");
  delay(500);
}
To use this sketch, follow this wiring diagram:
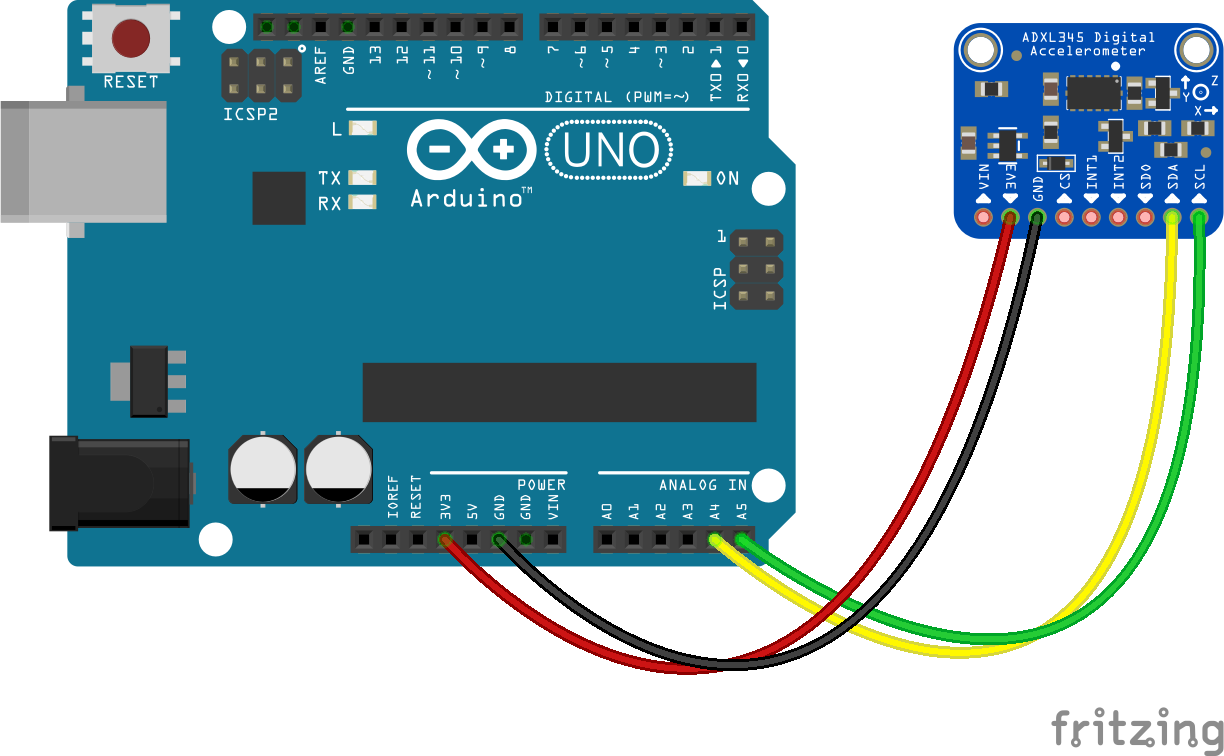
For other boards, make sure that this connection is followed:
| Arduino Pin | ADLX345 Pin |
|---|---|
| 3.3V | VDD |
| GND | GND |
| A4 | SDA/SDI |
| A5 | SCL/SCLK |
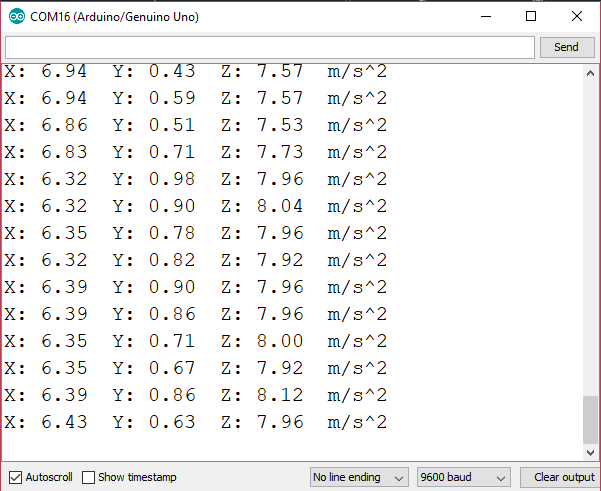
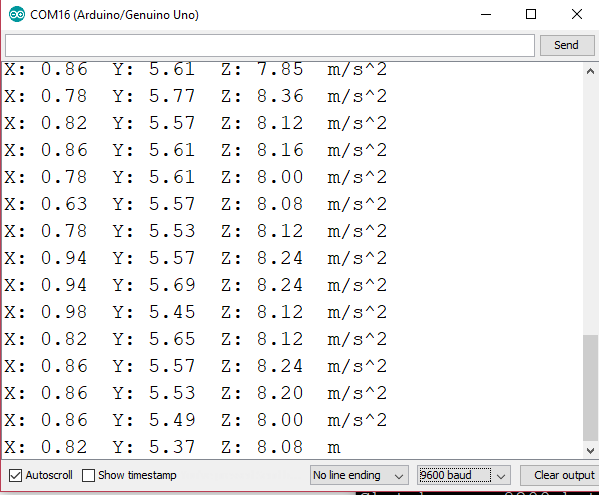
Upload the sketch to your Arduino and open Serial Monitor. The acceleration values is now visible:
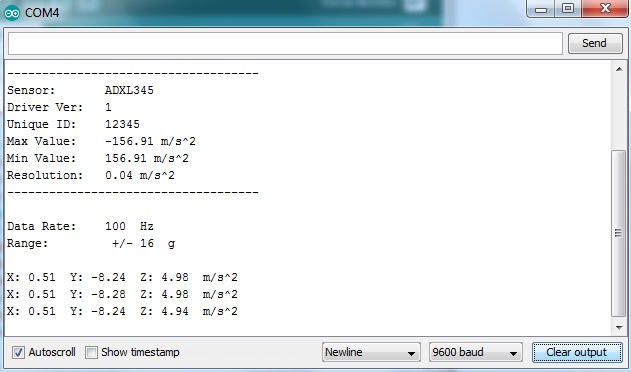
The library converts the output to m/s2 instead of g units.
Explaining the Sketch
Display Sensor Details
The sensortest sketch comes with three functions beside the usual setup() and loop(). The first function is the displaySensorDetails() function:
void displaySensorDetails(void)
{
  sensor_t sensor;
  accel.getSensor(&sensor);
  Serial.println("------------------------------------");
  Serial.print  ("Sensor:       "); Serial.println(sensor.name);
  Serial.print  ("Driver Ver:   "); Serial.println(sensor.version);
  Serial.print  ("Unique ID:    "); Serial.println(sensor.sensor_id);
  Serial.print  ("Max Value:    "); Serial.print(sensor.max_value); Serial.println(" m/s^2");
  Serial.print  ("Min Value:    "); Serial.print(sensor.min_value); Serial.println(" m/s^2");
  Serial.print  ("Resolution:   "); Serial.print(sensor.resolution); Serial.println(" m/s^2");
  Serial.println("------------------------------------");
  Serial.println("");
  delay(500);
}
This function displays the sensor type, maximum and minimum values, resolution and other information about the ADXL345. This function is responsible for this part of the output on the serial monitor:
Sensor:       ADXL345
Driver Ver:   1
Unique ID:    12345
Max Value:    -156.91 m/s^2
Min Value:    156.91 m/s^2
R⸮Accelerometer Test
ADXL Data Rate
The next function is getDataRate():
void displayDataRate(void)
{
  Serial.print  ("Data Rate:    ");

  switch(accel.getDataRate())
  {
    case ADXL345_DATARATE_3200_HZ:
      Serial.print  ("3200 ");
      break;
    case ADXL345_DATARATE_1600_HZ:
      Serial.print  ("1600 ");
      break;
    case ADXL345_DATARATE_800_HZ:
      Serial.print  ("800 ");
      break;
    case ADXL345_DATARATE_400_HZ:
      Serial.print  ("400 ");
      break;
    case ADXL345_DATARATE_200_HZ:
      Serial.print  ("200 ");
      break;
    case ADXL345_DATARATE_100_HZ:
      Serial.print  ("100 ");
      break;
    case ADXL345_DATARATE_50_HZ:
      Serial.print  ("50 ");
      break;
    case ADXL345_DATARATE_25_HZ:
      Serial.print  ("25 ");
      break;
    case ADXL345_DATARATE_12_5_HZ:
      Serial.print  ("12.5 ");
      break;
    case ADXL345_DATARATE_6_25HZ:
      Serial.print  ("6.25 ");
      break;
    case ADXL345_DATARATE_3_13_HZ:
      Serial.print  ("3.13 ");
      break;
    case ADXL345_DATARATE_1_56_HZ:
      Serial.print  ("1.56 ");
      break;
    case ADXL345_DATARATE_0_78_HZ:
      Serial.print  ("0.78 ");
      break;
    case ADXL345_DATARATE_0_39_HZ:
      Serial.print  ("0.39 ");
      break;
    case ADXL345_DATARATE_0_20_HZ:
      Serial.print  ("0.20 ");
      break;
    case ADXL345_DATARATE_0_10_HZ:
      Serial.print  ("0.10 ");
      break;
    default:
      Serial.print  ("???? ");
      break;
  }
  Serial.println(" Hz");
}
[the_ad id="3059"]
This function returns the current data rate of the ADXL345. This also gives us the usable data rates from the slowest (10 Hz) to the fastest (3200 Hz). The datasheet tells us about data rate selection:
An output data rate should be selected that is appropriate for the communication protocol and frequency selected. Selecting too high of an output data rate with a low communication speed results in samples being discarded.
This means rate selection is dependent on the speed of the microcontroller device. The Arduino UNO supports high-speed I2C mode which has a speed of 3.4 MHz so it will not have trouble at higher data rates.
To change data rate, use the function setDataRate(datarate). The datarate can be any of the following:
ADXL345_DATARATE_3200_HZ
ADXL345_DATARATE_1600_HZ
ADXL345_DATARATE_800_HZ
ADXL345_DATARATE_400_HZ
ADXL345_DATARATE_200_HZ
ADXL345_DATARATE_100_HZ
ADXL345_DATARATE_50_HZ
ADXL345_DATARATE_25_HZ
ADXL345_DATARATE_12_5_HZ
ADXL345_DATARATE_6_25HZ
ADXL345_DATARATE_3_13_HZ
ADXL345_DATARATE_1_56_HZ
ADXL345_DATARATE_0_78_HZ
ADXL345_DATARATE_0_39_HZ
ADXL345_DATARATE_0_20_HZ
ADXL345_DATARATE_0_10_HZ
For example, to change the data rate to 400 Hz, place this inside setup(), after accel.begin():
accel.setDataRate(ADXL345_DATARATE_400_HZ);
Range Value
The last function is the displayRange() function:
void displayRange(void)
{
  Serial.print  ("Range:         +/- ");

  switch(accel.getRange())
  {
    case ADXL345_RANGE_16_G:
      Serial.print  ("16 ");
      break;
    case ADXL345_RANGE_8_G:
      Serial.print  ("8 ");
      break;
    case ADXL345_RANGE_4_G:
      Serial.print  ("4 ");
      break;
    case ADXL345_RANGE_2_G:
      Serial.print  ("2 ");
      break;
    default:
      Serial.print  ("?? ");
      break;
  }
  Serial.println(" g");
}
This prints out the current range of the ADXL345. If ±2g is selected, the accelerometer can now detect acceleration up to ±19.6 m/s2 (2 * 9.8). The default value is ±16g which is equivalent ±156.8 m/s2.
To change the range, use the setRange(range) function. The range can be any of the following:
ADXL345_RANGE_16_G
ADXL345_RANGE_8_G
ADXL345_RANGE_4_G
ADXL345_RANGE_2_G
For example, the following changes the range to ±2g:
accel.setRange(ADXL345_RANGE_2_G);
Make sure that the above code is after the accel.begin() function inside setup().
Demonstration Video
Here’s a video showing the output of the sketch:
Explaining the Output
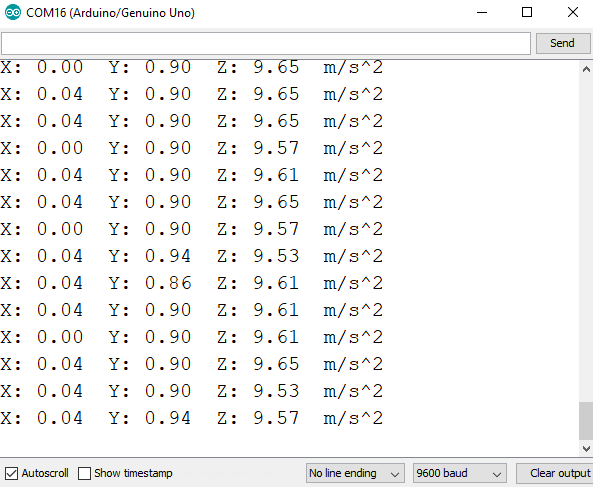
As mentioned, the ADXL345 measures acceleration forces. If the sensor is at rest, only the gravitational force is acting on it. If it is moving, then it will read the force that is applied.
At rest and with the sensor placed flat as pictured, we expect zero (or almost zero) values in both x and y axes, and a value equal to g for the z axes.
Tilt the board as shown and the sensor is now going against gravity in the x axis, hence we expect a non-zero value on x.

[the_ad id="3059"]
Tilt the board as shown and the sensor is now going against gravity in the y axis, and a non-zero y value is now read.
Move the sensor in a certain direction and it will give the acceleration due to the applied force and gravity!
If you find this tutorial helpful, kindly drop a comment below!

