
Uploading sensor data to web servers is one of the core ideas for Internet of Things (IoT). Such data are often small-sized and are continuously updated over time. And while HTTP performs satisfactorily for simple applications, like how I showed in my NodeMCU web server tutorial, there is a need for a much better method when speed and data-size are critical factors. I’ve already shown how to use MQTT as a faster and lightweight alternative to HTTP. In this tutorial, I will demonstrate how to use NodeMCU ESP8266 WebSocket.
Introduction to WebSocket
WebSocket, like HTTP, is a communications protocol over TCP. The key differences between WebSocket and HTTP is that the former operates full-duplex, bi-directional and at single TCP connection.
Full-duplex means two objects communicating with each other can send and receive messages simultaneously, like when you’re talking over the telephone. In contrast, half-duplex is non-simultaneous messaging, like when you’re using a walkie-talkie. A full-duplex system is faster than a half-duplex system.
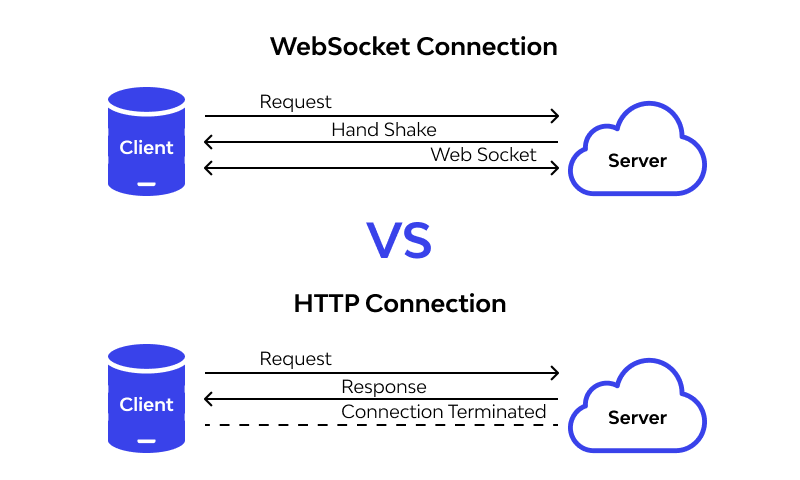
As a consequence of being full-duplex, WebSocket is also bidirectional. The client always initiates the communication in HTTP. The client or the server can initiate the communication in WebSocket.
Finally, WebSocket is established in a single TCP connection. The request-response pattern needs to be repeated for every HTTP request by the client.
NodeMCU WebSocket Library
A WebSocket library for NodeMCU using the Arduino IDE can be downloaded in this repository.
Extract the library to the Arduino libraries folder and then restart the IDE (if it was open when you were downloading the library).
The library has plenty of examples (File -> Examples ->WebSockets). I will create my own code here that is similar to the one on the NodeMCU web server tutorial via HTTP:
#include <ESP8266WiFi.h>
#include <WiFiClient.h>
#include <ESP8266WebServer.h>
#include <WebSocketsServer.h>
#include <Hash.h>
// Replace with your network credentials
const char* ssid = "<YOUR WIFI SSID>";
const char* password = "<YOUR WIFI PASSWORD>";
WebSocketsServer webSocket = WebSocketsServer(81);
ESP8266WebServer server(80); //instantiate server at port 80 (http port)
String page = "";
int LEDPin = 13;
void setup(void){
//the HTML of the web page
page = "<h1>Simple NodeMCU Web Server</h1><p><a href=\"LEDOn\"><button>ON</button></a> <a href=\"LEDOff\"><button>OFF</button></a></p>";
//make the LED pin output and initially turned off
pinMode(LEDPin, OUTPUT);
digitalWrite(LEDPin, LOW);
delay(1000);
Serial.begin(115200);
WiFi.begin(ssid, password); //begin WiFi connection
Serial.println("");
// Wait for connection
while (WiFi.status() != WL_CONNECTED) {
delay(500);
Serial.print(".");
}
Serial.println("");
Serial.print("Connected to ");
Serial.println(ssid);
Serial.print("IP address: ");
Serial.println(WiFi.localIP());
server.on("/", [](){
server.send(200, "text/html", page);
});
server.on("/LEDOn", [](){
server.send(200, "text/html", page);
digitalWrite(LEDPin, HIGH);
delay(1000);
});
server.on("/LEDOff", [](){
server.send(200, "text/html", page);
digitalWrite(LEDPin, LOW);
delay(1000);
});
server.begin();
webSocket.begin();
webSocket.onEvent(webSocketEvent);
Serial.println("Web server started!");
}
void loop(void){
webSocket.loop();
server.handleClient();
if (Serial.available() > 0){
char c[] = {(char)Serial.read()};
webSocket.broadcastTXT(c, sizeof(c));
}
}
void webSocketEvent(uint8_t num, WStype_t type, uint8_t * payload, size_t length){
if (type == WStype_TEXT){
   for(int i = 0; i < length; i++) Serial.print((char) payload[i]);
   Serial.println();
 }
}
Upload the code to your NodeMCU and, if successful, open Arduino's serial monitor to see something like this:

Then go to your preferred web browser and type in the address of the NodeMCU (shown in the screenshot above) on the address bar. You should see something like this:

To see what this code does, wire a LED to D7 (which is GPIO #13) on your NodeMCU.
Then click the buttons on the web page. The LED should respond to the button press:

Explaining the Code
There are a few differences here with my code using HTTP. First is the declaration of the WebSocket object:
WebSocketsServer webSocket = WebSocketsServer(81);
The WebSocket server must be on a different port to HTTP (which is 80). Here it’s on port 81. Then we need to start the WebSocket connection using begin()
webSocket.begin(); webSocket.onEvent(webSocketEvent);
The onEvent() function calls the webSocketEvent() function when data is received via WebSocket. The webSocketEvent():
void webSocketEvent(uint8_t num, WStype_t type, uint8_t * payload, size_t length){
if (type == WStype_TEXT){
for(int i = 0; i < length; i++) Serial.print((char) payload[i]);
Serial.println();
}
}
This function simply prints the data via WebSocket to the serial port. Here, we are waiting for a text type response but there are other types of responses:
 WStype_ERROR,
 WStype_DISCONNECTED,
 WStype_CONNECTED,
 WStype_TEXT,
 WStype_BIN,
 WStype_FRAGMENT_TEXT_START,
 WStype_FRAGMENT_BIN_START,
 WStype_FRAGMENT,
 WStype_FRAGMENT_FIN,
We also need to add a webSocket.loop() call on the loop() function to keep the connection alive.
Another advantage of using WebSocket is that you can send or receive data on the server without refreshing the page, like in the NodeMCU Ajax tutorial but easier. I will discuss this on my future tutorials.
I suggest you explore all the given examples on the library to learn more. Also, feel free to drop a comment if you want a solution for a problem you are experiencing on a project related to this topic. Have fun!

