What is Arduino?
What is Arduino?
Arduino is an open-source electronics platform based on easy-to-use hardware and software. Arduino boards are able to read inputs - light on a sensor, a finger on a button, or a Twitter message - and turn it into an output - activating a motor, turning on an LED, publishing something online. You can tell your board what to do by sending a set of instructions to the microcontroller on the board. To do so you use the Arduino programming language (based on Wiring), and the Arduino Software (IDE), based on Processing.
This is how their official website would define the Arduino, the single-board microcontroller that paved the way for electronics to reach non-engineers and significantly increased the number of do-it-yourself electronics enthusiasts. The Arduino, in fact, is not the first of its kind as there are countless of microcontrollers before it. But it rose to prominence because it made coding microcontrollers simpler. Much simpler.
Arduino History
The Arduino software was forked from Wiring, a thesis project by then Interaction Design Institute Ivrea (IDII) Master's student Hernando Barragan (circa 2003). Wiring, in turn, builds on Processing, a coding platform build for visual artists. Thus, Wiring's core idea was to allow artists to incorporate electronics to their work while limiting the complexities.
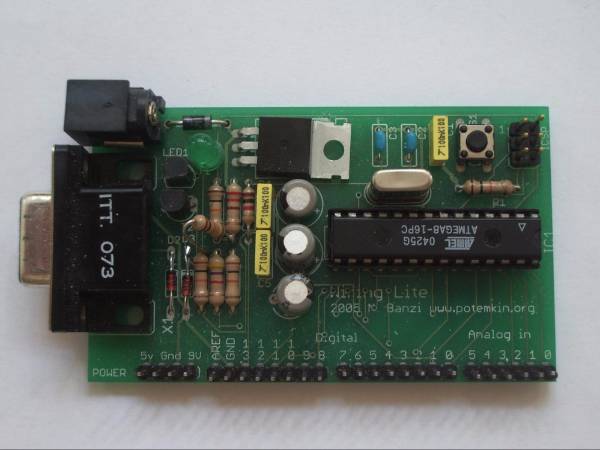
Wiring Lite , the first Arduino prototype, featured the ATMega8:

The name "Arduino" comes from the name of the bar in Ivrea where the founders (Massimo Banzi, David Cuartielles, Tom Igoe, Gianluca Martino, and David Mellis) used to meet. Massimo Banzi was Barragan's thesis adviser but left him out when they created the Arduino LLC company in 2008.
In 2014, there were two Arduino companies: Arduino SRL and Arduino LLC. The former was created by Gianluca Martino, who in 2008 secretly registered the Arduino trademark in Italy. This prevented the original Arduino LLC from registering the trademark worldwide except in the US where they initially registered. This consequently created a rift between the founders and two websites arose: arduino.org (SRL) and arduino.cc (LLC).
Arduino LLC created the trademark Genuino as the brand name of the Arduino board outside the United States. On October 1, 2016, Arduino LLC and Arduino SRL announced its merger and removed the Genuino brand completely.
The entire history of Wiring and Arduino is very interesting and I suggest you read Barragan's account on how it all began. The article hints on the saltiness between Baraggan and the original Arduino team but I guess everything went well after Barragan was appointed as Arduino's Chief Design Architect.
The Arduino IDE
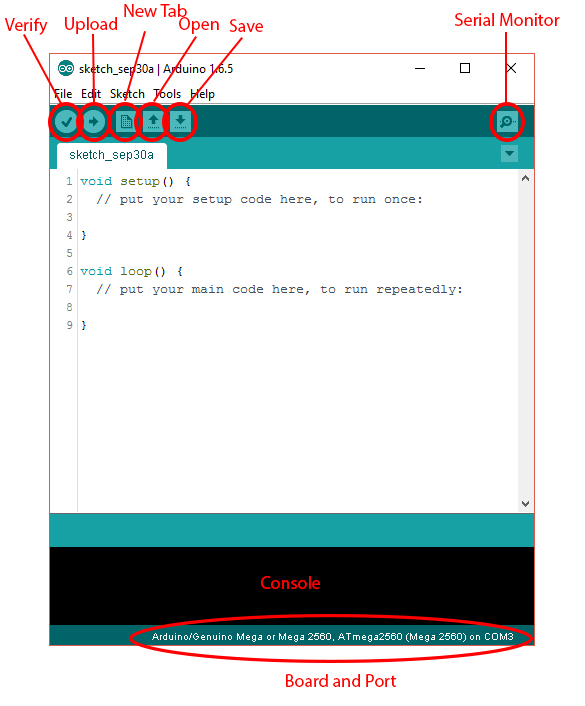
The Arduino Integrated Development Environment (IDE) is a simple and lightweight editor used to create programs or "sketches". There are a number of buttons on the IDE but the main ones are Verify and Upload. To verify means to check the sketch for errors and compile it to machine-readable "hex" code. Upload sends that hex code to the Arduino board. That's it! No more programmer hardware, fuse settings, oscillators, etc. to worry about.

A serial monitor makes it easier to debug and trace your sketch. The IDE also supports multiple tabs to better organize for longer sketches or those with included header files.
The Arduino language's core is C/C++, which is not that difficult to use, but Barragan managed to make it simpler by just requiring two functions: setup() and loop(). Furthermore, a sketch will not compile if any of these two core functions are missing.
Here's a sketch that blinks the on-board LED on the Arduino UNO:
// the setup function runs once when you press reset or power the board
void setup() {
  // initialize digital pin 13 as an output.
  pinMode(13, OUTPUT);
}

// the loop function runs over and over again forever
void loop() {
  digitalWrite(13, HIGH);   // turn the LED on (HIGH is the voltage level)
  delay(1000);              // wait for a second
  digitalWrite(13, LOW);    // turn the LED off by making the voltage LOW
  delay(1000);              // wait for a second
}
The setup() function runs once at the start of the sketch. It is used to define initial environment settings. In the example above, pinMode(), a Wiring original function, is inside setup(). This is a function that sets a pin as either an input or output.
The loop() function runs repeatedly until the Arduino turns off. Here we see another function, digitalWrite() which sets the state of an output pin to either high or low.
The Arduino Hardware
Being open-source, you can create your own Arduino board. Here is the most popular board, the Arduino UNO:

Basically, the Arduino UNO is an ATMega328p microcontroller with a special library and a bootloader -- a software that allows program to be written to the microcontroller serially. This is what allows us to easily upload code from a personal computer via USB (the USB connection is possible thanks to a FTDI chip). The Arduino UNO can take power from the USB connection or from DC input jack which accepts voltages from 7 to 12 V.
As mentioned, the UNO features an on-board LED wired to pin 13. The rest of the pin functions will be covered as we go along with this tutorial.
The Arduino Community
Besides the simple IDE and fully-featured board, one of Arduino's strengths is its community. The Arduino forum is home to thousands of experience makers ready to answer questions about Arduino products, projects and events. The Arduino Stack Exchange is another excellent community to seek help from for your projects. And of course, Teach Me Micro is one of your best reference in learning not just Arduino but also other microcontrollers.
What's Next
This tutorial attempts to provide a more in-depth approach of Arduino programming. We will start with the basics, of course, then we will proceed with rigor in an attempt to create more advanced and flexible projects. Let's begin!


