

Launching a project into production doesn’t mean it’s 100% finished --- this is why software/firmware updates exist. And your users are not programmers so you want the update process as user-friendly as possible. Thankfully, the ESP32 allows you to update its compiled code, called firmware, to be updated over the air (OTA).
There are a number of tutorials on doing OTA updates on the ESP32 but I haven’t seen one where you can update the firmware from an external website. Like, store the binary file in www.example.com/latest/ and have your ESP32 fetch that file. I believe this approach is easier for IoT projects that have already been released to users -- just send them the firmware via the internet every time there’s an update.
The concept is fairly simple: using the right libraries, create a GET request for a certain file in a website. If the file exists, then create a stream to download the file. We expect the file to be large and won’t fit inside a standard string, so we need to incrementally write it to the ESP32. Once the firmware has been written, restart the ESP32 to load the newly written binary.
First, make sure your ESP32 supports OTA. The only thing to check is the partition scheme in Tools:
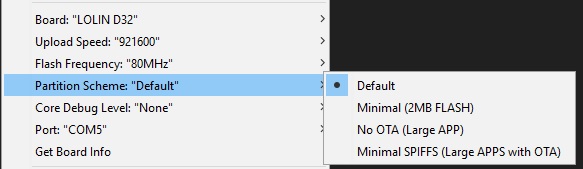
Selecting “No OTA” will disable over-the-air updates so don’t do that. Here I’m just using the default partition scheme.
Then, create the sketch that you want as an update. For example, here's what I want to change my ESP32 code into:
// the setup function runs once when you press reset or power the board
void setup() {
  Serial.begin(9600);
  Serial.println("Hello World");
}

// the loop function runs over and over again forever
void loop() {}
Now, this sketch entirely removes the OTA function of the previous sketch. You wouldn't that if you want to continue doing OTAs. I'm just using this example here for simplicity.
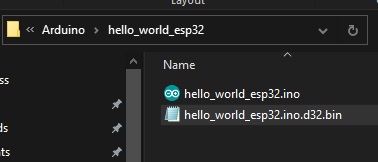
Next, create a binary file for that sketch above. Just go to Sketch > Export compiled Binary (or CTRL+ALT+S on windows) to do that:

A .bin file should now be present with your .ino file.
Next, upload this .bin file into your external web server. For example, our website is server.com. We upload the .bin file to the root folder of the website. Hence, the .bin file is accessible at http://www.server.com/hello_world_esp32.ino.d32.bin
Next, we create another sketch for getting the .bin file from the webserver. The first step is to establish a WiFi connection:
// Start WiFi connection
  WiFi.mode(WIFI_MODE_STA);
  WiFi.begin(ssid, password);
  while (WiFi.status() != WL_CONNECTED) {
      delay(500);
      Serial.print(".");
  }

  Serial.println("");
  Serial.println("WiFi connected");
  Serial.println("IP address: ");
  Serial.println(WiFi.localIP());
Then connect to the host which is the URL of the .bin file above. And then use an HTTP GET request to check if the file is indeed there.
// Connect to external web server
  client.begin(HOST);
  // Get file, just to check if each reachable
  int resp = client.GET();
If the file is present, the value of the resp variable will be 200 which is the HTTP code for ‘OK’. If this is the case then we can start streaming the file.
// If file is reachable, start downloading
  if(resp > 0){
      // get length of document (is -1 when Server sends no Content-Length header)
      totalLength = client.getSize();
      // transfer to local variable
      int len = totalLength;
      // this is required to start firmware update process
      Update.begin(UPDATE_SIZE_UNKNOWN);
      Serial.printf("FW Size: %u\n",totalLength);
      // create buffer for read
      uint8_t buff[128] = { 0 };
      // get tcp stream
      WiFiClient * stream = client.getStreamPtr();
      // read all data from server
      Serial.println("Updating firmware...");
      while(client.connected() && (len > 0 || len == -1)) {
           // get available data size
           size_t size = stream->available();
           if(size) {
              // read up to 128 byte
              int c = stream->readBytes(buff, ((size > sizeof(buff)) ? sizeof(buff) : size));
              // pass to function
              updateFirmware(buff, c);
              if(len > 0) {
                 len -= c;
              }
           }
           delay(1);
      }
  }
Here we use a function updateFirmware() which is the one responsible for writing the stream to the ESP32. It uses the Update library, included in the ESP32 for Arduino core.
// Function to update firmware incrementally
// Buffer is declared to be 128 so chunks of 128 bytes
// from firmware is written to device until server closes
void updateFirmware(uint8_t *data, size_t len){
  Update.write(data, len);
  currentLength += len;
  // Print dots while waiting for update to finish
  Serial.print('.');
  // if current length of written firmware is not equal to total firmware size, repeat
  if(currentLength != totalLength) return;
  Update.end(true);
  Serial.printf("\nUpdate Success, Total Size: %u\nRebooting...\n", currentLength);
  // Restart ESP32 to see changes
  ESP.restart();
}
You can grab the full sketch on this repository. You can just easily recycle this code from line 39 up to the end of setup() and also the updateFirmware() function to use in your own project. Just specify your own URL for the location of the .bin file (defined as HOST in the code) and of course your own WiFi credentials.
Once this sketch is uploaded, open serial monitor to view this:

As you can see, Hello World is now on the bottom of the monitor, which was the output of the .bin file on the web server.
Again, just be mindful that your new firmware should still have the capabilities of doing OTA. Otherwise, you can't do OTAs anymore!
I hope you find this tutorial helpful. For any concerns, just drop a comment below or send a message via or FB/IG channels.


Hello, Your tutorial is great.
Unfortunately I got the Guru Meditation Error: Core 1 panic'ed (LoadProhibited). Exception was unhandled
I have posted the details on Git. Have it ever happened to you?
https://github.com/kurimawxx00/webota-esp32/issues/1
Hi Pietro,
I haven't experienced that error. I will investigate and get back to you asap.
Hi,
Can you send your code via email to roland@teachmemicro.com? You can also use this to know which part of the code is producing the exception: https://github.com/me-no-dev/EspExceptionDecoder
Hi, I have exactly the same issue. I checked your Git where you say the problem was probably caused by pointing to your file on a http:// link instead of a https:// link. With me however that's not the case. Any other ideas?
Hi Jens,
If you're seeing some exception error, please use this tool to know more about it: https://github.com/me-no-dev/EspExceptionDecoder
Hello. Nice and helpful tutorial. I was wondering what kind of external web server you used and how I can serve the .bin file from the server and make it accessible over the internet to esp32?
Do you have any examples/tutorial on how to set that kind of server?
I am quite new to software world so any help will be useful.'
Hello, nice and helpful tutorial. I was wondering what kind of web server do you use and how it can serve the .bin file and make it accessible to esp32 for the update?
Do you know any examples/ tutorials on how to set up a server like that?
I am quite new to the software world , so any help will be welcome.
Hi,
I am using a hosted file server. It's paid so it doesn't take much effort to set up. Basically, it's an Apache server with CPanel. Check out those paid domain services with hosting.
Thank you for providing such great tutorial and repo.
I've adopted into my project. However, I'm running into two practical issues.
1. My file server/AWS S3 bucket would return a 403 response if the file doesn't exist. The (resp > 0) condition in your original code will take this warning page as a firmware and download it. I can easily modify that condition.
2. I'm trying to work out a way for the device to compare the version of the firmware so I won't end up an infinite loop of downloading/rebooting. I'll let you know if I found some way.