
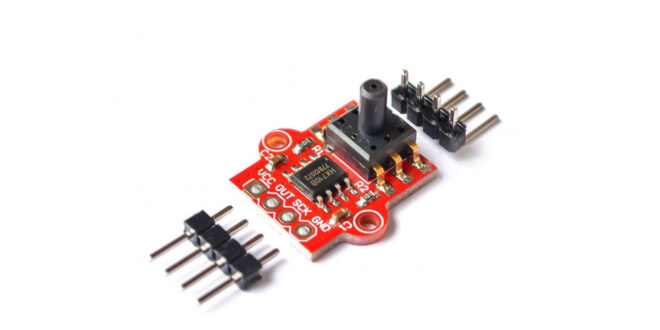
In this tutorial, we will feature the MPS20N0040D and how to use it with the ESP32 microcontroller. It's challenging to directly interface this pressure sensor with the ESP32 but thankfully, we have a development board that comes with a HX710B analog-to-digital converter.
ESP32 Pressure Sensor Wiring Diagram
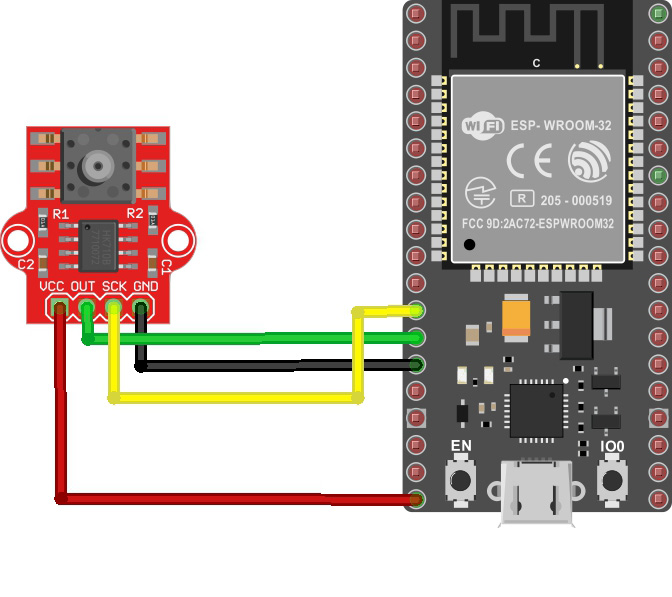
The MPS20N0040D outputs voltage proportionally to the pressure it detects. This voltage is then converted to data by the HX710B. The HX710B, on the other hand, communicates with the ESP32 serially. That is, a series of pulses are sent into the ESP32 with a clock signal framing those pulses.
To make life easier, I created a custom library for the Arduino environment that easily handles the HX710B. A similar tutorial uses an almost identical ADC to convert signals from a load cell to weight data. My own custom library is a modified version of that library but instead of weight, the output is now in pascals, mmHg, atm, and psi.
But first, you must calibrate the sensor accordingly. Use the read_average() function to acquire the value read by the HX710B from the sensor when there is no pressure applied:
#include "HX710B.h"

const int DOUT_Pin = 12;   //sensor data pin
const int SCK_Pin  = 14;   //sensor clock pin

HX710B pressure_sensor;
void setup() {
  Serial.begin(57600);
  pressure_sensor.begin(DOUT_Pin, SCK_Pin);
}

void loop() {

  if (pressure_sensor.is_ready()) {
    Serial.println(pressure_sensor.read_average());
  } else {
    Serial.println("Pressure sensor not found.");
  }
  delay(1000);
}
Upload the code and open Serial Monitor. You will now see the OFFSET value:
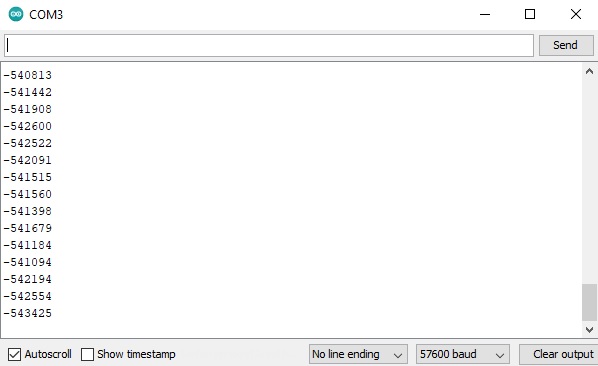
For my device, I chose the offset value of -550000. We use this to get our zero value:
#include "HX710B.h"

const int DOUT_Pin = 12;   //sensor data pin
const int SCK_Pin  = 14;   //sensor clock pin

HX710B pressure_sensor;
long offset = -550000;
void setup() {
  Serial.begin(57600);
  pressure_sensor.begin(DOUT_Pin, SCK_Pin);
  pressure_sensor.set_offset(offset);
}

void loop() {

  if (pressure_sensor.is_ready()) {
    Serial.print("Kilopascal: ");
    Serial.println(pressure_sensor.pascal());
  } else {
    Serial.println("Pressure sensor not found.");
  }
  delay(1000);
}
You can clone/download the library and place it directly in the Documents/Arduino/libraries folder of your computer.
Here’s an example sketch that displays the pressure in kilopascals in the Serial Monitor, using the wiring diagram above:
#include "HX710B.h"

const int DOUT_Pin = 12;   //sensor data pin
const int SCK_Pin  = 14;   //sensor clock pin

HX710B pressure_sensor;

void setup() {
  Serial.begin(57600);
  pressure_sensor.begin(DOUT_Pin, SCK_Pin);
}

void loop() {

  if (pressure_sensor.is_ready()) {
    Serial.print("Pressure (kPa): ");
    Serial.println(pressure_sensor.pascal());
  } else {
    Serial.println("Pressure sensor not found.");
  }
  delay(1000);
}
To display other units of pressure, use the following:
Serial.print("ATM: ");
Serial.println(pressure_sensor.atm());
Serial.print("mmHg: ");
Serial.println(pressure_sensor.mmHg());
Serial.print("PSI: ");
Serial.println(pressure_sensor.psi());
Given that we are using a WiFi-capable microcontroller such as the ESP32, we will go further. This time, we can display the pressure readings on a server run by the ESP32.
First, we create a simple web page where we will display our pressure values. We will use Ajax on this page so that the pressure values update without refreshing the page. This is now the front-end part of our project.

For the back end, we read the data from the MPS20N004D and sent it to the server using Ajax.
The full code can be downloaded from my repository.
Continue reading if you want to learn more about how the MPS20N004D pressure sensor works.
How the MPS20N0040D Works
The MPS20N0040D pressure sensor is a bridge circuit where one of the bridge elements is a pressure-sensitive resistor. The circuit diagram is shown below. A source voltage is applied to the bridge at points 2 and 5 and output is measured at points 1/6, and 3.

The voltage output at points 3 with respect to 1/6 is calculated using this formula:
Vout = (R4/R3+R4 - R2/R1+R2)Vin
When the bridge circuit is balanced, i.e., all resistors have equal values, the output voltage, Vout is zero.
Let’s say each resistor in the bridge is 10 ohms. Then the voltage output, for a 5V input, is:
Vout = (10/20 - 10/20) 5 = 0
When pressure is applied, one of the resistances in the bridge changes value. This unbalances the bridge and Vout is no longer zero.
Let’s say that because of the pressure, R1 changed by 10 ohms. The value Vout then becomes
Vout = (0.5 - 10/20 + 10)5 = (0.5 - 0.333)5 = 0.83335
A 10-ohm change is a bit generous; in reality, the change in resistance is often very small. This corresponds to the voltage from the sensor Vout also being very small, way below the sensitivity of the Arduino’s ADC. Hence, there’s the need to use an external ADC, with a higher resolution than the Arduino’s 10-bit ADC. That’s the job of the HX710B.
The HX710B is a 24-bit ADC that sends out pulses based on the voltage it reads. The higher the number of pulses within a specified frame, the higher the voltage measured. A 24-bit ADC can detect a voltage level of as low as:
Sensitivity = 5/2^24 = 2.98023e-7 V
In comparison, a 10-bit ADC, the Arduino’s ADC via the analog input can detect:
Sensitivity = 5/2^10 = 4.88e-3 V
The MPS20N0040D gives out a voltage output that is linearly proportional to the applied pressure in kilopascals.
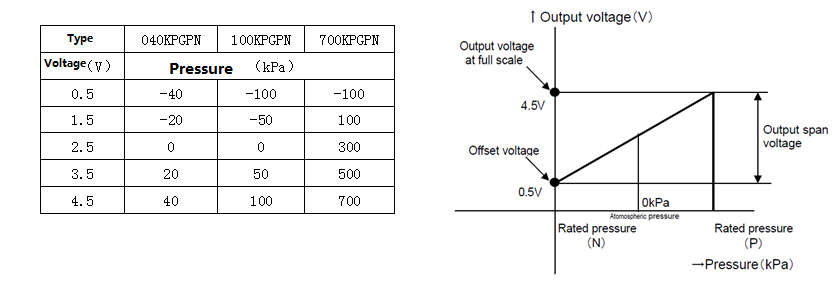
Using two-point form of the linear equation, we derive the equation for the voltage vs. pressure curve:
V- V1 = V2 - V1 / P2 - P1 (P - P1)
V - 0.5 = 4.5 - 0.5 / 40 + 40 (P + 40)
V - 0.5 = 0.05 P + 2
V = 0.05P + 2.5
We can use this formula to convert the adc output value to pressure in pascals.
P = 20V + 50
ADC value = V / Sensitivity
P = 20 * Sensitivity * ADC value + 50
For a 24-bit ADC, the equation becomes:
P = 1.430E-2 * ADC value + 50
This is the equation used in the library to read the pressure in pascals.
For other units of pressure, we just use conversion factors:
1 pa = 7.50062 mm Hg
1 pa = 0.0145038 psi
1 pa = 9.86923e-3 atm
This article is sponsored by WIN SOURCE
WIN SOURCE is a leading independent distributor in Asia, relying on Asia’s extensive and mature manufacturing industry chain, and WIN SOURCE’s 23 years of rich global supply chain. Winsource continuously optimizes the online shopping platform and supplier network, and at the same time develops the WS internal supply chain operation system, including sales, procurement, warehousing logistics, marketing and other subsystems to support our global supply chain. In order to satisfy customers to achieve one-stop BOM procurement, obtain the ability to quickly win Shortage & Obsolete inventory, and continuously optimize and reduce procurement and production costs.
Advantages of WIN SOURCE:
- One-stop purchase of electronic components inventory of more than 1 million SKUs and products of more than 3,000 brand suppliers
- 24 hours delivery, 365 days warranty
- The industry’s highest standard of quality system management to ensure the authenticity and effectiveness of the goods
- Relying on the big manufacturing country in Asia and the global supply chain system, complete the procurement at the lowest cost Winsource is happy to provide customers with free parts to help customers with testing, design and R & D.


