

Now that we have set up the Raspberry Pi Pico for the Arduino environment, it’s time to build real projects. First on the list is a simple motion detector using a Passive Infrared Receiver (PIR) sensor.
Raspberry Pi Pico to PIR Sensor Wiring and Code
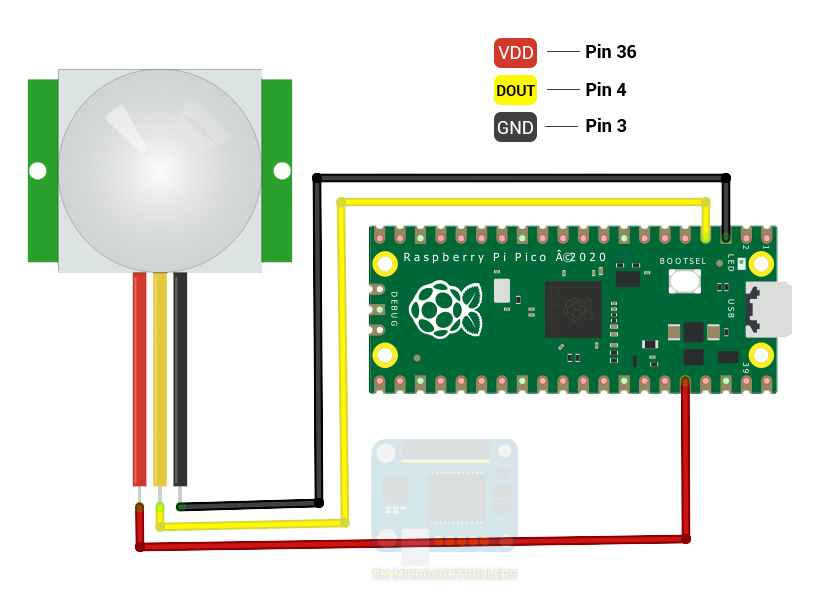
Interfacing with the HC-SR501 PIR sensor is quite easy. We only need to read the state of the signal or DOUT pin to know if it has detected any motion. Thus, we can connect the DOUT pin to any digital pin of the Raspberry Pi Pico. The diagram below connects the Pico’s GPIO2 (pin #4) pin to the PIR sensor’s DOUT pin.
For a better view of the Pico's external pins, see Raspberry Pico Pinout.
Here’s the code for this setup:
int dOut = 2;   // Input for HC-SR501
int pirVal;     // Place to store read PIR Value

void setup() {
   Serial.begin(9600);
   pinMode(dOut, INPUT);
}

void loop() {
  pirVal = digitalRead(dOut);
  if(pirVal){
    Serial.println(“Motion detected!”);
    delay(3000);                                //wait for three seconds
  }
}
The code prints “Motion detected!” in Serial Monitor whenever the PIR sensor detects motion and then waits for three seconds before trying to detect again. This assumes that the time delay pot is set to 3 seconds.
TIPS:
- If the circuit above prints “Motion detected!” even if no movement is detected, try turning the sensitivity knob counter-clockwise until you achieve the right sensitivity.
- Make sure the delay in the code matches the time delay setting for the pot. If the 3 seconds in the original code is enough, turn the time delay knob fully counter-clockwise.
Want to learn more about how PIR sensors work? Then read ahead.
About The HC-SR501 PIR Motion Sensor
Humans and other objects with temperatures above absolute zero emit invisible infrared radiation (IR). When such a body is within range of a PIR sensor and then moves, the sensor treats this as a change in IR. This then triggers other circuit components to generate a pulse at a specific interval.
Detection Range
A PIR sensor detects IR at 100° to 130° and 3 to 7 meters from the sensor.

Internals and Pinout
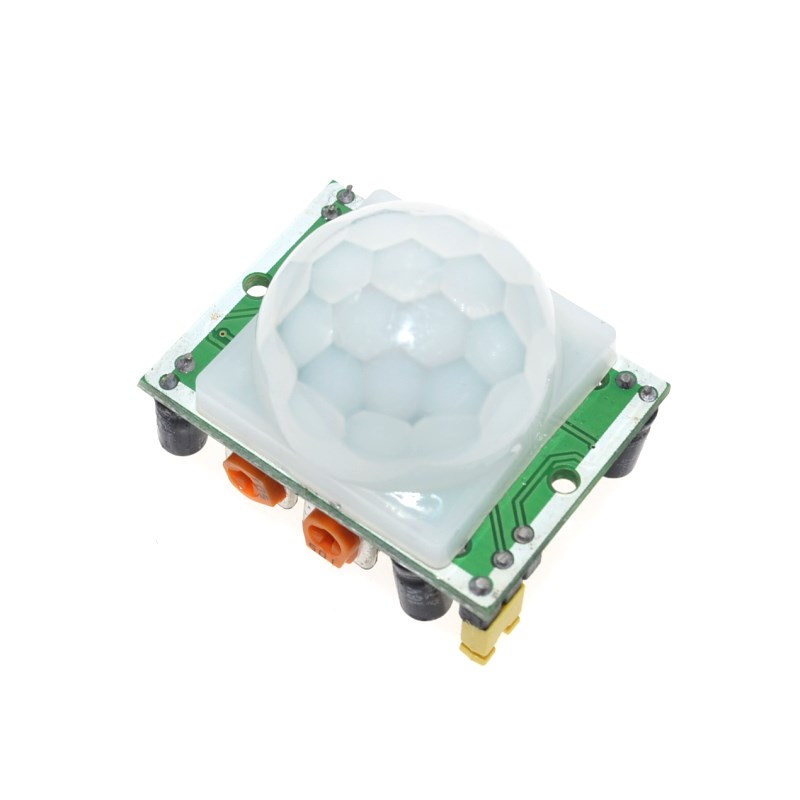
The actual sensor is a metallic package with a window at the center. This window filters all other types of radiation except infrared.
The dome you see covering the sensor is called a Fresnel lens. This lens focuses the received IR signal to the center of the sensor. This is the reason why the PIR sensor has a conic reception area instead of a straight line.
The HC-SR501 module has three interface pins, a set of jumpers, and potentiometers.
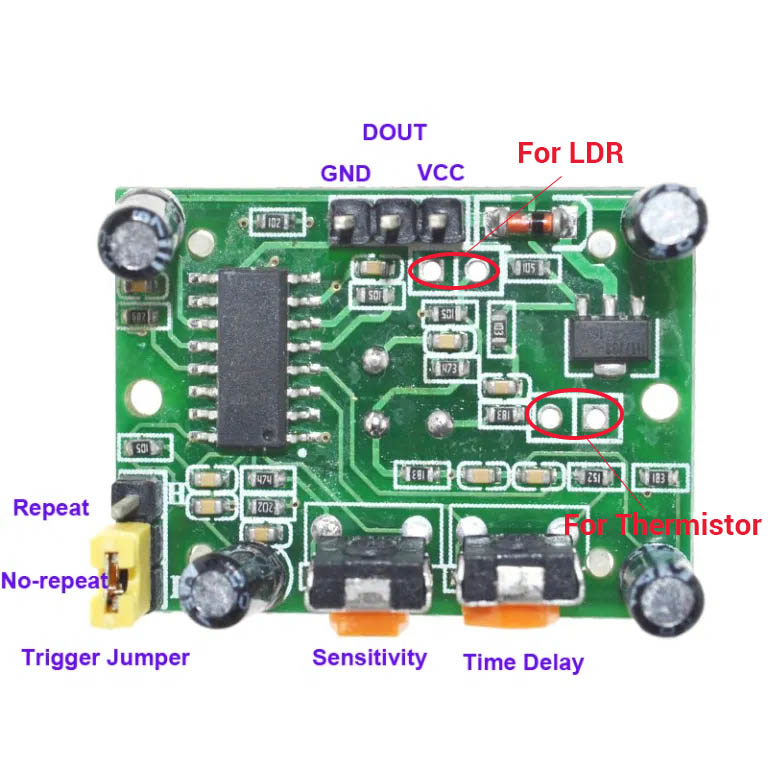
Power is provided to the module through the VCC and GND pins. While the module is supposed to run from 4.5 V to 20 V, it still works, surprisingly, from 3.3 V of the Raspberry Pi Pico. The DOUT pin goes high if motion is detected. Moreover, the DOUT pin’s voltage level will not go up beyond 3.3 V so it’s safe to use with a Pico.
There are two empty pads encircled in red in the picture above. The one on top is for adding a CdS Cell or Light Dependent Resistor (LDR) while the one at the lower right is for adding a thermistor. With an LDR, the PIR sensor will trigger only when it’s dark. Meanwhile, if a thermistor is added, the reduced sensitivity brought by an increase in temperature is negated.
Triggering and Timing
The PIR sensor behaves differently depending on the jumper position. When in non-repeat or single trigger mode, the DOUT pin goes high for a period of adjusted delay time set by the time delay potentiometer. After this time delay, the DOUT pin goes low for another fixed delay interval, regardless if motion is detected or not. This means that any movement between the first trigger and the end of the fixed delay is undetected.
When in repeat mode, the DOUT pin goes high when motion is detected and stays high as long as the object is still moving. In the event that motion is no longer detected, the DOUT pin stays high for a time set through the time delay potentiometer. After this, the DOUT pin goes low for a fixed delay interval before being able to detect motion again.
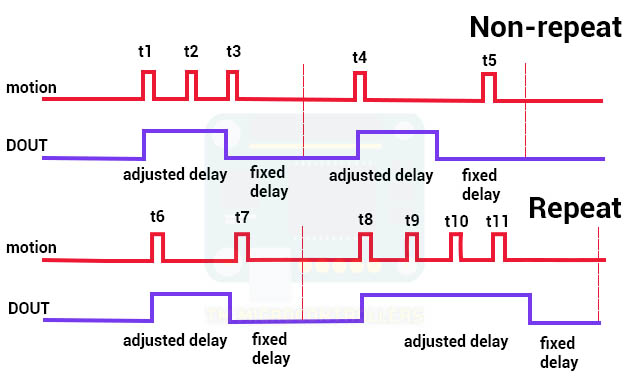
In the image above, non-repeat mode, t1 is the first motion detected. t2 and t3 are within the delay intervals and hence will not trigger the sensor. Consequently, t4 triggers the sensor and t5 does not.
In repeat mode, t6 is the first motion detected. t7 does not trigger the sensor because it is within the fixed delay interval. t9, t10, t11, which occurs after t8 triggers the sensor, extend the time delay since they occurred within the adjusted delay interval.
The BISS0001 datasheet, which is the controller on the HC-SR501 module, says that the time the DOUT pin stays high is:
, where R10 is the series combination of a 10k resistor and 10M potentiometer and C6 is 10 nF, according to the HC-SR501 datasheet. Hence, the time delay can be between 2.5 s to 4 minutes.
Meanwhile, the fixed interval where the DOUT pin goes low is:
, where R9 is a 1M resistor and C7 is a 100 nF capacitor. This means the interval where the DOUT pin stays low is around 2.4 s.
As already mentioned, the time delay can be from 2.5 seconds (fully counter-clockwise) to 4 minutes (fully clockwise). Meanwhile, the sensitivity pot adjusts how far the PIR sensor can detect. The minimum is 3 meters (fully clockwise) and the maximum is 7 meters (fully counter-clockwise).


