
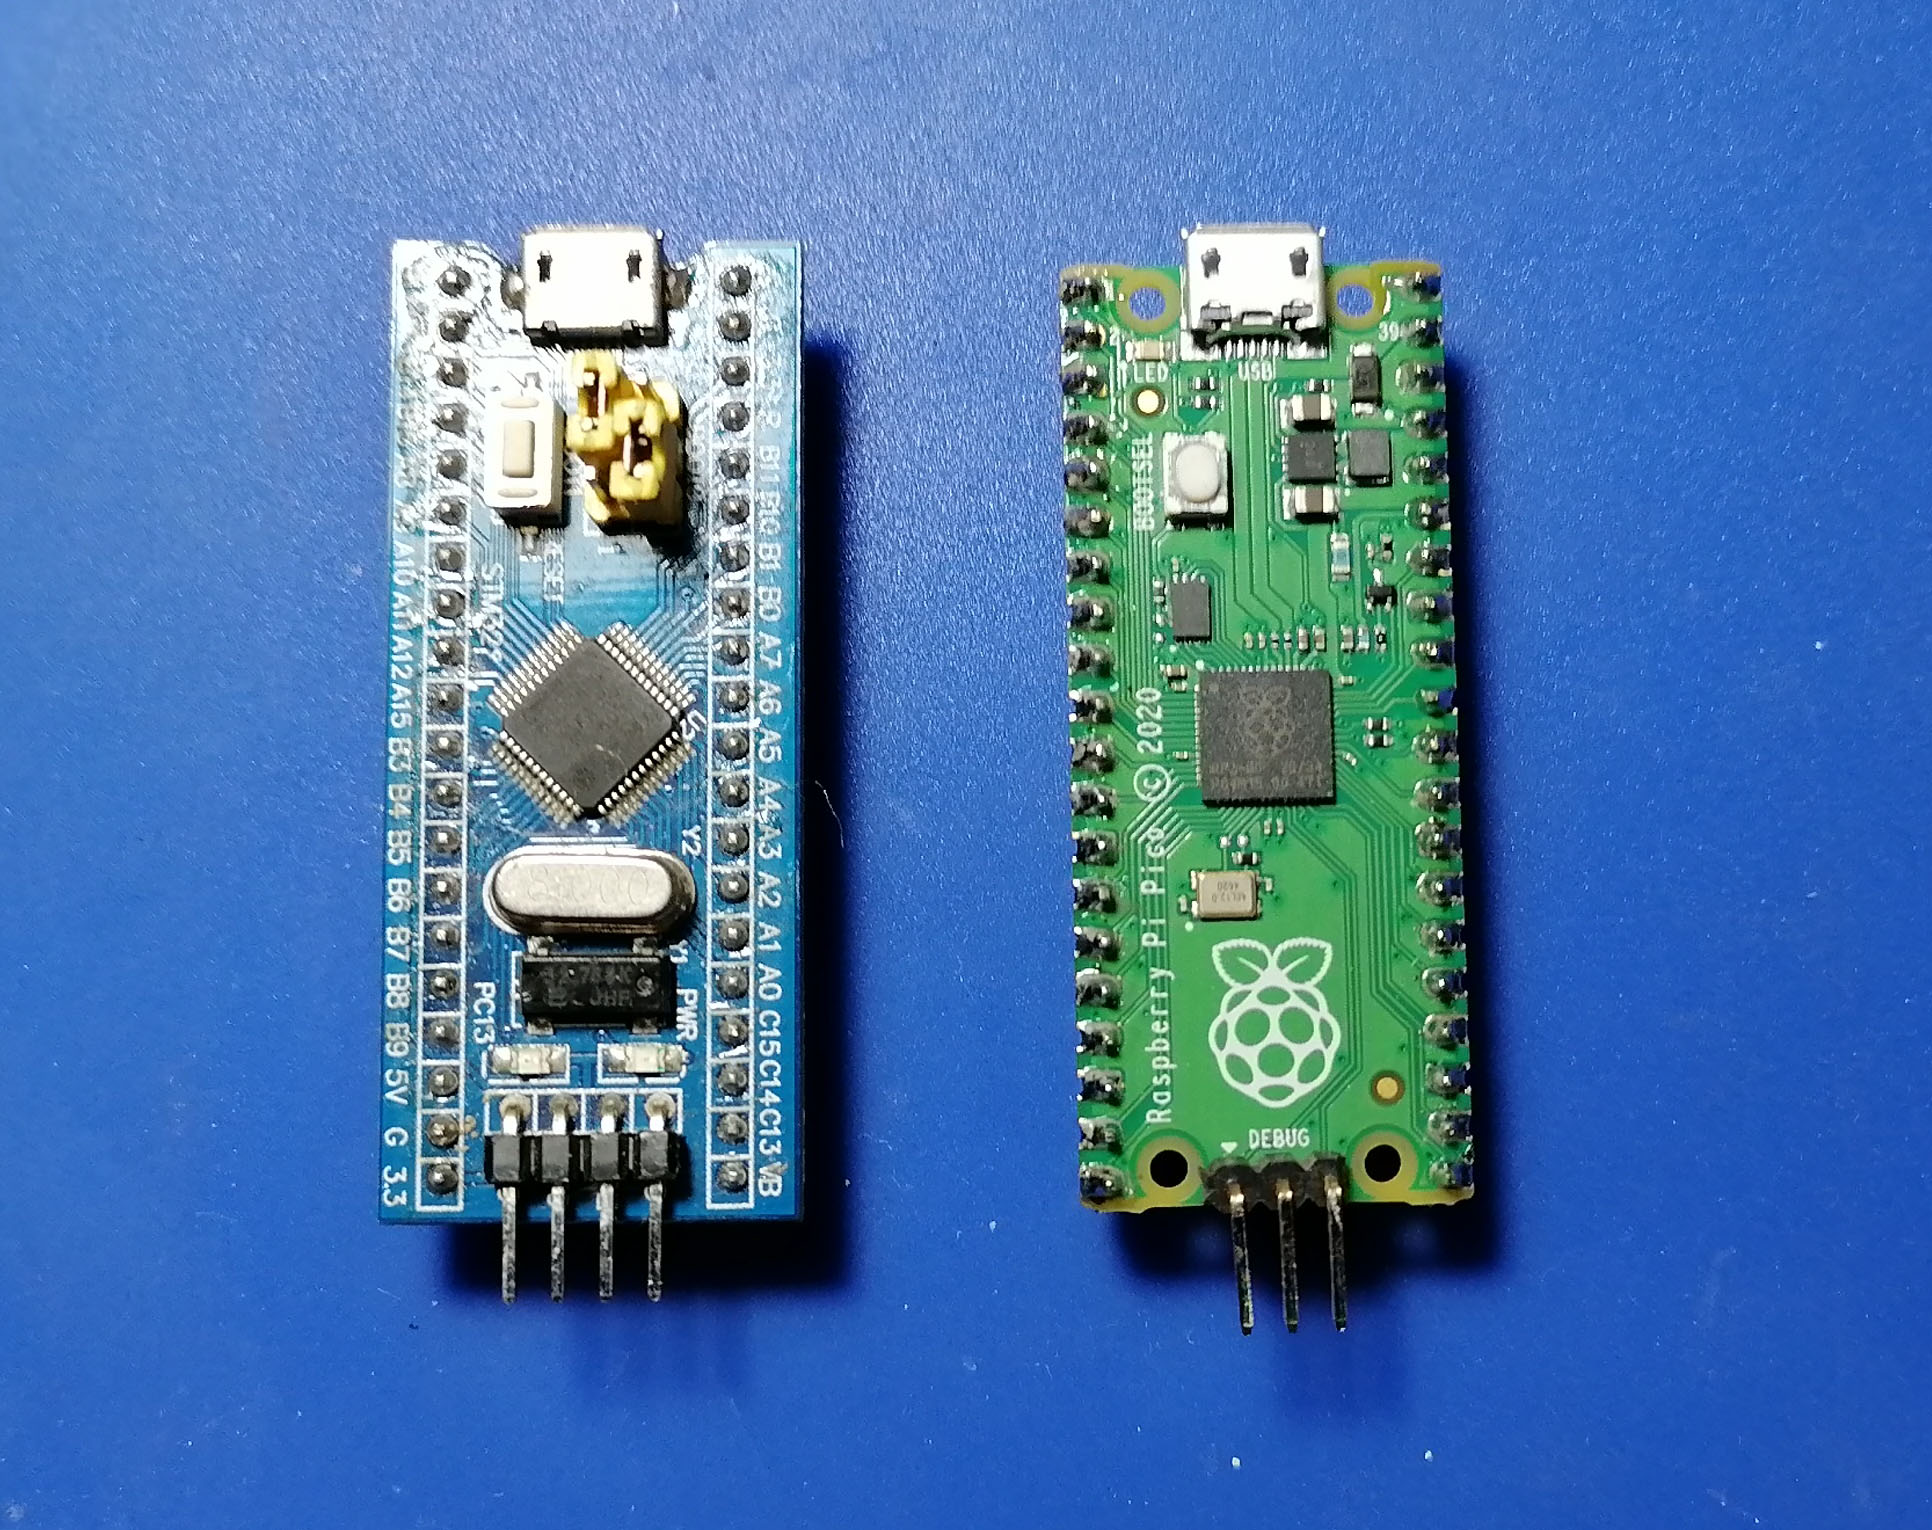
A few months after its release, I finally got a hand on the Raspberry Pi Pico. It’s a microcontroller board featuring the RP2040, but don’t expect it to be like an Arduino UNO.
In fact, it's very much like the STM32 Blue Pill not only because both are ARM microcontrollers but also, physically.
Anyway, to load a program to a Raspberry Pi Pico, you just need to drag .uf2 files to it while connected to your computer via microUSB cable. Or, you can upload using SWD, just like the STM32F4. Loading a program is easy, it’s building one on a Windows machine that’s slightly hard. This tutorial is a simple guide on building a C/C++ code for the Raspberry Pi Pico.
Requirements
- Visual Studio with Build Tools for C++
- CMake
- GNU ARM Embedded Tool
- Python 3
- Raspberry Pi Pico SDK
- An IDE of your choice (e.g. Visual Studio Code)
Add Variables to PATH
After installing all of the above, check if both CMake and Nmake are in your environment variables. Press windows key + R to open the Run dialog and paste: rundll32.exe sysdm.cpl,EditEnvironmentVariables. Check the Path variables for both user and system and see if the following locations are there:
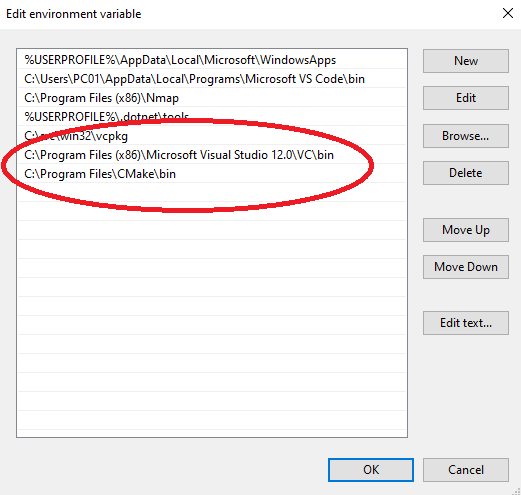
If not, then just add the above to the Path variable in both user and system variables.
Raspberry Pi Pico Code Structure
For this example, you'll need the following files:
- blink.c
- main CMakeLists
- source file CMakeLists
- folders blink and build
we will write (or copy) a short C code that flashes the onboard LED on the Raspberry Pi Pico. Create the following in the IDE of your choice:
#include "pico/stdlib.h"

int main() {
#ifndef PICO_DEFAULT_LED_PIN
#warning blink example requires a board with a regular LED
#else
    const uint LED_PIN = PICO_DEFAULT_LED_PIN;
    gpio_init(LED_PIN);
    gpio_set_dir(LED_PIN, GPIO_OUT);
    while (true) {
        gpio_put(LED_PIN, 1);
        sleep_ms(250);
        gpio_put(LED_PIN, 0);
        sleep_ms(250);
    }
#endif
}
We’ll name it blink.c, and then put it inside a folder named blink. On that same folder, we create a CMakeLists.txt file, which will be used by CMake for building the code above. The CMakeLists.txt contains the following:
add_executable(blink
        blink.c
        )

# Pull in our pico_stdlib which pulls in commonly used features
target_link_libraries(blink pico_stdlib)

# create map/bin/hex file etc.
pico_add_extra_outputs(blink)

# add url via pico_set_program_url
example_auto_set_url(blink)
Learn more about CMake here.
Next, we create a project folder named Blink_project. We then place the blink folder inside this and then another CMakeLists.txt with the following text:
cmake_minimum_required(VERSION 3.13)

set (ENV{PICO_SDK_PATH} "D:/pico-sdk")
set (ENV{PICO_TOOLCHAIN_PATH} "C:/Program Files (x86)/GNU Arm Embedded Toolchain/10 2020-q4-major/bin")

# initialize the SDK based on PICO_SDK_PATH
# note: this must happen before project()
include(pico_sdk_import.cmake)

enable_language( C CXX ASM )

project(Blink_project)

# initialize the Raspberry Pi Pico SDK
pico_sdk_init()

# rest of your project
add_subdirectory(blink)
Notice that we have specified two file paths above, one for PICO_SDK_PATH and PICO_TOOLCHAIN_PATH. The first one should point at the location of your Raspberry Pi Pico SDK (uncompressed) and the other should point to your GNU ARM Embedded toolchain.
Next, create an empty folder named build.
Then finally, copy the file pico_sdk_import.cmake from inside the pico_sdk/external folder and paste it inside the Blink_project folder.
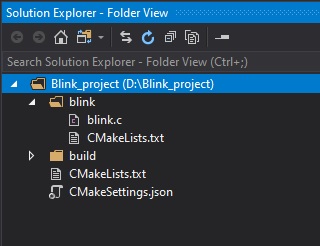
By now, this should be the structure of your project:
Blink_project
|   CMakeLists.txt
|   pico_sdk_import.cmake
|
+---blink
|       blink.c
|       CMakeLists.txt
|
\---build
After setting up the project, it’s time to build!
Building and Compiling the Code
Open Developer Command Prompt (windows key, then type developer in search box). Change directory to the build folder inside the project directory.
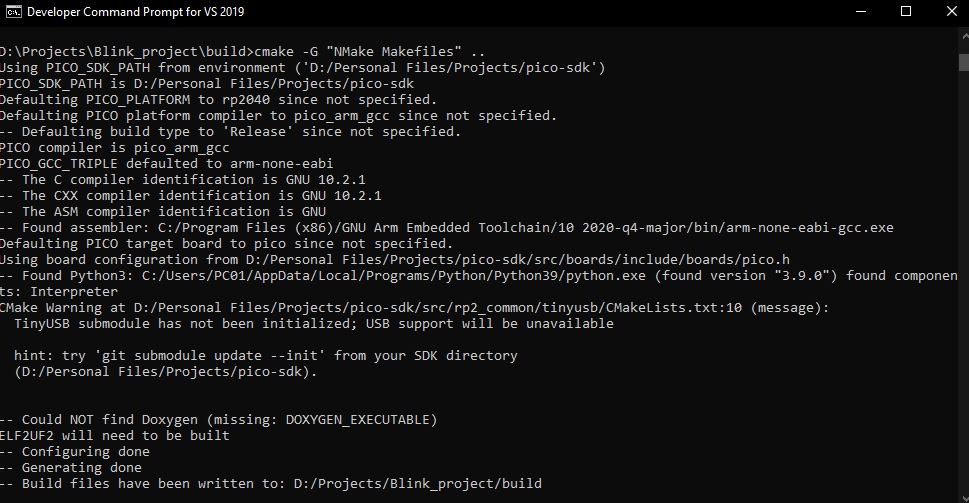
C:\Program Files (x86)\Microsoft Visual Studio\2019\Community>cd /d "D:\Projects\Blink_project\build"
Next, build using CMake
D:\Projects\Blink_project\build>cmake -G "NMake Makefiles" ..
After that, build files will now be inside the build folder. But we are not done yet! Remember that the Raspberry Pi Pico needs binaries and no binaries have been created.
To create the binaries from the source and build files, run make inside the same directory:
D:\Projects\Blink_project\build>nmake
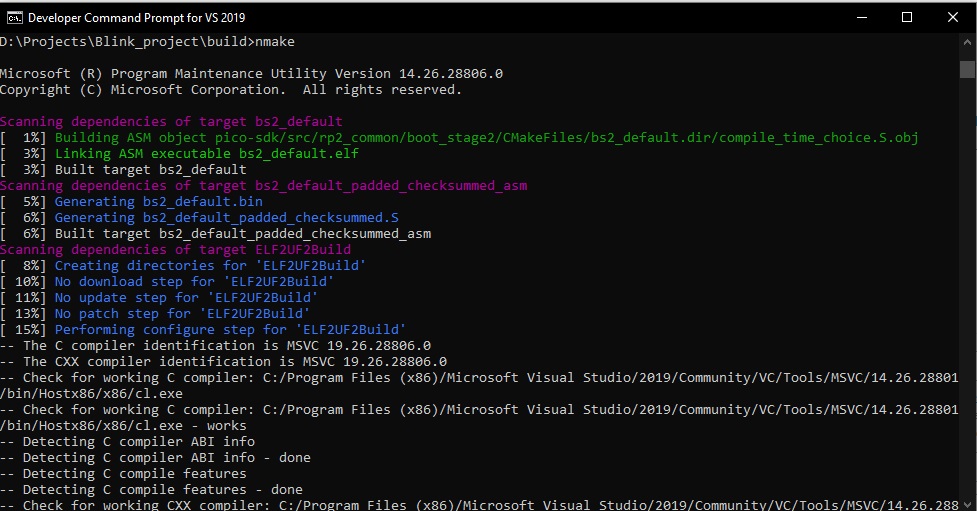
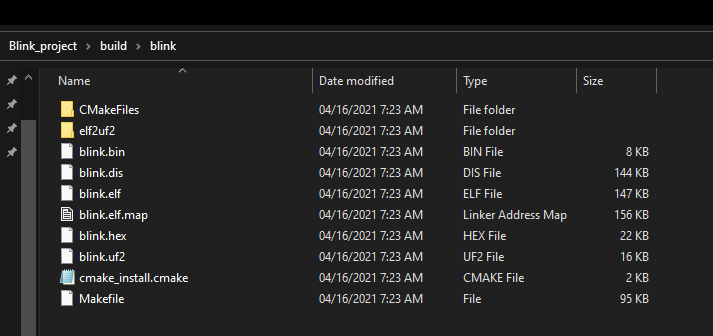
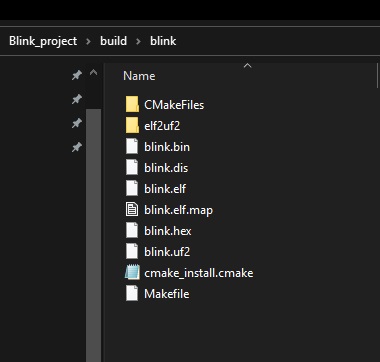
If the above command is successful, the binary files are now inside build/blink folder.
Building with Visual Studio 2019
You can also build files and binaries using Visual Studio 2019.
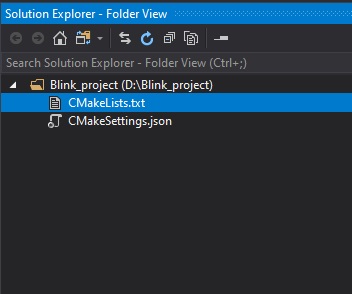
Open a New Project on VS 2019. If you installed the C++ Build Tools, an option for building through CMAKE will appear.

Name your project. Then in Solution Explorer, delete everything that can be deleted. These should be the only ones left:
Then, we will follow the same file structure as before, changing the CMakeLists.txt to the ones above.
However, VS 2019 adds another (and important) file CMakeSettings.json. This houses the settings we need to compile the files correctly for the Raspberry Pi Pico.
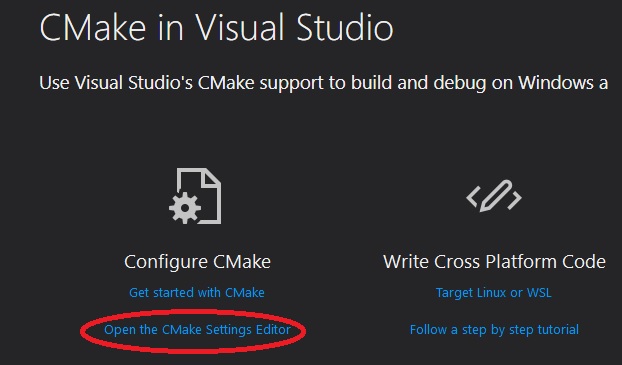
If CMakeSettings.json is missing from your project, close VS 2019, open it again and load the project folder. Then click Open the CMake Settings Editor:
In solution explorer, right-click on the CMakeSettings.json file, click Open With.., and choose JSON Editor.
Replace what’s inside the CMakeSettings.json file with the following:
{
  "configurations": [
    {
      "name": "RaspberryPiPico",
      "generator": "NMake Makefiles",
      "configurationType": "Release",
      "buildRoot": "${projectDir}\\build\\",
      "variables": [
        {
          "name": "CMAKE_TOOLCHAIN_FILE",
          "value": "D:\\pico-sdk\\cmake\\preload\\toolchains\\pico_arm_gcc.cmake",
          "type": "FILEPATH"
        }
      ]
    }
  ]
}
Make sure to change D: \\pico-sdk above to the location of your SDK folder. Save the file and VS 2019 will automatically try to create the build files. If everything’s good, you can now start creating binaries.
Still on VS 2019, click Tools > Command Line > Developer Command Prompt.
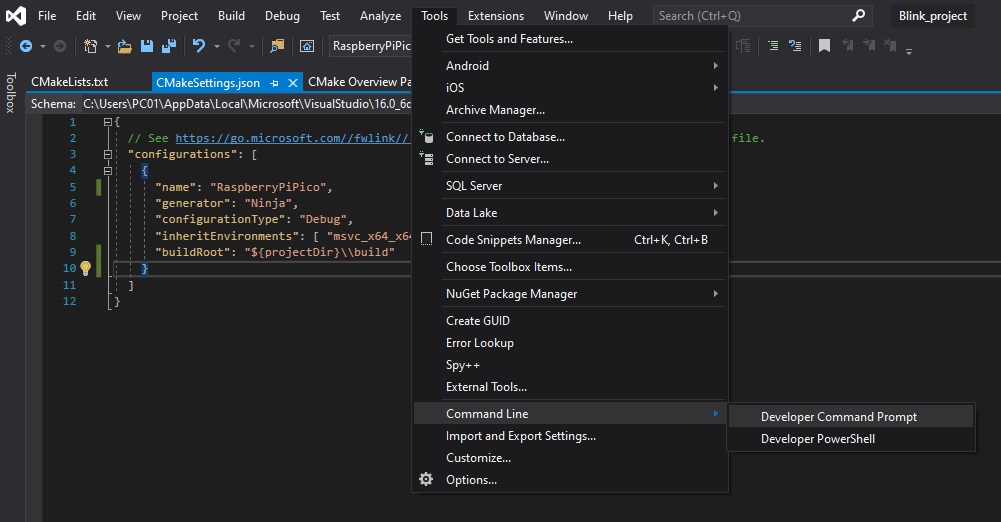
Change directory to the build folder, and then run nmake as before.
D:\Blink_project>cd build

D:\Blink_project\build>nmake
The binaries will now be inside the folder <Project Name>/build/<src file>/:
Now you can plug in your Raspberry Pi Pico where it will appear as a removable drive. Then, drag the .uf2 file and that's it! You've programmed your Pico on Windows.


