
SPIFFS or Serial Peripheral Interface Flash File System is a system that utilizes extra flash memory on the ESP8266 and ESP32 for storing files. It’s so named because the user reads, writes or deletes files in the memory using the serial interface. In this article, I will show you how to set up SPIFFS for your NodeMCU or WeMos D1 Mini board. Also, an example is presented on how to take advantage of this feature.
Video Tutorial
Why Use SPIFFS?
In my NodeMCU web server article, I used a sketch that presents a simple web page for controlling an external LED.
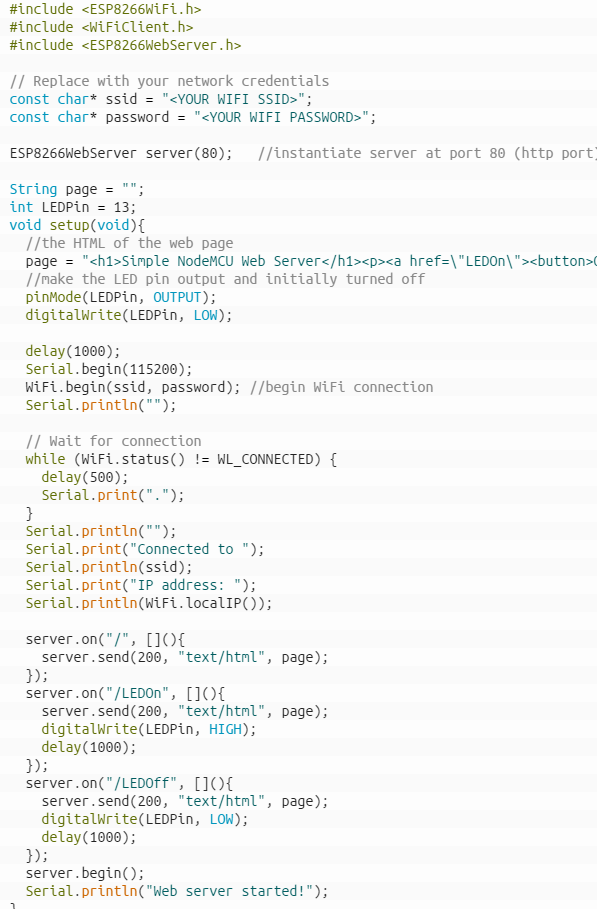
When this sketch is uploaded to an ESP8266 board, the server page is now viewable in the local network through the device's IP address. This how to server page looks like on a desktop browser:
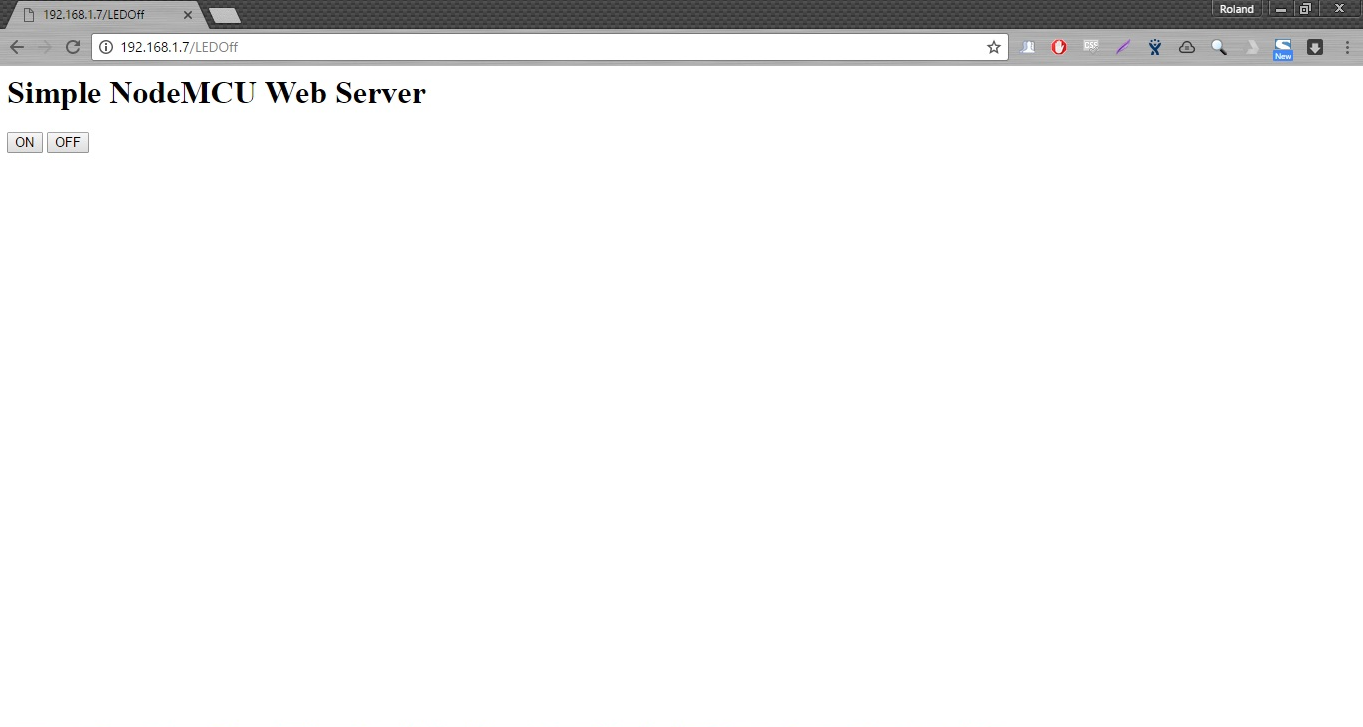
Clicking the ON button turns on the LED while the OFF button turns off the LED. It looks super simple because the HTML for this page is just this:
<h1>Simple NodeMCU Web Server</h1>
<p>
  <a href=\"LEDOn\"><button>ON</button></a>
  <a href=\"LEDOff\"><button>OFF</button></a>
</p>
A much better looking web page is one with styling, images or scripts. We could do that but we are always mindful of the memory limitations of the ESP8266. Defining a long HTML in sketch means using a long string which jumps from one memory location to another for every compilation. This proves an inefficient memory management scheme and more likely to crash your ESP8266.
The best solution is to store the page files outside of the sketch memory location. The ESP8266 flash memory has the following allocations for the Arduino platform:
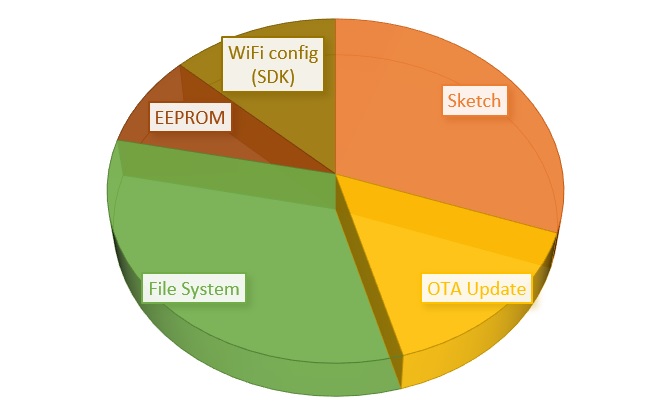
Note that the File System and EEPROM size may vary as per user allocation. You can use EEPROM to store data but it still limited. The SPIFFS (File System) size, in contrast, is up to 3 MB. That’s 75% of the total flash size of the ESP8266.
Setting up SPIFFS
To start using SPIFFS, download this file: https://github.com/esp8266/arduino-esp8266fs-plugin/releases/download/0.5.0/ESP8266FS-0.5.0.zip
Inside this zip file is a folder named ESP8266FS. Extract this to /tools inside your Arduino sketchbook location. Create the tools folder if you don’t have one. By default, the sketchbook location is at Documents/Arduino for Windows and Mac or /home/Sketchbook for Linux.
After this, open your Arduino IDE. A new option should appear in Tools:
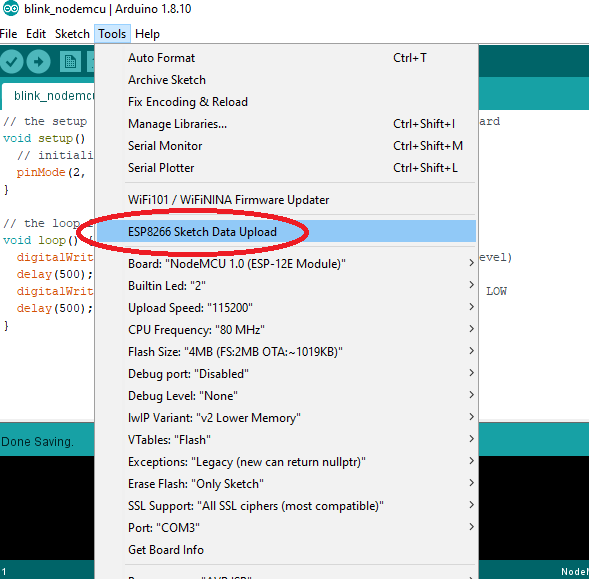
This tool allows you to add files to your device’s SPIFFS. To add the files, open or create a sketch and place a data folder inside the sketch folder. For example, if I would add an HTML file, that html file is inside a data folder in the same location as my .ino file.

To store the contents of the data folder to SPIFFS, just click the Tools > ESP8266 Sketch Data Upload. Of course you’ll still need to upload the sketch to your NodeMCU because that’s in another location.
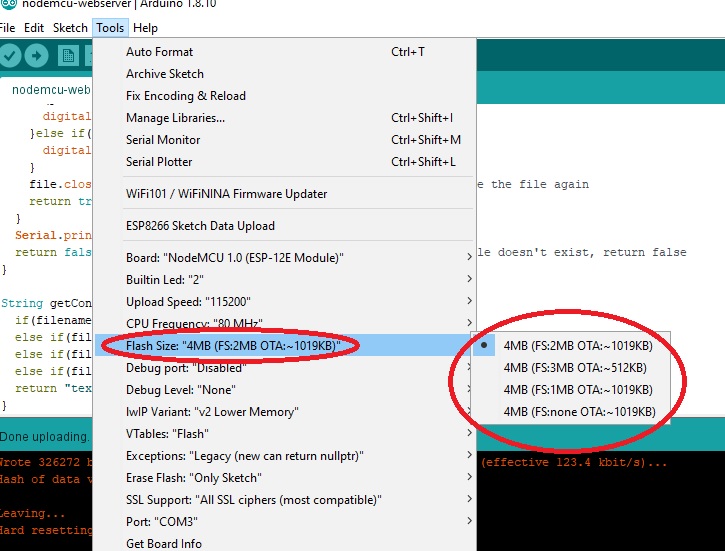
In addition, you can specify how much memory you want to allocate to SPIFFS. This is one of the options as you select your ESP8266 board type:
Modifying the Simple Web Server Page
Now that we have SPIFFS set up, we modify the old HTML to make it more pleasing. I created three HTML pages: index.html, LEDOn.html, LEDOff.html. I also added some images and a css file for styling. These are all the contents of my data folder:

When writing HTML, it’s best to code it on text-editor first and view it on a local browser. This way, you can finalize what the pages look like before uploading them to SPIFFS. Here’s my index.html file:
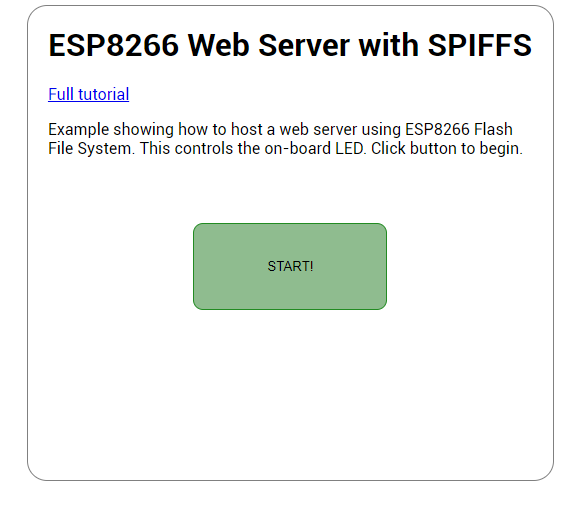
<html>
<head>
<meta name='viewport' content='width=device-width, initial-scale=1.0'>
<link rel='stylesheet' href='style.css'>
</head>
<body>
      <h1>ESP8266 Web Server with SPIFFS</h1>
      <p><a href='https://www.teachmemicro.com/esp8266-spiffs-web-server-nodemcu/'>Full tutorial</a></p>
      <p> Example showing how to host a web server using ESP8266 Flash File System. This controls the on-board LED. Click button to begin.</p>
      <a href="LEDOff.html"><button id='start-button'>START!</button></a>
</body>
</html>
This is the first file the client reads on the server.
Here’s the LEOn and LEDOff html files:
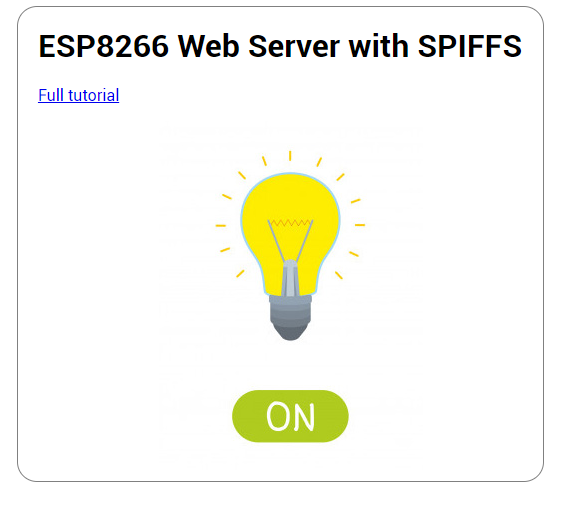
html>
<head>
<meta name='viewport' content='width=device-width, initial-scale=1.0'>
<link rel='stylesheet' href='style.css'>
</head>
<body>
      <h1>ESP8266 Web Server with SPIFFS</h1>
      <p><a href='https://www.teachmemicro.com/esp8266-spiffs-web-server-nodemcu/'>Full tutorial</a></p>
      <a href="LEDOff.html"><img id="LED-ON" src="led-on-img.jpg"></a>
</body>
</html>
<html>
<head>
<meta name='viewport' content='width=device-width, initial-scale=1.0'>
<link rel='stylesheet' href='style.css'>
</head>
<body>
      <h1>ESP8266 Web Server with SPIFFS</h1>
      <p><a href='https://www.teachmemicro.com/esp8266-spiffs-web-server-nodemcu/'>Full tutorial</a></p>
      <a href="LEDOn.html"><img id="LED-OFF" src="led-off-img.jpg"></a>
</body>
</html>
Here's my CSS file:
body{
  background-color:white;
  font-family: 'Roboto', sans-serif;
  border: 1px solid;
  border-color: gray;
  border-radius: 20px;
  margin-left: 35%;
  width: 30%;
  height: 50%;
  padding: 20px;
}

#LED-ON, #LED-OFF{
  margin-left: 25%;
}

#start-button{
  width: 40%;
  height: 20%;
  background-color: darkseagreen;
  border: 1px solid forestgreen;
  border-radius: 10px;
  margin-left: 30%;
  margin-top: 10%;
}
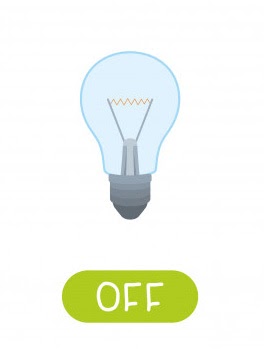
The two images are for showing on and off bulbs:

All in all these files are around 56 kB. Still too small for our 3 MB SPIFFS!
As for the sketch, there are also some changes to the original.
/*

ESP8266 WiFi Server with SPIFFS
by Roland Pelayo

Full tutorial: https://www.teachmemicro.com/esp8266-spiffs-web-server-nodemcu/

Rev 1.0 - Initial code - September 19, 2020

*/

//Declare libraries
#include <ESP8266WiFi.h>
#include <WiFiClient.h>
#include <ESP8266WebServer.h>
#include <FS.h>

//provide your own WiFi SSID and password
const char* ssid = "<Your WiFi SSID>";
const char* password = "<Your WiFi Password>";

//Create WebServer instance
ESP8266WebServer server(80);

void setup() {
  //Setup on-board LED
  pinMode(2, OUTPUT);
  //For debugging
  Serial.begin(115200);
  //Initiate WiFi Connection
  WiFi.begin(ssid, password);
  Serial.println("");
  // Wait for connection
  while (WiFi.status() != WL_CONNECTED) {
    delay(500);
    Serial.print(".");
  }
  Serial.println("");
  Serial.print("Connected to ");
  //Print your WiFi's SSID (might be insecure)
  Serial.println(ssid);
  Serial.print("IP address: ");
  //Print your local IP address (needed for browsing the app)
  Serial.println(WiFi.localIP());

  if(!SPIFFS.begin())
  {
    // Serious problem
    Serial.println("SPIFFS Mount failed");
  } else {
    Serial.println("SPIFFS Mount succesfull");
  }

  server.onNotFound([]() { // If the client requests any URI
    if (!handleFileRead(server.uri())) // send it if it exists
      server.send(404, "text/plain", "404: Not Found"); // otherwise, respond with a 404 (Not Found) error
  });

  //start web server
  server.begin();
  //Just stating things
  Serial.println("HTTP server started");
}

void loop() {
  server.handleClient(); //make the ESP32 respond to web clients
}

bool handleFileRead(String path) { // send the right file to the client (if it exists)
  Serial.println("handleFileRead: " + path);
  if (path.endsWith("/")) path += "index.html"; // If a folder is requested, send the index file
  String contentType = getContentType(path); // Get the MIME type
  if (SPIFFS.exists(path)) { // If the file exists
    File file = SPIFFS.open(path, "r"); // Open it
    size_t sent = server.streamFile(file, contentType); // And send it to the client
    if(path == "/LEDOn.html"){
      digitalWrite(2, LOW);
    }else if(path == "/LEDOff.html"){
      digitalWrite(2, HIGH);
    }
    file.close(); // Then close the file again
    return true;
  }
  Serial.println("\tFile Not Found");
  return false; // If the file doesn't exist, return false
}

String getContentType(String filename){
  if(filename.endsWith(".htm")) return "text/html";
  else if(filename.endsWith(".html")) return "text/html";
  else if(filename.endsWith(".css")) return "text/css";
  else if(filename.endsWith(".jpg")) return "image/jpeg";
  return "text/plain";
}
First is the inclusion of the FS library:
#include <FS.h>
This already comes with the ESP8266 core so no need to install it.
Then we start SPIFFS like this:
if (!SPIFFS.begin())
{
  // Serious problem
  Serial.println("SPIFFS Mount failed");
} else {
  Serial.println("SPIFFS Mount succesfull");
}
This way, if SPIFFS fail, we will know via serial monitor.
We will not be using server.on() as before. Instead, we’ll do the opposite:
server.onNotFound([]() { // If the client requests any URI
  if (!handleFileRead(server.uri())) // send it if it exists
    server.send(404, "text/plain", "404: Not Found"); // otherwise, respond with a 404 (Not Found) error
});
The way the server works now is that it will search for files that a client requests. When the client accesses a URL on the server, the file associated with that URL is read from SPIFFS. If the file is not found, a “404:Not Found” is shown on the page. File reading is in a function I call handleFileRead():
bool handleFileRead(String path) { // send the right file to the client (if it exists)
  Serial.println("handleFileRead: " + path);
  if (path.endsWith("/")) path += "index.html"; // If a folder is requested, send the index file
  String contentType = getContentType(path); // Get the MIME type
  if (SPIFFS.exists(path)) { // If the file exists
    File file = SPIFFS.open(path, "r"); // Open it
    size_t sent = server.streamFile(file, contentType); // And send it to the client
    if(path == "/LEDOn.html"){
       digitalWrite(2, LOW);
    }else if(path == "/LEDOff.html"){
       digitalWrite(2, HIGH);
    }
    file.close(); // Then close the file again
    return true;
  }
  Serial.println("\tFile Not Found");
  return false;
}
This is also where we control the LED. When the user accesses the file LEDOn.html, we turn on the LED by making it LOW (the LED is active LOW). Alternatively, when the user accesses the file LEDOff.html, we turn off the LED.
You’ll also notice this function:
String getContentType(String filename){
  if(filename.endsWith(".htm")) return "text/html";
  else if(filename.endsWith(".html")) return "text/html";
  else if(filename.endsWith(".css")) return "text/css";
  else if(filename.endsWith(".jpg")) return "image/jpeg";
  return "text/plain";
}
This returns the MIME type of the file being accessed. This is important as browsers need to know what type of file they are presenting. This is similar to how operating systems view different file extensions.
Upload the sketch, open the serial monitor to acquire the IP address and use that in your browser. This should appear:
Click START and you’ll be on the LEDOff page:
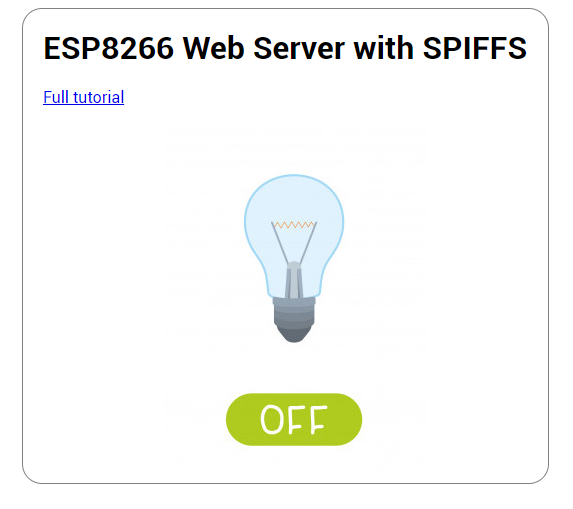
Click the bulb image to turn on the on-board LED!
With a dedicated file system, we have improved our basic ESP8266 web server!


