

Most of the time, the data from a sensor in an IoT application needs to be recorded. This data logging is important for later statistical analysis now most popularly known as data analytics. In this tutorial, we will record the data captured from the sensor to a spreadsheet. Let's build a NodeMCU ESP8266 Google Sheets data logger!
We will be using the same circuit we used in the last tutorial. The new things we need for this tutorial are
- Pushingbox account
- Google Drive account
Pushingbox is an API that will help capture data from the NodeMCU to the Google Sheet. It is necessary because Google does not allow direct logging via HTTP ever since its move to HTTPS.
Step 1: Create a Blank Spreadsheet]
Log-in to your Google Drive account. Create a blank spreadsheet and name it.
Step 2: Create a Form
Next, create a new form. Place a "short answer text" as an input field. Then on the upper right corner, click the preview button. This will open a new window.
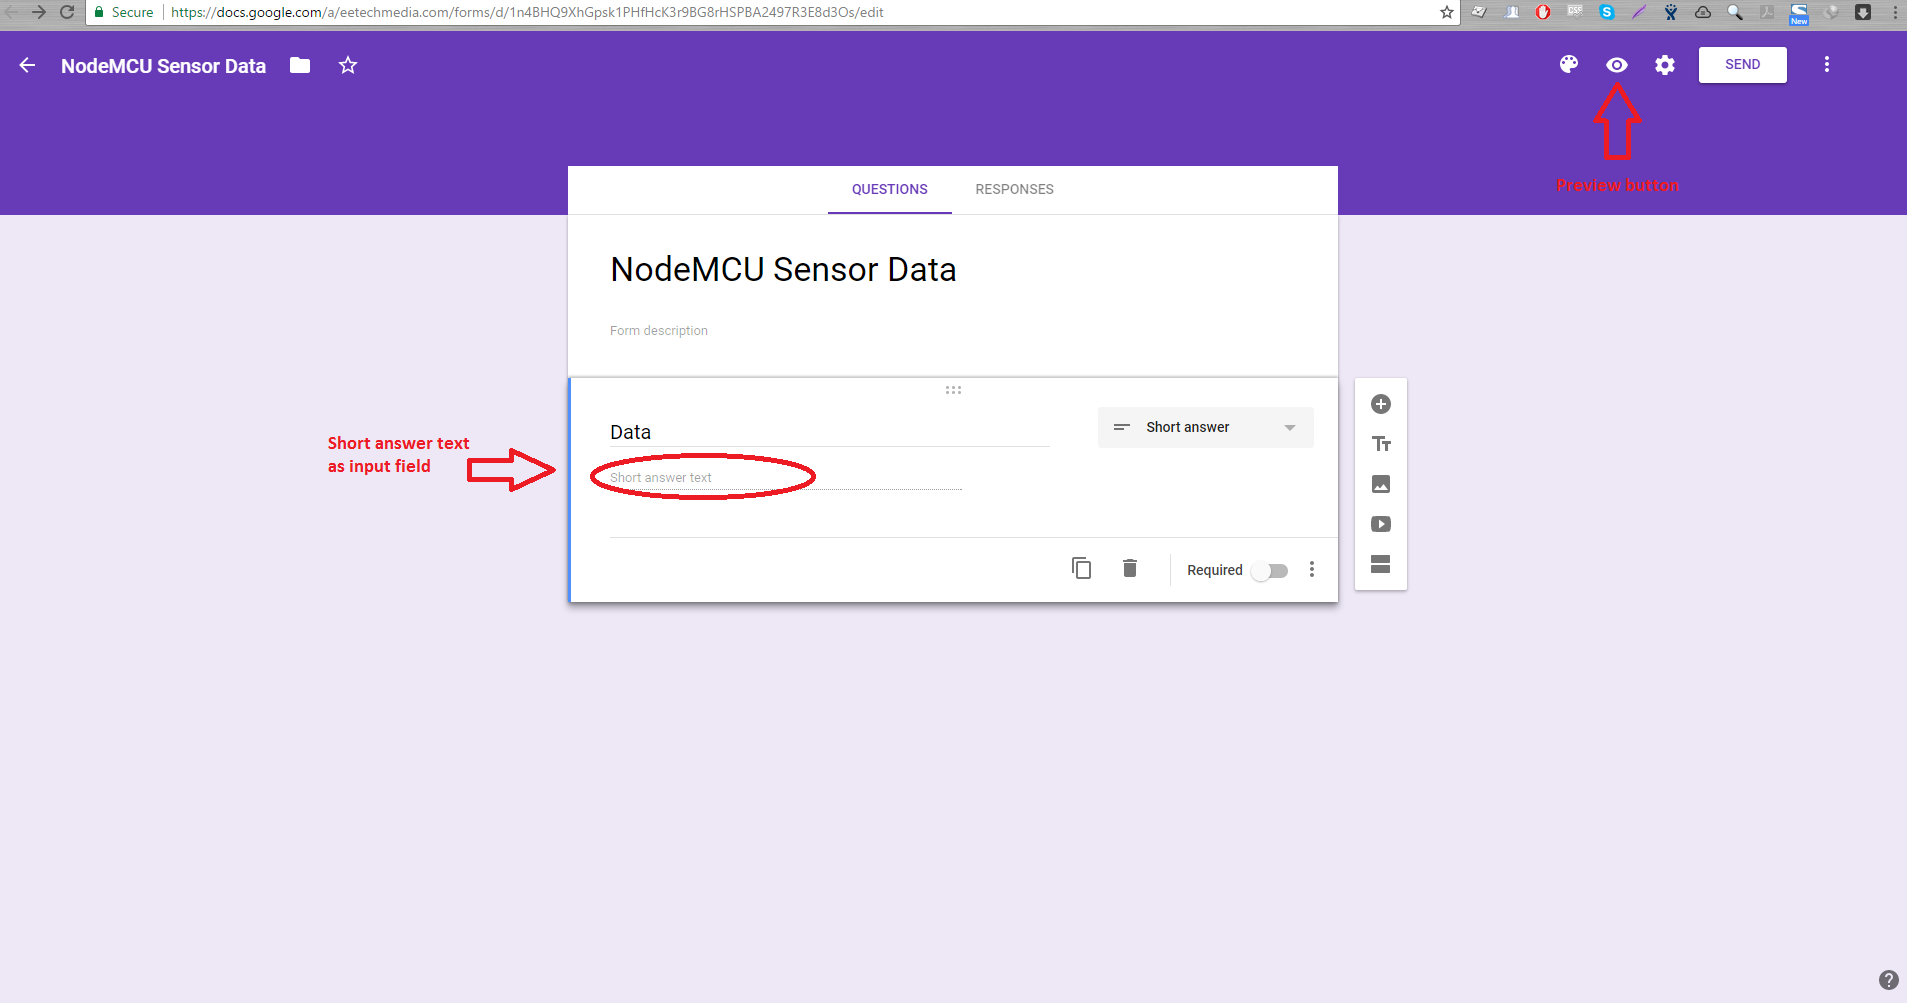
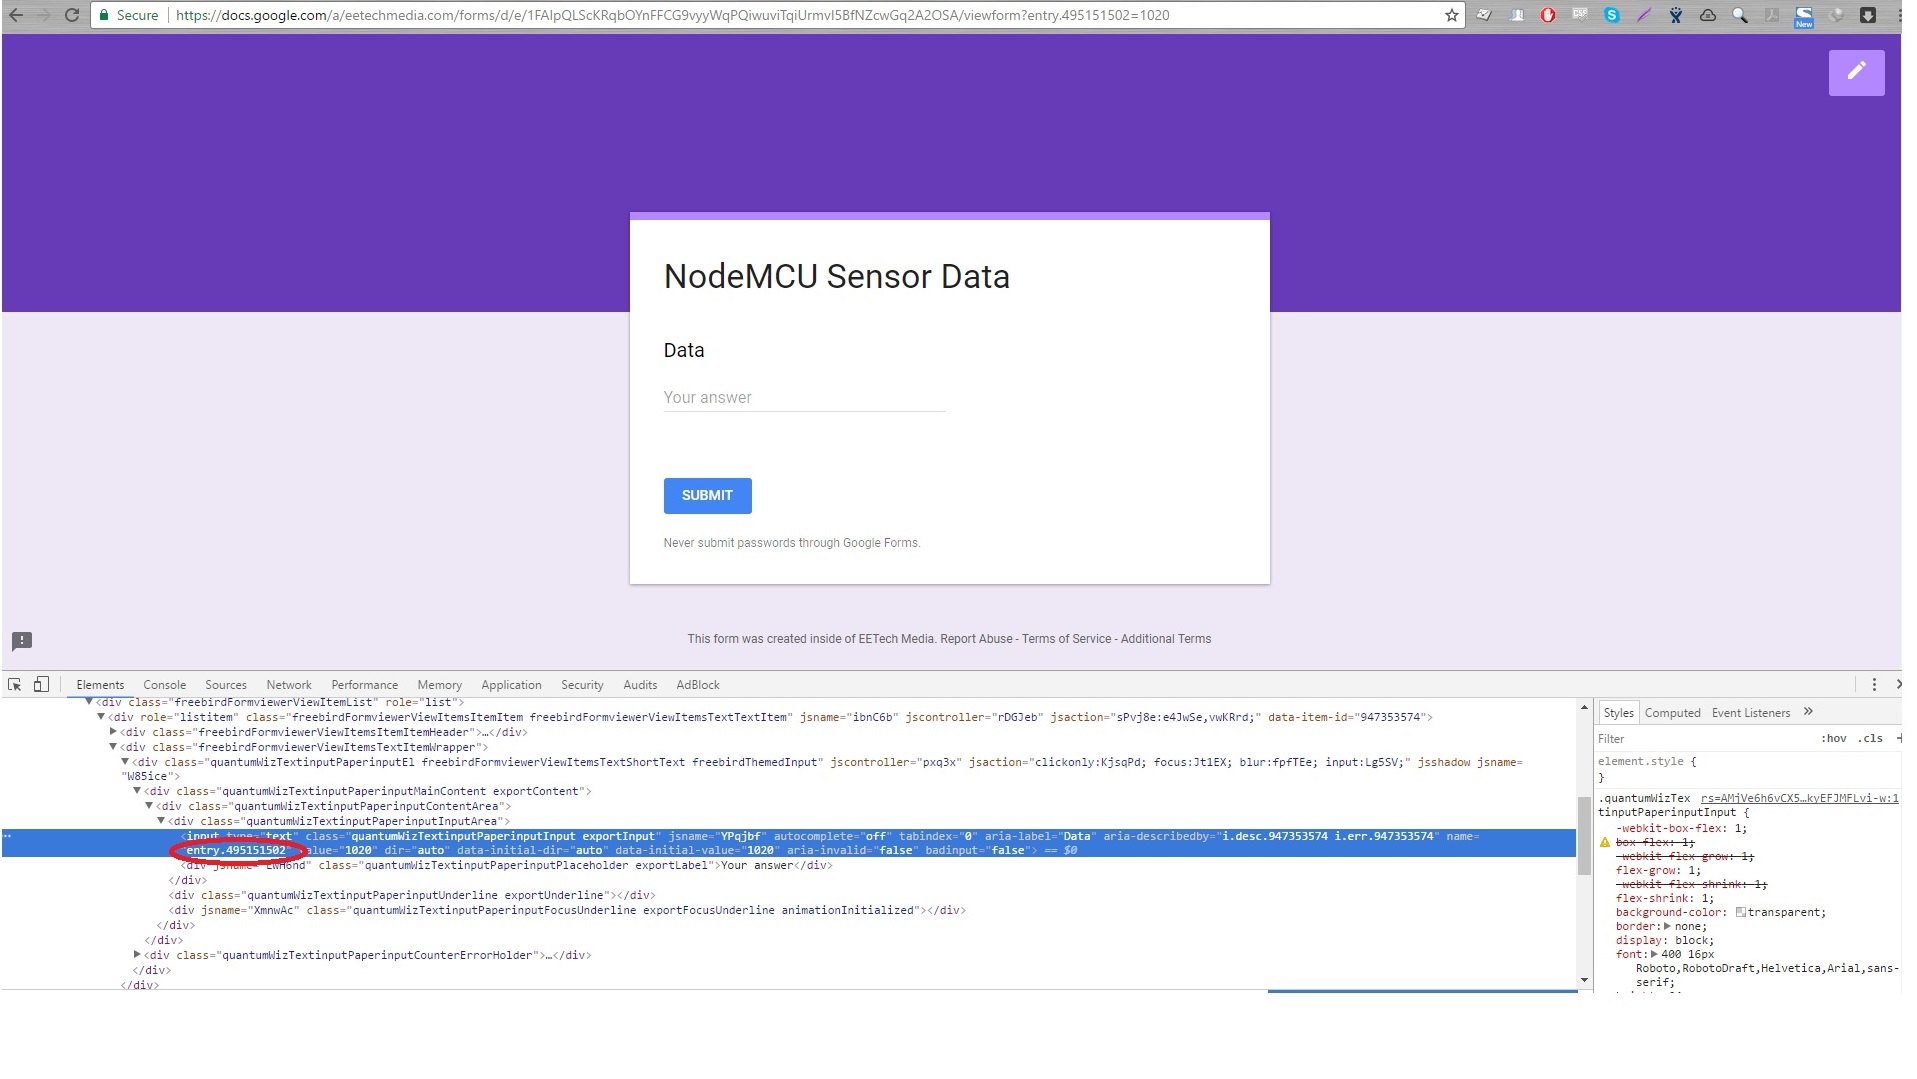
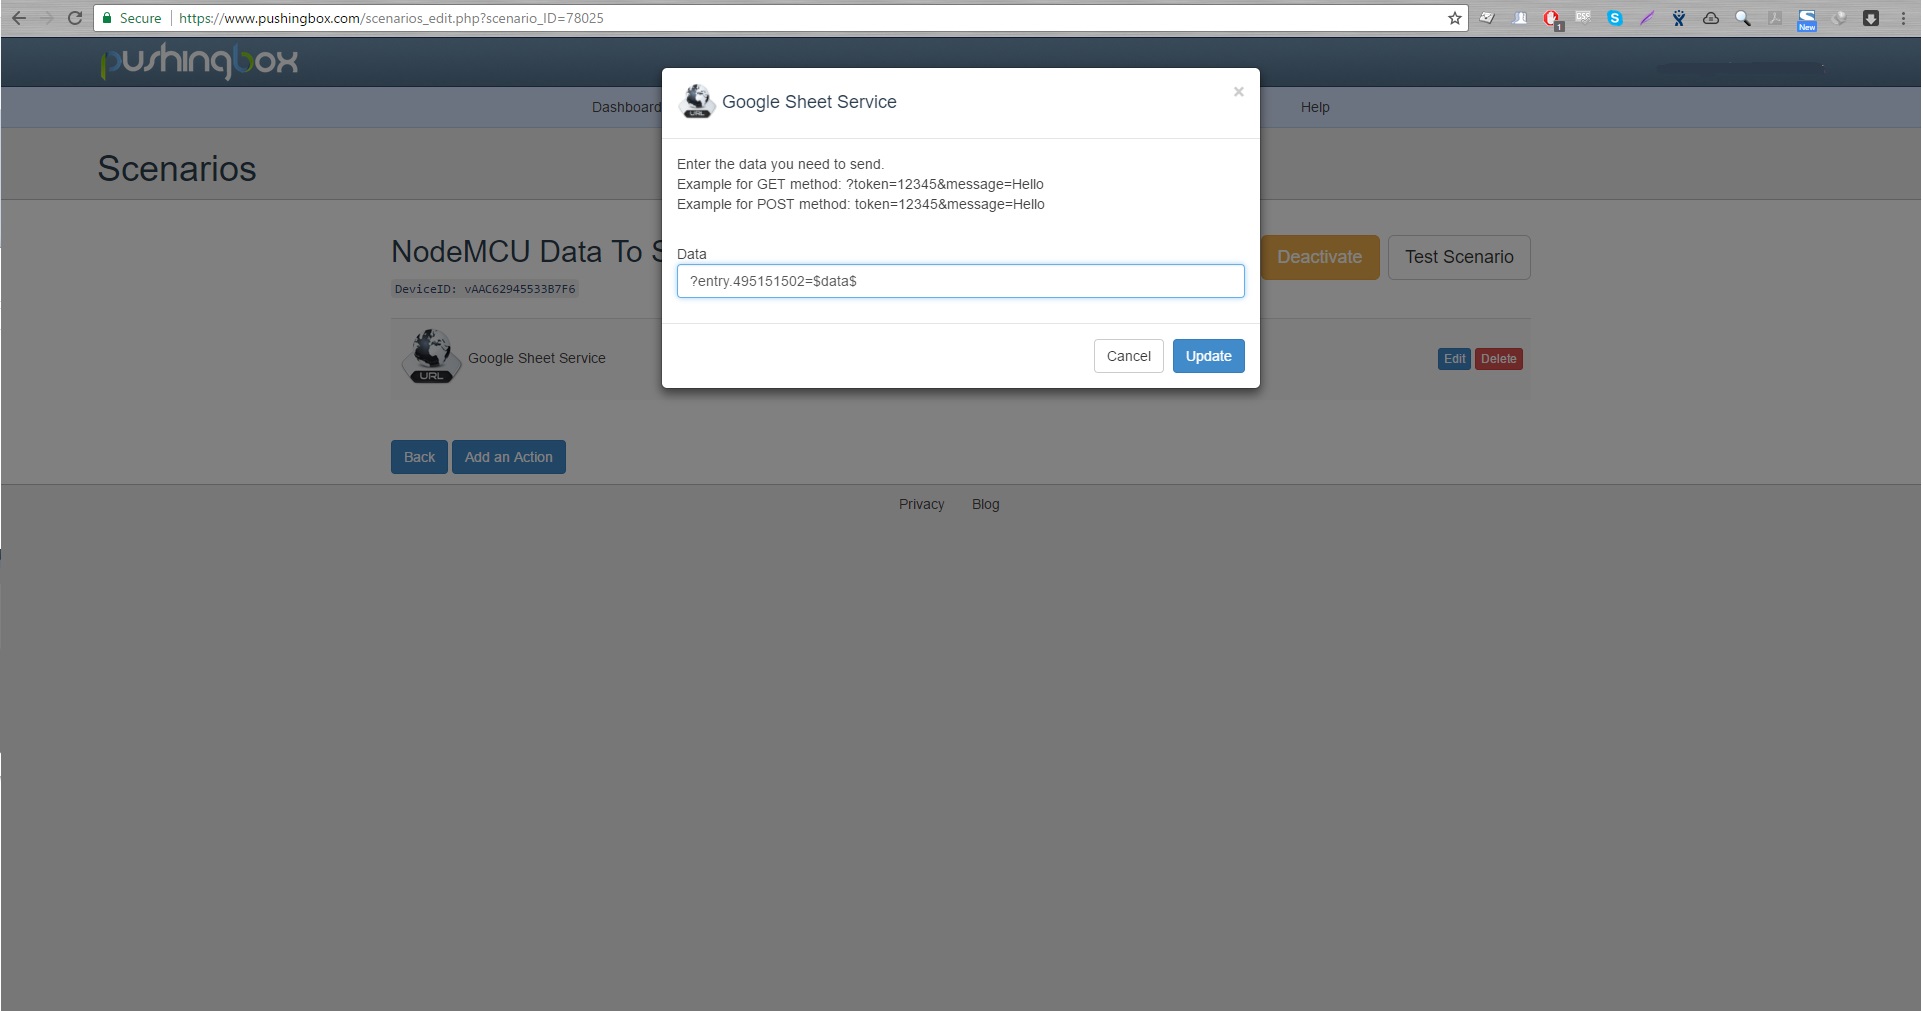
Get the URL of the newly opened window. For example, mine's: the url of this link. Then right-click on the input field you just created and choose "Inspect". On the "Elements" tab, you will acquire the name of the input field. Mine's entry.495151502 as pictured. We need this for later.
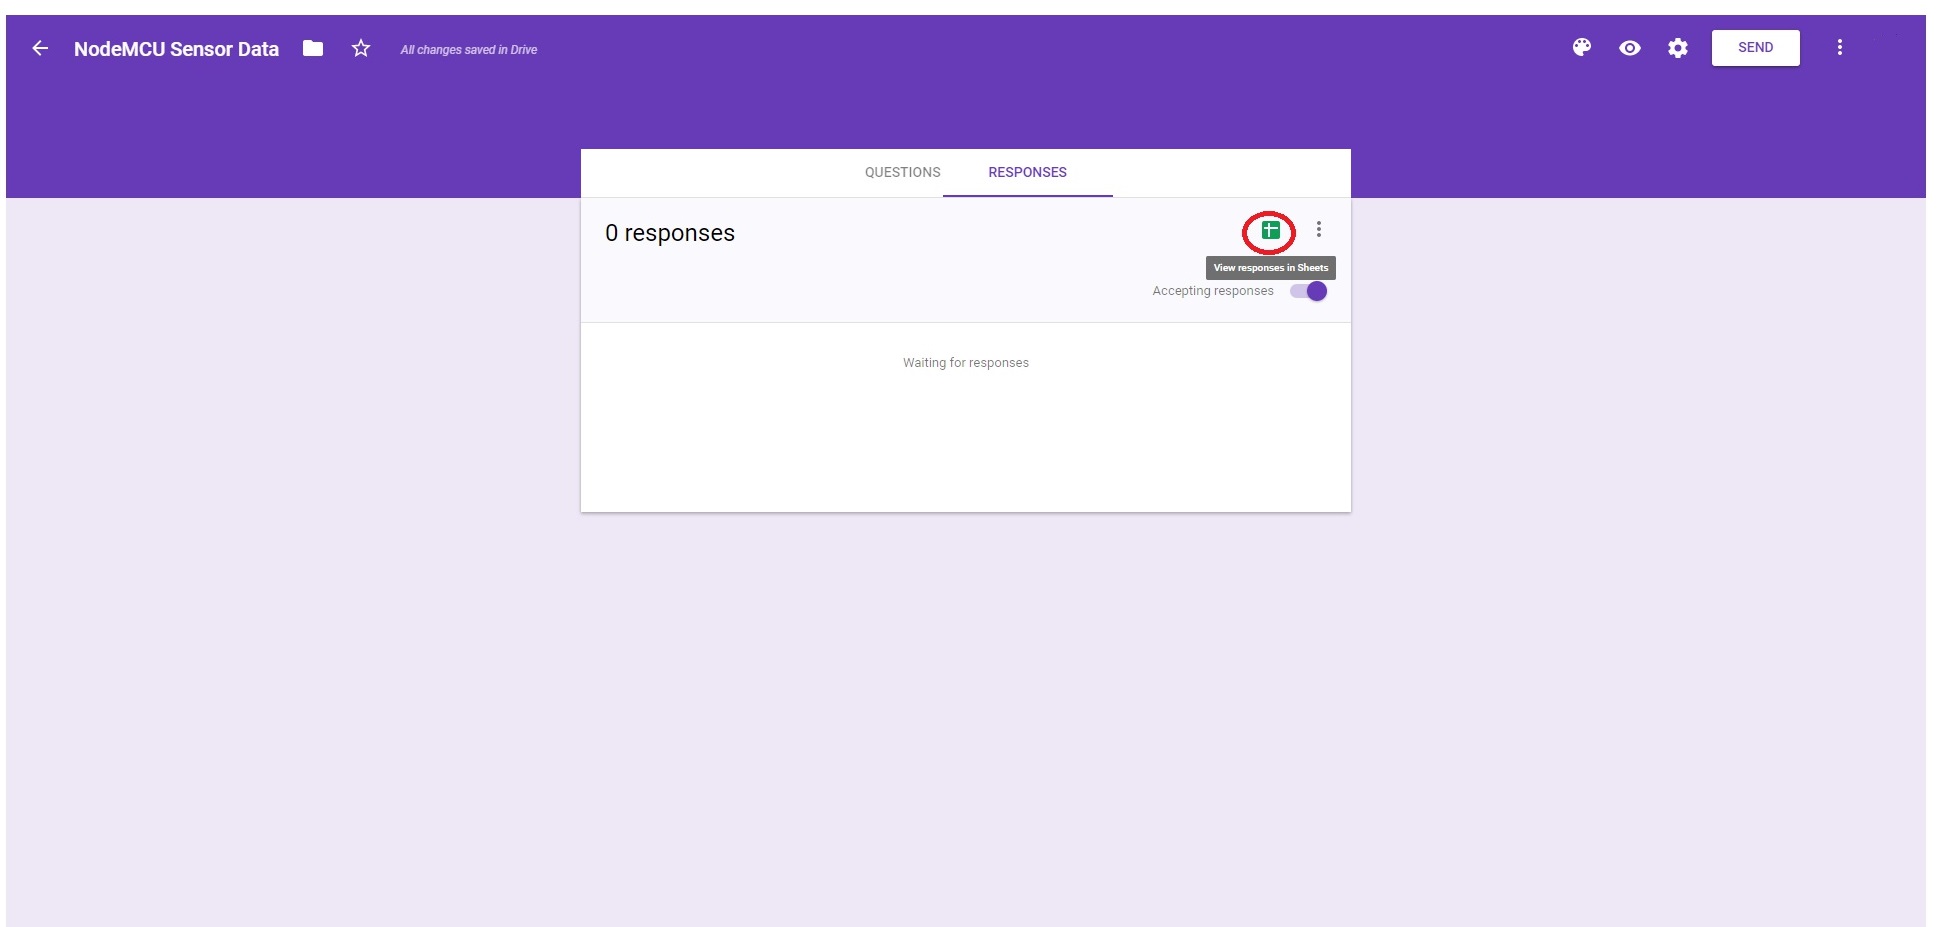
Step 3: Link the Form to the Spreadsheet
Go back to the previous window (where you edit the form) and click the "Responses" tab. You'll see the Google Sheet icon just above the "Accepting Responses" switch. Click it and a window will pop out. Choose "Select existing spreadsheet" and click "Select". Choose the spreadsheet you created in Step 1.
Step 4: Configure Pushingbox
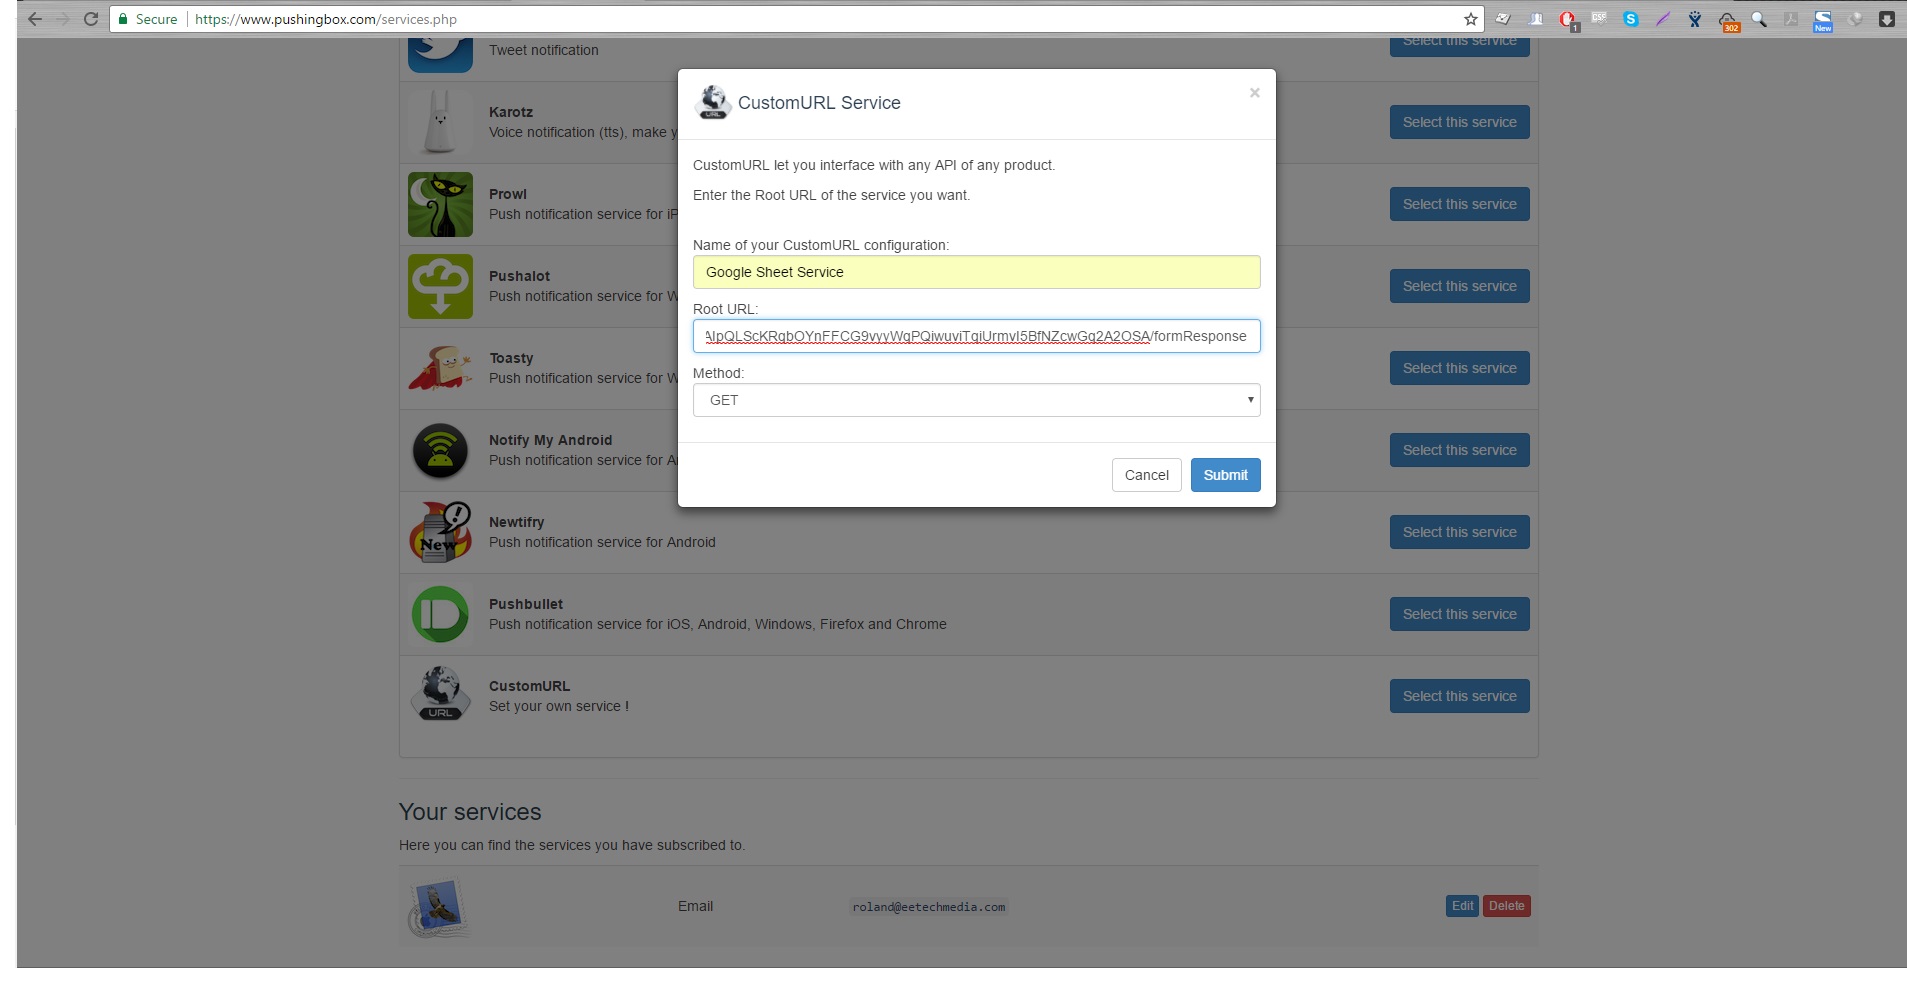
Now go to pushingbox.com and create an account using the same email you used for Google drive. Click the "My Services" tab and click the "Add a service" button. Select "CustomURL". Fill in the form that popped out. Name the service then on the Root URL field, paste the Google Form URL BUT replace "viewform" with "formResponse". Example, using the url above, that would be the url of this link . Leave the Method field as GET.
Next, go to "My Scenarios". On the text field, give a name for the scenario and click "Add". Then click "Add an Action". Click the "Add an action with this service" of the service you just created. On the field on the window that pops out, type in the name of the input field in the form plus the "=$data$". You will be given a device ID after that.
Step 5: Write the NodeMCU Code
After getting the device ID, its time to write a code for the NodeMCU. Here's mine:
#include <ESP8266WiFi.h>

const char* ssid     = "<Your SSID>";   //replace with your own SSID
const char* password = "<Your Password>";    //replace with your own password
const char* host = "api.pushingbox.com";

int button = 4;
double data;

void setup() {
  Serial.begin(115200);
  delay(10);

  // We start by connecting to a WiFi network
  Serial.println();
  Serial.println();
  Serial.print("Connecting to ");
  Serial.println(ssid);

  /* Explicitly set the ESP8266 to be a WiFi-client, otherwise, it by default,
     would try to act as both a client and an access-point and could cause
     network-issues with your other WiFi-devices on your WiFi-network. */
  WiFi.mode(WIFI_STA);
  WiFi.begin(ssid, password);

  while (WiFi.status() != WL_CONNECTED) {
    delay(500);
    Serial.print(".");
  }

  Serial.println("");
  Serial.println("WiFi connected");
  Serial.println("IP address: ");
  Serial.println(WiFi.localIP());

  pinMode(A0, INPUT);
  pinMode(button, INPUT);
}

void loop() {
 if(digitalRead(button) == 0){
    delay(1000);
    data = analogRead(A0);
    Serial.print("connecting to ");
    Serial.println(host);

    // Use WiFiClient class to create TCP connections
    WiFiClient client;
    const int httpPort = 80;
    if (!client.connect(host, httpPort)) {
      Serial.println("connection failed");
      return;
    }

    // We now create a URI for the request
    String url = "/pushingbox?";
    url += "devid=";
    url += "<your device ID here>";
    url += "&data="+String(data);

    Serial.print("Requesting URL: ");
    Serial.println(url);

    // This will send the request to the server
    client.print(String("GET ") + url + " HTTP/1.1\r\n" +
               "Host: " + host + "\r\n" +
               "Connection: close\r\n\r\n");
    unsigned long timeout = millis();
    while (client.available() == 0) {
      if (millis() - timeout > 5000) {
      Serial.println(">>> Client Timeout !");
      client.stop();
      return;
    }
  }

  // Read all the lines of the reply from server and print them to Serial
  while(client.available()){
    String line = client.readStringUntil('\r');
    Serial.print(line);
    Serial.print("Data Sent!");
  }

  Serial.println();
  Serial.println("closing connection");
  }
}
Don't forget to replace with your WiFi's SSID and password. Also, provide your device ID on line 58.
The data will be logged to the spreadsheet everytime pin D2 is grounded. If you decide to remove this control then the code will continuously send data to the spreadsheet. Note that pushingbox allows only 1000 requests per day.
If you have any questions regarding this tutorial, kindly drop a comment below and I'll respond right away. Try it now!


")

Took a couple days to get this to work. Problem was the ? before entry.12345564. I believe if you could have made your pics larger or the ability to blow them up it would have helped a lot.
Thanks for the suggestion! I will be making it larger
Thanks for the tutorial. this tutorial is based on just one input field, like in mine i need to save date for both temperature and humidity and when i get to the entry ,it has different entry id for both fields. please how will i go about that
Hello
You can add as many input fields as you like and just use multiple variables on the URL of your pushingbox service.
how to use multiple variables on the URL of your pushingbox service?
You just need to make sure that whatever goes between the $ signs when you add the action in pushingbox, is the same field name you use when you construct the url in the sketch.
So my pushingbox scenario contains:
?entry.2079504522=$data$ and
?entry.1627195063=$data1$
Then in my Arduino sketch I have:
url += "&data=" + String(reading);
url += "&data1=" + String(reading1);
if we want to read tag and information from rfid tags and send it to google sheets then what changes need to be made in the code?
You need to merge your RFID sketch with this one, or vice versa, or put them both in a new sketch but with only one setup() and one loop(), then in the url use whatever variable name you used to capture the RFID, say it was myRFID, like this:
url += "&data=" + String(myRFID);
What I did with my sketch was use a couple of functions in loop(), that way I separated the reading of the pins into the variables from sending those off to pushingbox.
So my loop() looks simply like this:
void loop()
{
if (digitalRead(sendButton) == 0)
{
getReadings();
updateGoogle();
}
}//loop
updateGoogle() contains all the code from the original loop() here in the blog, except the part where it reads the analog pin
getReadings() contains the analogRead (and other reads, since I have more than one sensor). It could just as easily hold the code to read the rfid tag.
If you keep things apart like that, ie read the values and update the cloud, it makes it muuuuch simpler to get your mind round things. You can sort out the Google update stuff while just having a placeholder variable in the read function, without having to try to get two things working at once. Once the update works, put the "real" code into the other function.
Fantastic!!! I started from scratch in midmorning and by evening (after going to the gym, shopping and dinner) I was logging data to my new Google spreadsheet... with no errors along the way. Thanks due to your detailed, accurate and complete instructions. I converted the .ino script to Nodemcu .lua to run on my 8266 Huzzah Feather. I still can't believe that I actually finished a project in one day. Thanks again.
i am making the same project but i cant do the merge could you send your code it may help
I do not know what you mean by "i cant do the merge", please explain. Which code do you need, the Nodemcu lua code that generates the data or the google script that receives the data and adds it to the spreadsheet or both?
I mean both of them, receiving the UID as an array then sending it to the google sheet
I am getting Bad DevID
please help
You promised to make your pictures larger - I would appreciate seeing larger screenshots.
Which microcontroller should be used to send data to google drive? I also need the link in which that microcontroller is used. I will be so thankful to you.
It's in the article raghav, a nodemcu microcontroller is used
Hi Roland,
Thanks a lot for this interesting tutorial. I want to know if pushingbox is able to provide a time tag to data entry at google sheet, like for example recording values with their corresponding time in another column.
Thanks!
Well _that_ was easy: worked out of the box. (Although I'm glad I had read the comments first and knew about that ? )
One trivial change I made was to pinMode the button as INPUT_PULLUP, else with it floating it might have gone low on its own and used some of the 1000 attempts.
Nice series of tutorials, thanks.
I deleted the contents of the spreadsheet, pretending I had done my analysis and could discard them. I had hoped that subsequent updates would start from line 2 again, but alas they go into the spreadsheet at the line below where it previously was. It obviously needs to keep track of how fa down it had gone before, but do you know if there's a way to reset that and have it start at the top again?
I wanted to know how this code will actually go with the sensors reading?
I mean do we have to enter the sensor 's code within this above mentioned code?
also, after loading data into spreadsheets can we load them from spreadsheets onto the web page?
How do you find your device ID ?
Is it the same ID that shows up on my router in the last tutorial about the light sensor ?
Sorry for the noob question but I am just getting started with MCUs.
Hi, I trying to send ultrasonic sensor values to google sheet using your process.My code is uploading successfully but data is not getting in sheet. Plz help me with this. In my serial monitor it is showing that connection failed
#include
const char* ssid = "xxxxx";
const char* password = "xxxxx"; //replace with your own password
const char* host = "api.pushingbox.com";
const int trigPin = 5;
const int echoPin = 4;
//height of the water tank in centimeter
const int height_tank=25;
//Pin Number of The Motor Relay
int led=0;
// defines variables
int distance;
int duration;
void setup() {
pinMode(trigPin, OUTPUT); // Sets the trigPin as an Output
pinMode(echoPin, INPUT); // Sets the echoPin as an Input
pinMode(led,OUTPUT);//Set the Motor Relay Pin as an OUTPUT
Serial.begin(9600); // Starts the serial communication
// We start by connecting to a WiFi network
Serial.println();
Serial.println();
Serial.print("Connecting to ");
Serial.println(ssid);
WiFi.mode(WIFI_STA);
WiFi.begin(ssid, password);
while (WiFi.status() != WL_CONNECTED) {
delay(500);
Serial.print(".");
}
Serial.println("");
Serial.println("WiFi connected");
Serial.println("IP address: ");
Serial.println(WiFi.localIP());
}
int ping(){
// Clears the trigPin
digitalWrite(trigPin, LOW);
delayMicroseconds(2);
// Sets the trigPin on HIGH state for 10 micro seconds
digitalWrite(trigPin, HIGH);
delayMicroseconds(10);
digitalWrite(trigPin, LOW);
// Reads the echoPin, returns the sound wave travel time in microseconds
duration = pulseIn(echoPin, HIGH);
// Calculating the distance
distance= duration*0.034/2;
// Prints the distance on the Serial Monitor
return distance;
}
void loop() {
distance=ping();
int division_lenght=height_tank/5;
int level=distance/division_lenght;
level=5-level;
Serial.println(level);
Serial.println(distance);
if(level==1){
digitalWrite(led,HIGH);
Serial.println(" On");
}else if(level==2){
digitalWrite(led,HIGH);
Serial.println(" On");
}else if(level==3){
digitalWrite(led,HIGH);
Serial.println("On");
}else if(level==4){
digitalWrite(led,HIGH);
Serial.println("On");
}
else{
digitalWrite(led,LOW);
Serial.println("OFF");
}
delay(1000);
Serial.print("connecting to ");
Serial.println(host);
// Use WiFiClient class to create TCP connections
WiFiClient client;
const int httpPort = 80;
if (!client.connect(host, httpPort)) {
Serial.println("connection failed");
return;
}
// We now create a URI for the request
String url = "/pushingbox?";
url += "devid=";
url += "v57D03554AC78F92";
url += "&distance="+String(distance);
Serial.print("Requesting URL: ");
Serial.println(url);
// This will send the request to the server
client.print(String("GET ") + url + " HTTP/1.1\r\n" +
"Host: " + host + "\r\n" +
"Connection: close\r\n\r\n");
unsigned long timeout = millis();
while (client.available() == 0) {
if (millis() - timeout > 5000) {
Serial.println(">>> Client Timeout !");
client.stop();
return;
}
}
// Read all the lines of the reply from server and print them to Serial
while(client.available()){
String line = client.readStringUntil('\r');
Serial.print(line);
Serial.print("Data Sent!");
}
Serial.println();
Serial.println("closing connection");
}
Super thanks. Using your website, I was able to log data to my google form using ESP8266 AT command. I had to use another micro for doing precise power measurement on AC line, and then send the RMS value to google form using AT command.
Your steps were precise and to the point.
I am not able to understand where to add multiple variable on the URL of pushingbox service , when we are going to send data of more than one sensor on googlesheet.
Hi, this is a fantastic find, thank you for taking the time to write it up. My problem is when I inspect my google form short answer box the code looks quite different. Do you know if google have changed the way they collect this data and is there a fix? Thanks heaps.