
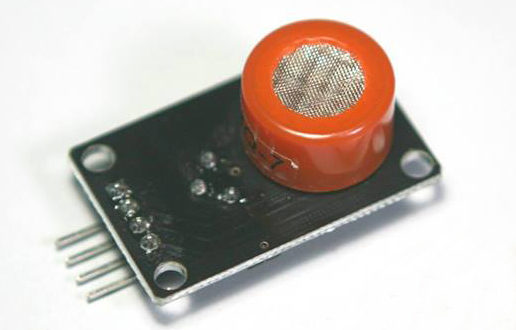
The MQ-7 carbon monoxide gas sensor is especially designed to be sensitive to carbon monoxide (CO) gas which is emitted by vehicles, factories, etc. Since this gas is considered toxic to humans at certain levels, the concentration of CO is used to determine the air pollution in a given area.
Introduction to MQ-7 Carbon Monoxide Sensor
According to its datasheet, the MQ-7 carbon monoxide sensor detects 20 to 2000 ppm of CO in the air. Here is its sensitivity characteristic curve:
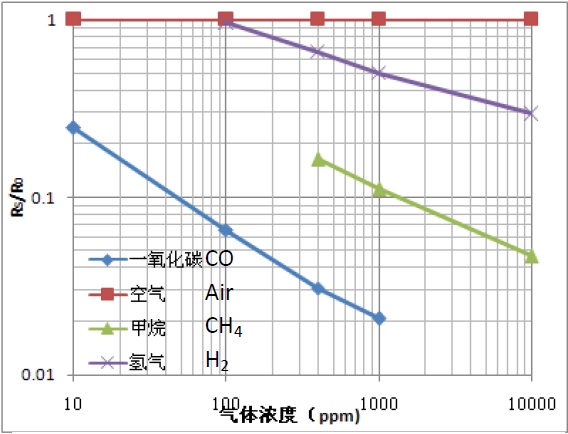
This is a graph of Rs/R0 vs. gas concentration in ppm. Rs is the resistance of the sensor in target gas while R0 is the resistance in clean air. We will use this graph later when we create our code.
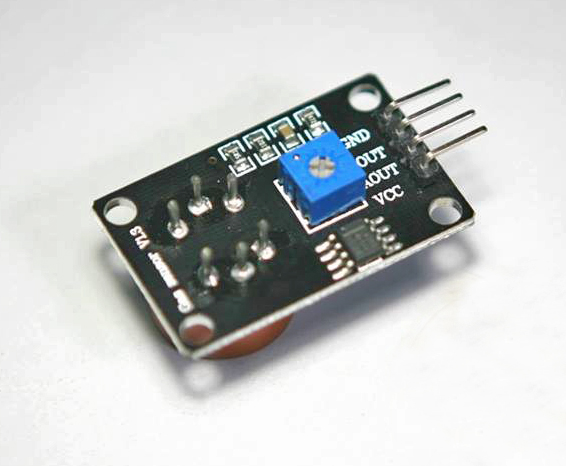
For this tutorial, I will be using the MQ-7 breakout board which has four output pins as shown:

This breakout board is more convenient as it converts resistance variations to voltage variations. Here is its schematic diagram:
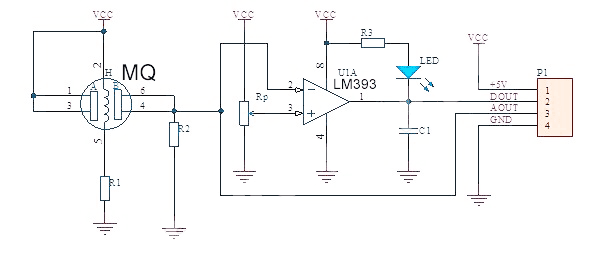
This schematic diagram is the same as with the MQ-3 alcohol sensor and MQ-6 LPG sensor.
There are two ways to read the output from the MQ-7. One is through the DOUT pin which gives a high when the concentration threshold is reached and low otherwise. The threshold can be varied by adjusting the trimmer on the breakout board which is Rp in the schematic.
Meanwhile, the AOUT pin gives varying voltage representing the CO concentration. We can convert the voltage reading to ppm if we look at the characteristic curve above, which is a log-log plot.
We are only interested in the blue line on the plot which gives the CO concentration. The function of a line in such a plot is given as

Where F1, x1, and F0, x0 are any two points in the plot. We can select two points on the plot, as shown:
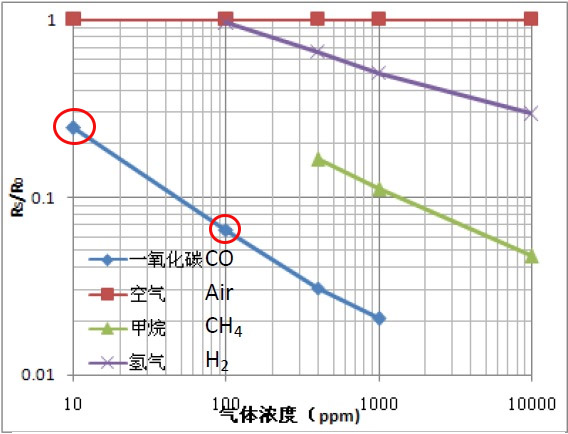 The encircled two points are approximated to be:
- F1 = 0.25 , x1 = 10
- F0 = 0.065, x0 = 100
Thus, using the equation above:
or, the relationship between concentration in ppm and RS/R0 is now:
Solving for ppm:
Arduino Sketch for MQ-7
Before we can use this formula in a sketch, we need to determine R0 of the MQ-7 sensor first. This varies between devices so there is a need for actual testing.
From the log-log plot, we can see that RS/R0 is constant in air and is equal to 1. Since by definition, R0 is the resistance of the sensor in clean air, then only RS varies for every gas.
RS is the sensor resistance and forms a voltage divider with the resistor R2 (see schematic diagram above). Thus, RS can be determined if the series resistor R2 from the schematic is known. Most boards use a 2 kilo-ohm resistor for R2.
We can then use this sketch to get R0:
float sensor_volt;
float RS_gas;
float R0;
int R2 = 2000;

void setup() {
 Serial.begin(9600);
}

void loop() {
  int sensorValue = analogRead(A0);
  sensor_volt=(float)sensorValue/1024*5.0;
  RS_gas = ((5.0 * R2)/sensor_volt) - R2;
  R0 = RS_gas / 1;
  Serial.print("R0: ");
  Serial.println(R0);
}
Once R0 is determined, we can then use this sketch to display the ppm concentration of C0
float RS_gas = 0;
float ratio = 0;
float sensorValue = 0;
float sensor_volt = 0;
float R0 = 7200.0;

void setup() {
 Serial.begin(9600);
}

void loop() {
   sensorValue = analogRead(A0);
   sensor_volt = sensorValue/1024*5.0;
   RS_gas = (5.0-sensor_volt)/sensor_volt;
   ratio = RS_gas/R0; //Replace R0 with the value found using the sketch above
   float x = 1538.46 * ratio;
   float ppm = pow(x,-1.709);
   Serial.print("PPM: ");
   Serial.println(ppm);
   delay(1000);
}
Upload the sketch above to your Arduino, open your serial monitor and now you have an Arduino carbon monoxide sensor! Use this with a smartphone app and detect C0 levels in your surrounding. If it's above 35 ppm, that’s already toxic and you should leave right away!


Hi, would it be possible to know the values of the resistors in the circuit? Thank you.
Hi
I am using MQ-7 to measure CO in PPM.
WHEN i have copied the code and run the arduino software , give me some faults.
can u send me the code please.
I am not expert in this field.
change this line
for(int i = 0; i<100; i++){
but I do not understand, why need this code.
analogWrite(A1, 1023);
Excellent write-up ... but I cannot seem to figure out which pin on the sensor breakout board I should connect A1 to, when running the sketch that calculates R0.The schematic makes no mention of it, neither does your narrative.
Thank you,
Mike Sims
Hi,
I will improve this article, thanks!
Can anybody provide me with a video tutorial of the setup. I'm extremely new to this field.
at this line R0 = RS_gas / 1 . Is it 1 come from air constant?