Arduino Programming: Arrays

An array is a data structure for storing multiple variables of the same data type. Mastering arrays will definitely make your Arduino sketches more efficient. If you’re a beginner when it comes to Arduino array, then this tutorial is for you.
Introduction
As already mentioned, an array is a container for multiple variables of the same type. This means an array can consist of a group of integers, characters or floating point numbers. In contrast, a group of variables of different types is called a struct.
When programming with arrays, I would always imagine them as a box subdivided into sections. Say we declare an array of integers with a size of 5.
int numbers [5];
This is what they look like in my mind:

The numbers on the bottom of each box is the address of each element of the array. Note that the numbering always starts at 0.
When declaring an array, the size must be known. This is for reserving memory space to be occupied by the array.
To put elements inside an array, we can do it in one line:
int numbers[] = {1, 3, 5, 7, 9};
Or we can put values inside each element in the array:
int numbers[5];
numbers[0] = 1;
numbers[1] = 3;
numbers[2] = 5;
numbers[3] = 7;
numbers[4] = 9;
Both of these would result in an array with the following contents:

Accessing Arduino Array Elements
Accessing an element in the array is just like how you would put something inside it. For example,
int x = numbers[1];
This will make x equals the 2nd element in the array. In our previous example, that element is 3.
Since array elements are stored in sequence, you can use loops to access each element. For example, this will print each array element in the Arduino’s serial monitor:
for(int i = 0;i<5;i++){
   Serial.println(numbers[i]);
}
The for loop starts at i = 0 and ends at i = 4. This effectively iterates through all the array elements.
Getting Array Size
The function sizeof() returns the number of bytes (8 bits) in an array. However, doing this:
sizeof(numbers);
will not return 5. This is because the array consists of 16-bit integers. So the function above will return 10 since one number is composed of two bytes.
To get the number of elements in an array of integers, it should be:
sizeof(numbers) / sizeof(numbers[0]);
sizeof(numbers[0]) returns 2 since the first element is a 16-bit number.
In our for loop, we can do this:
for(int i = 0;i<sizeof(numbers) / sizeof(numbers[0]);;i++){
  Serial.println(numbers[i]);
}
This is better for accessing each element of an array with an unknown size.
Actually, we can refer to other elements in the array and it’s still correct.
sizeof(numbers) / sizeof(numbers[1]);

sizeof(numbers) / sizeof(numbers[2]);

sizeof(numbers) / sizeof(numbers[3]);

 …
It’s just safer to use the first element in case we don’t know the number of elements in the array.
Char Arrays and Strings
An array of char variables can be declared like this:
char w[] = {‘h’,’e’,’l’,’l’,’o’};
Or simply:
char w[] = “hello”;
A String is an array of char variables with a null terminator ‘\0’ character at the end. So this one:
char s[] = {‘h’,’e’,’l’,’l’,’o’,’\0’};
And this is one:
String s = “hello”;
Are essentially the same.
Two Dimensional Arrays
We can also create two-dimensional arrays. Empty ones are declared like this:
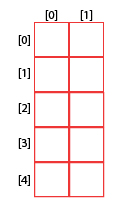
int numbers[2][5];
This means you are declaring an array with 5 rows and 2 columns. Another way of looking at it is declaring 5 arrays, with each element containing 2 inner elements.

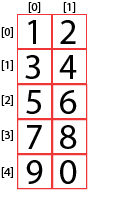
With 2D arrays, the box now becomes a table. Say for example you are declaring an array with predefined values:
int numbers = {{1,2},{3,4},{5,6},{7,8},{9,0}};
This array visually would be:

Arduino Array Example
Say you connect three LEDs to pins D9, D10, and D11 and they need to flash sequentially. Using arrays, your code could be:
int leds[3] = {9,10,11};
void setup() {
 Serial.begin(9600);
 for(int i=0;i<3;i++){
  pinMode(leds[i],OUTPUT);
 }
}

void loop() {
  for(int i=0;i<3;i++){
    digitalWrite(leds[i],HIGH);
    delay(1000);
  }
  for(int i=0;i<3;i++){
    digitalWrite(leds[i],LOW);
    delay(1000);
  }
}
First, we declare an array of pins which we connect the LEDs:
int leds[3] = {9,10,11};
To make these output pins, we iterate through it using the for loop:
for(int i=0;i<3;i++){
   pinMode(leds[i],OUTPUT);
}
Turning them on with a second delay in between is as simple as:
for(int i=0;i<3;i++){
 digitalWrite(leds[i],HIGH);
 delay(1000);
}
Similarly, the LEDs are turned off using:
for(int i=0;i<3;i++){
  digitalWrite(leds[i],LOW);
  delay(1000);
}
This is a shorter code compared to not using Arduino arrays.
This tutorial was originally written by Roland Pelayo for circuitxcode.com


