Arduino Programming: Structs

Structs (short for structure) are far less common in Arduino programming because they are mostly used in C whereas Arduino is based on C++. However, they are still a very useful tool especially if there is a need for a user-defined data set. This tutorial aims to help you understand how to use Arduino structs.
Introduction
When you have multiple instances of a variable with the same data type, you normally use an array. For example:
int number[10];
Here, we have an array of size 10, all composed of integers.
Now what if we want to have a group of variables but of different data types? This is where structs are very useful.
For simplicity, let me start off with a basic example and then we’ll apply structs to Arduino programming.
Defining a Struct
Let’s create a struct for a ball. The ball struct contains two data types, a string(as char pointer) and a double. The string data type is the ball’s color while the double data type is its radius.
struct ball
{
     char* color;
     double radius;
}
Now if we want to define a ball, we just do it like this:
struct ball basketball;
basketball.color = “brown”;
basketball.radius = 12.13;
Members of a struct are accessed using the dot (.) operator. All members are publicly accessible by default. This marks the difference between structs and classes as the latter has members that are private by default.
We could also use the typedef modifier to make struct declarations shorter:
typedef struct
{
     char* color;
     double radius;
}ball;
With typedef, declaring a struct will now be:
ball basketball;
basketball.color = “brown”;
basketball.radius = 12.13;
One good advantage of using structs is when passing multiple variables to a function. Let’s say you have a function that accepts a string and a double as parameters:
char* color = “brown”;
double radius = 12.13;
shoot(color, radius);
By using structs, one parameter will now be passed instead of two:
ball basketball;
basketball.color = “brown”;
basketball.radius = 12.13;
shoot(basketball)
Brackets can also be used to give values to the members of a struct. The above example is the same as the one below:
ball basketball = {“brown”,12.13};
shoot(basketball);
Using Structs in Arduino Programming
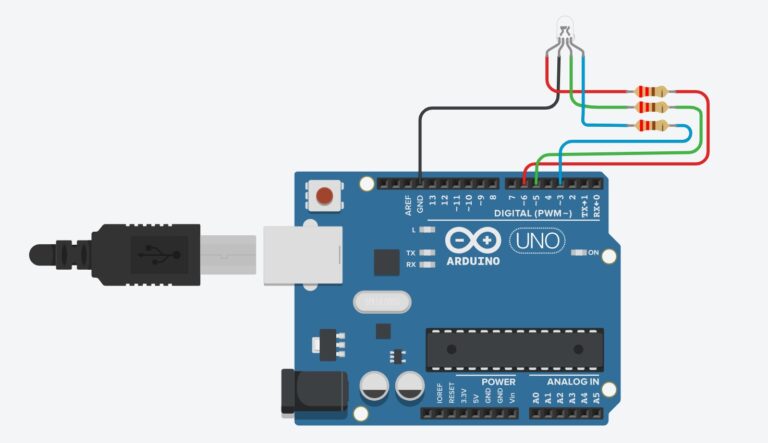
Now let’s apply structs in an Arduino sketch. For this example, we’ll use an RGB LED with Arduino. If you read the article on the link, you’ll know that an RGB LED has four terminals. We will follow this connection:

Normally, we will use this sketch to display the color red:
int r = 6;
int g = 5;
int b = 3;

void setup() {
     pinMode(r,OUTPUT);
     pinMode(g,OUTPUT);
     pinMode(b,OUTPUT);
}

void loop() {
     analogWrite(r,255);
     analogWrite(g,0);
     analogWrite(b,0);
}
Here, the RGB LED pins are connected to digital pins 6, 5 and 3 as shown in the wiring diagram and on this part of the sketch:
int r = 6;
int g = 5;
int b = 3;
The red color is displayed because the “r” pin receives the maximum pulse width while the other pins have no pulse:
void loop()
{
     analogWrite(r,255);
     analogWrite(g,0);
     analogWrite(b,0);
}
If we are to modify this sketch by adding structs, the first thing to do is define a struct like this:
typedef struct
{
     byte red;
     byte green;
     byte blue;
}RGB;
Here, the struct contains three 8-bit elements named after the basic colors.
Next, we define a function that accepts the same struct with three integers as parameters and sends pulses to the RGB LED based on the passed parameter.
void setColor(RGB color)
{
     analogWrite(r,color.red);
     analogWrite(g,color.green);
     analogWrite(b,color.blue);
}
All we have to do now is give values to the members of the struct and pass that struct to the function. For example, to set the RGB LED’s color to red:
RGB rgb = {255, 0, 0}
void loop()
{
     setColor(rgb);
}
Here is now the full sketch:
int r = 6;
int g = 5;
int b = 3;

typedef struct{
  byte red;
  byte green;
  byte blue;
}RGB;

RGB rgb = {255, 0, 0};

//Function prototype
void setColor(RGB color);
void setup() {
  pinMode(r,OUTPUT);
  pinMode(g,OUTPUT);
  pinMode(b,OUTPUT);
}

void loop() {
  setColor(rgb);
}

void setColor(RGB color){
  analogWrite(r,color.red);
  analogWrite(g,color.green);
  analogWrite(b,color.blue);
}
We can modify the sketch above to generate random colors on the RGB LED:
int r = 6;
int g = 5;
int b = 3;

typedef struct
{
  byte red;
  byte green;
  byte blue;
}RGB;

RGB rgb;

//Function prototype
void setColor(RGB color);
void setup() {
  pinMode(r,OUTPUT);
  pinMode(g,OUTPUT);
  pinMode(b,OUTPUT);
  randomSeed(analogRead(0));
}

void loop()
{
  rgb.red = random(256);
  rgb.green = random(256);
  rgb.blue = random(256);
  setColor(rgb);
  delay(100);
}

void setColor(RGB color)
{
  analogWrite(r,color.red);
  analogWrite(g,color.green);
  analogWrite(b,color.blue);
}
Here, we easily modify the contents of the struct and then assign it random values from 0 to 255.
rgb.red = random(256);
rgb.green = random(256);
rgb.blue = random(256);
This tutorial is originally written by Roland Pelayo for circuitxcode.com


