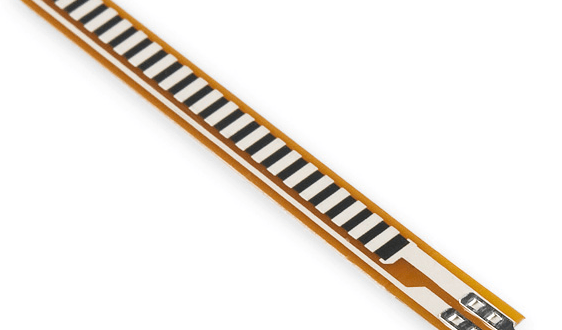
A flex sensor can be used with an Arduino to detect bending, measure finger movement, control servos, or build gesture-based projects. In this tutorial, you’ll learn how a flex sensor works, how to connect a flex sensor to an Arduino UNO, and how to read bend values using a simple voltage divider circuit. We’ll also look at practical flex sensor Arduino projects, including servo control and wearable glove applications.
What is a Flex Sensor?
A flex sensor is a resistive sensor that changes resistance when it is bent. When the sensor is straight, it has one resistance value. When it bends, the resistance changes depending on the bend angle.
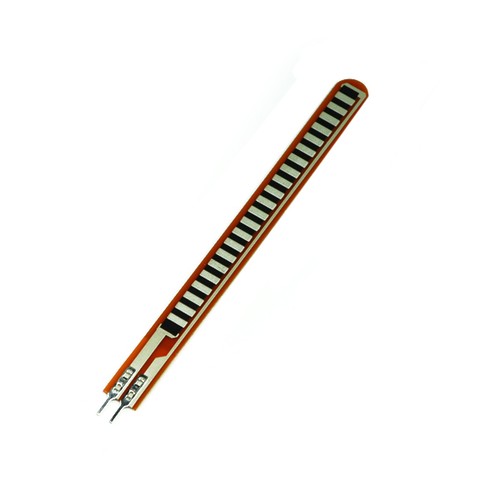
There are several types of bend sensors, including conductive ink-based sensors, fiber-optic sensors, and capacitive bend sensors. However, the most common type used in Arduino projects is the conductive ink-based flex sensor.
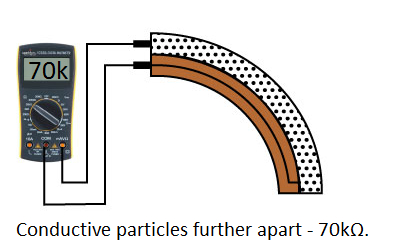
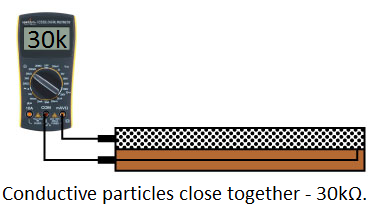
A conductive flex sensor uses a special resistive material, usually printed as conductive ink. When the sensor bends, the spacing between conductive particles changes. As a result, the resistance of the sensor also changes.
For example, one flex sensor may measure around 30 kΩ when straight and around 70 kΩ when bent to 90 degrees. However, these values are not the same for every sensor. Therefore, you should measure your own flex sensor with a multimeter before finalizing your Arduino code.
How a Flex Sensor Works
A flex sensor acts like a variable resistor. One side of the sensor connects to the circuit, and the other side completes the resistive path. As the sensor bends in the correct direction, its resistance increases.
Most hobby flex sensors are unidirectional. This means the resistance changes mostly when the sensor is bent in one direction. If you bend it the opposite way, the resistance may not change much, or the sensor may even be damaged if bent too far. Because of this, always check the recommended bend direction of your flex sensor before attaching it to a glove, robotic finger, or moving part.
Flex Sensor Arduino Circuit
Since a flex sensor is a resistive device, the easiest way to read it with an Arduino is to use a voltage divider.
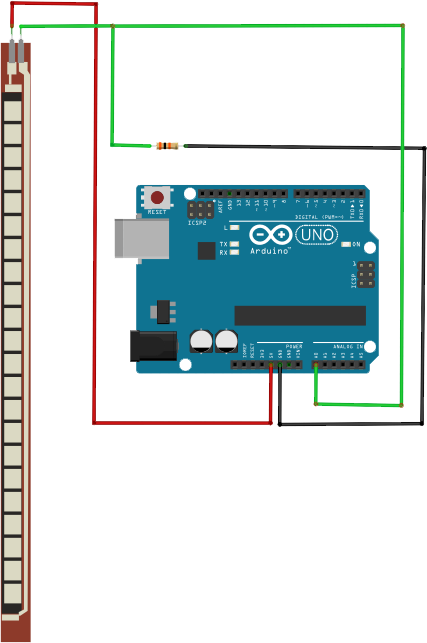
For a basic flex sensor Arduino circuit, connect:
- One end of the flex sensor to 5V
- The other end of the flex sensor to Arduino analog pin A0
- A fixed resistor from A0 to GND
The fixed resistor is usually called the series resistor or voltage divider resistor. A good starting value is the resistance of your flex sensor when it is straight. For example, if your flex sensor measures 30 kΩ when flat, use a 30 kΩ resistor. This setup converts the changing resistance of the flex sensor into a changing voltage. The Arduino then reads that voltage using analogRead(). As the flex sensor bends, the voltage at A0 changes. Then, the Arduino can convert that reading into a bend value, percentage, or estimated angle.
Arduino Flex Sensor Code
Before using the sensor in a project, it is best to print the raw analog readings first. This helps you find the actual values for your own sensor.
Upload this sketch:
const int flexPin = A0;

void setup() {
   Serial.begin(9600);
}

void loop() {
   int flexValue = analogRead(flexPin);
   Serial.print("Raw flex value: ");
   Serial.println(flexValue); delay(300);
}
Open the Serial Monitor and bend the sensor slowly. Take note of the value when the sensor is straight and when it is bent.
For example, your readings might look like this:
Straight: 420
Bent: 760
Your values may be different depending on your sensor, resistor value, and supply voltage.
Estimating Bend Angle
Once you know the straight and bent readings, you can map the flex sensor value to an approximate bend angle.
const int flexPin = A0;

const int straightValue = 420;  // Replace with your measured straight value
const int bentValue = 760;      // Replace with your measured bent value

void setup() {
  Serial.begin(9600);
}

void loop() {
  int flexValue = analogRead(flexPin);

  int angle = map(flexValue, straightValue, bentValue, 0, 90);
  angle = constrain(angle, 0, 90);

  Serial.print("Flex value: ");
  Serial.print(flexValue);

  Serial.print(" | Bend angle: ");
  Serial.print(angle);
  Serial.println(" degrees");

  delay(300);
}
This does not produce a laboratory-grade angle measurement. However, it works well for simple Arduino projects where you only need an estimated bend amount.
Calculating Flex Sensor Resistance
If you want to calculate the actual resistance of the flex sensor, you can use the voltage divider equation. In the circuit where the flex sensor is connected to 5V and the fixed resistor is connected to GND, the sensor resistance can be estimated using:
const int flexPin = A0;
const float fixedResistor = 30000.0; // 30k resistor

void setup() {
  Serial.begin(9600);
}

void loop() {
  int adcValue = analogRead(flexPin);

  if (adcValue == 0) {
    Serial.println("ADC value is zero. Check wiring.");
    delay(500);
    return;
  }

  float flexResistance = fixedResistor * (1023.0 / adcValue - 1.0);

  Serial.print("ADC: ");
  Serial.print(adcValue);

  Serial.print(" | Flex resistance: ");
  Serial.print(flexResistance);
  Serial.println(" ohms");

  delay(500);
}
This is useful when you want to compare the sensor’s resistance when straight, slightly bent, and fully bent.
Flex Sensor with Arduino Servo Motor
One popular flex sensor Arduino project is servo control. When the sensor bends, the servo moves. This is useful for robotic fingers, animatronics, wearable controllers, and gesture-based devices.
Connect the servo signal pin to Arduino pin 9. Then, use this sketch:
#include <Servo.h>

const int flexPin = A0;
const int servoPin = 9;

const int straightValue = 420;  // Replace with your measured value
const int bentValue = 760;      // Replace with your measured value

Servo myServo;

void setup() {
  Serial.begin(9600);
  myServo.attach(servoPin);
}

void loop() {
  int flexValue = analogRead(flexPin);

  int servoAngle = map(flexValue, straightValue, bentValue, 0, 90);
  servoAngle = constrain(servoAngle, 0, 90);

  myServo.write(servoAngle);

  Serial.print("Flex: ");
  Serial.print(flexValue);

  Serial.print(" | Servo angle: ");
 .println(servoAngle);

  delay(15);
}
If the servo moves in the wrong direction, swap the values in the map() function:
int servoAngle = map(flexValue, straightValue, bentValue, 90, 0);Flex Sensor Applications
A flex sensor makes it possible to control electronics through bending motion. Because of this, it is useful in projects where buttons or knobs are not ideal.
Common flex sensor Arduino applications include:
- Robotic hand control
- Gesture-controlled gloves
- Servo motor control
- Wearable input devices
- Posture monitoring
- Musical controllers
- Game controllers
- Physical therapy feedback devices
- Bend detection for soft robotics
For example, you can attach several flex sensors to a glove and use each finger movement to control a servo motor. You can also use one flex sensor as a simple bend switch to turn LEDs, motors, or sound effects on and off.
You can also attach the sensor to a glove and do cool stuff like control a robotic arm:
Tips for Using a Flex Sensor
Do not bend the sensor sharply near its base, because this can permanently damage the resistive material. Instead, mount the sensor so the bend happens gradually along its length. Also, avoid repeated extreme bending unless your sensor is rated for that use. For wearable projects, it is better to attach the flex sensor to a flexible backing material so the sensor does not crease. Finally, always calibrate the sensor in the actual position where it will be used. A flex sensor attached to a glove may produce different readings compared with the same sensor tested on a table.
Conclusion
Using a flex sensor with Arduino is straightforward because the sensor behaves like a variable resistor. By placing it in a voltage divider circuit, the Arduino can read the bend amount through an analog input pin. After calibration, you can use the flex sensor to estimate bend angle, control a servo motor, detect gestures, or build wearable Arduino projects.