When I first moved from ultrasonic sensors to Time-of-Flight (ToF) sensors, the difference was night and day. Measurements became faster, more stable, and far more precise. In this tutorial, I’ll show you exactly how I use a ToF sensor like the VL53L0X with the ESP32.
What is a Time-of-Flight Sensor?
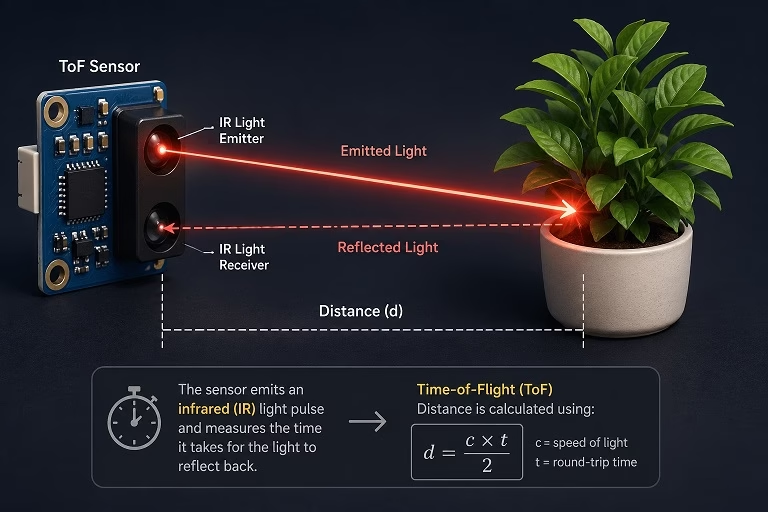
A Time-of-Flight sensor measures distance using light instead of sound. It emits an infrared laser and calculates how long it takes for the reflection to return.
Because it uses light, it avoids common ultrasonic issues like:
- Poor readings on soft surfaces
- Wide beam angles
- Slow response time
With ToF sensors, I consistently get millimeter-level precision, especially indoors.
Why Use ESP32 with ToF Sensors?
The ESP32 is perfect for this because:
- Built-in I2C makes wiring simple
- Plenty of processing power for filtering
- Easy to expand into WiFi dashboards later
This combo is something I often use for smart sensing projects.
Materials
For this setup, I used:
- ESP32 development board
- VL53L0X (or VL53L1X) ToF sensor
- Breadboard
- Jumper wires
Wiring the ToF Sensor to ESP32
The ToF sensor uses I2C, so wiring is straightforward.
| ToF Sensor | ESP32 |
| VCC | 3.3V |
| GND | GND |
| SDA | GPIO 21 |
| SCL | GPIO 22 |
I always stick to 3.3V with ESP32 to avoid voltage compatibility issues.
Installing the Library
In Arduino IDE, install:
- Adafruit VL53L0X
This library is reliable and easy to use, especially if you’re just starting.
Basic ESP32 ToF Example Code
Here’s the exact code I use for quick testing:
#include <Wire.h>
#include "Adafruit_VL53L0X.h"

Adafruit_VL53L0X lox = Adafruit_VL53L0X();

void setup() {
 Serial.begin(115200);
 Wire.begin();

 if (!lox.begin()) {
   Serial.println("Failed to initialize VL53L0X");
   while (1);
 }
 Serial.println("ToF Sensor Ready!");
}

void loop() {

 VL53L0X_RangingMeasurementData_t measure;
 lox.rangingTest(&measure, false);

 if (measure.RangeStatus != 4) {
   Serial.print("Distance: ");
   Serial.print(measure.RangeMilliMeter);
   Serial.println(" mm");
 } else {
   Serial.println("Out of range");
 }

 delay(500);
}
What the Output Means
The sensor returns distance in millimeters.
Typical ranges:
- VL53L0X → up to ~2 meters
- VL53L1X → up to ~4 meters
If you see “Out of range”, it usually means:
- Object is too far
- Surface is not reflective enough
Improving Accuracy
Raw readings can still fluctuate slightly. In real projects, I always apply simple filtering.
Here’s a quick averaging function:
int get_average_distance(int samples) {
 int sum = 0;
 int valid = 0;

 for (int i = 0; i < samples; i++) {
   VL53L0X_RangingMeasurementData_t measure;
   lox.rangingTest(&measure, false);

   if (measure.RangeStatus != 4) {
     sum += measure.RangeMilliMeter;
     valid++;
   }

   delay(50);
 }

 if (valid == 0) return -1;
 return sum / valid;
}
This alone dramatically improves stability.
Common Problems and Fixes
Sensor Not Detected
I usually check:
- SDA/SCL swapped
- Loose wiring
- I2C address (normally 0x29)
Constant Invalid Readings
This often comes from:
- Weak power supply
- Too fast reading loop
Adding delay usually fixes it.
Noisy Measurements
If readings jump around:
- Use averaging
- Avoid direct sunlight
- Keep sensor steady
Real-World Applications
Once this is working, you can easily expand it into:
- Touchless switches
- Distance-triggered automation
- Liquid level sensing
- Robot obstacle detection
- Smart parking systems
This sensor is one of those components that scales really well from beginner to advanced projects.
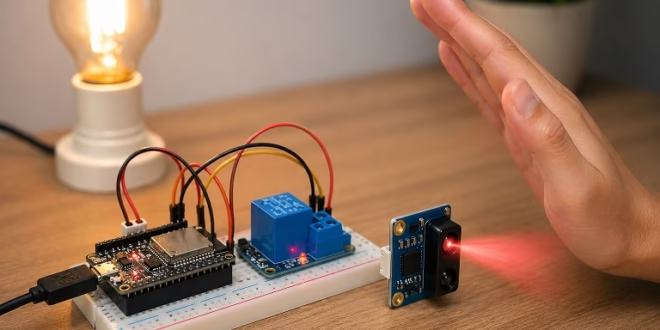
Example Project: Touchless Switch (ToF + Relay)
One of my favorite practical uses of a ToF sensor is creating a touchless switch. Instead of physically pressing a button, you simply place your hand in front of the sensor to toggle a device—like a light or fan.
This is especially useful for:
- Hygiene (no physical contact)
- Smart home projects
- Modern UI interactions
How It Works
The idea is simple:
- The ToF sensor continuously measures distance
- When your hand comes within a threshold (e.g., < 100 mm), it triggers an action
- The ESP32 toggles a relay module
- The relay acts like a physical switch (ON/OFF)
I usually add a small delay or state logic to prevent repeated triggering.
Additional Components
For this project, I added:
- 1-channel relay module (3.3V or 5V compatible)
- External load (e.g., lamp, fan, or test LED)
Relay Wiring
| Relay Module | ESP32 |
| VCC | 5V or 3.3V |
| GND | GND |
| IN | GPIO 26 |
Note: Some relay modules are active LOW, meaning:
- LOW → ON
- HIGH → OFF
Concept Logic
Instead of constantly switching while your hand is present, I use a toggle mechanism:
- Detect hand within threshold
- Toggle relay state
- Wait until hand is removed before detecting again
This prevents flickering or rapid switching.
Example Code: Touchless Toggle Switch
#include <Wire.h>
#include "Adafruit_VL53L0X.h"
#define RELAY_PIN 26
#define DIST_THRESHOLD 100  // mm

Adafruit_VL53L0X lox = Adafruit_VL53L0X();
bool relay_state = false;
bool hand_detected = false;

void setup() {
 Serial.begin(115200);
 Wire.begin();

 pinMode(RELAY_PIN, OUTPUT);
 digitalWrite(RELAY_PIN, HIGH); // OFF (for active LOW relay)

 if (!lox.begin()) {
   Serial.println("Failed to initialize VL53L0X");
   while (1);
 }

 Serial.println("Touchless Switch Ready");

}


void loop() {

 VL53L0X_RangingMeasurementData_t measure;
 lox.rangingTest(&measure, false);

 if (measure.RangeStatus != 4) {
   int distance = measure.RangeMilliMeter;
   Serial.print("Distance: ");
   Serial.println(distance);

   // Hand detected

   if (distance < DIST_THRESHOLD && !hand_detected) {
     relay_state = !relay_state;
     digitalWrite(RELAY_PIN, relay_state ? LOW : HIGH);
     Serial.println(relay_state ? "Relay ON" : "Relay OFF");
     hand_detected = true;
     delay(300); // debounce
   }

   // Hand removed
   if (distance >= DIST_THRESHOLD) {
     hand_detected = false;
   }
 }
 delay(50);
}
Behavior Explanation
Here’s what actually happens when I use it:
- I move my hand close to the sensor
- The ESP32 detects distance < 100 mm
- The relay toggles ON
- I remove my hand → system resets
- Next gesture toggles it OFF
It feels very natural—almost like a “gesture button”.
Safety Notes (Important)
If you’re controlling AC devices:
- Use proper relay modules with isolation
- Never touch exposed wiring
- Consider using a relay module with optocoupler
For testing, I recommend starting with:
- LED + resistor instead of mains devices
Improvements I Usually Add
In real builds, I often extend this by:
- Adding LED indicator for ON/OFF state
- Using moving average filtering for stable detection
- Adding sound or buzzer feedback
- Integrating with WiFi control (web dashboard or MQTT)
Conclusion
Using a Time-of-Flight sensor with ESP32 is one of the easiest ways to build accurate distance-based projects. Once I started using these sensors, I stopped relying on ultrasonic modules for most indoor applications.
They’re precise, fast, and incredibly easy to integrate.