
Parking in tight spaces can be challenging, especially with limited visibility. To help avoid collisions with obstacles, this project will show you how to build an Arduino Parking Sensor using an ultrasonic sensor and a buzzer. The ultrasonic sensor detects the distance to an obstacle, and the buzzer produces warning beeps, which become faster as the object gets closer.
Project Overview
In this project, we'll use the following components:
- Arduino UNO (or similar) board: The brain of the system.
- Ultrasonic sensor (HC-SR04): Measures the distance to an object by sending out ultrasonic waves and calculating the time it takes for the echo to return.
- Buzzer: Produces beeping sounds that speed up as the distance to an obstacle decreases.
How It Works
The ultrasonic sensor sends a pulse and waits for it to bounce back from an obstacle. Based on the time taken for the pulse to return, the Arduino calculates the distance to the object. Depending on the distance, the buzzer emits beeps at different rates — the closer the object, the faster the beeping.
When the trigger pin is held high, the ultrasonic sensor module begins emitting a signal until that pin is pulled low. If the signal encounters an obstacle, it will bounce back to the sensor. As a result, the "echo" of the signal is used to measure the distance: the duration between the sending of the signal and the return of the signal can be read on the echo pin as a pulse.
The distance in centimeters between the HC-SR04 and the obstacle can then be calculated using
where 0.034 is the speed of sound: 340 m/s
This system mimics the parking sensors commonly found in modern cars, providing audible feedback to the driver as they approach a barrier or obstacle.
Components Needed
- Arduino UNO or any other Arduino board
- Ultrasonic sensor (HC-SR04)
- Active Buzzer
- Jumper wires
- Breadboard
- USB cable (to connect Arduino to a computer)
- Power source (if needed)
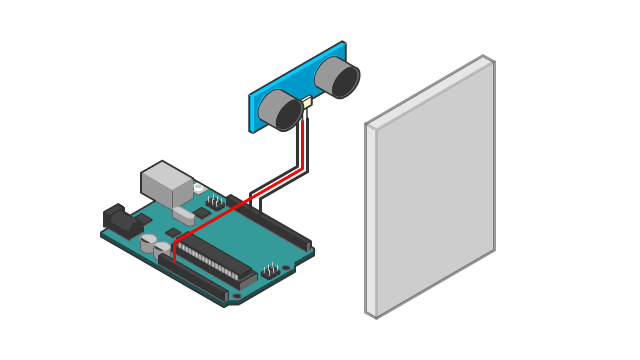
Circuit Diagram
To set up the Arduino parking sensor, connect the components as follows:
- Ultrasonic Sensor (HC-SR04):
- VCC to Arduino 5V
- GND to Arduino GND
- Trig to Arduino Pin 9
- Echo to Arduino Pin 10
- Buzzer:
- Positive terminal to Arduino Pin 11
- Negative terminal to Arduino GND
Code
Here’s the Arduino sketch to make the parking sensor functional:
// Define pins for ultrasonic sensor and buzzer
const int trigPin = 9;
const int echoPin = 10;
const int buzzerPin = 11;

// Variables for distance calculation
long duration;
int distance;

void setup() {
  pinMode(trigPin, OUTPUT);
  pinMode(echoPin, INPUT);
  pinMode(buzzerPin, OUTPUT);

  Serial.begin(9600); // Initialize serial communication for debugging
}


void loop() {
  // Clear the trigPin by setting it LOW
  digitalWrite(trigPin, LOW);
  delayMicroseconds(2);

  // Trigger the sensor by setting trigPin HIGH for 10 microseconds
  digitalWrite(trigPin, HIGH);
  delayMicroseconds(10);
  digitalWrite(trigPin, LOW);

  // Read the echoPin and calculate the duration
  duration = pulseIn(echoPin, HIGH);

  // Calculate distance in centimeters (speed of sound = 343 m/s)
  distance = duration * 0.034 / 2;

  // Print the distance for debugging purposes
  Serial.print("Distance: ");
  Serial.println(distance);

  // Control the buzzer based on distance
  if (distance <= 10) {
    // Very close, fast beeping
    tone(buzzerPin, 1000);
    delay(100);
    noTone(buzzerPin);
    delay(100);
  } else if (distance <= 30) {
    // Medium distance, slower beeping
    tone(buzzerPin, 1000);
    delay(300);
    noTone(buzzerPin);
    delay(300);
  } else if (distance <= 50) {
    // Farther away, even slower beeping
    tone(buzzerPin, 1000);
    delay(500);
    noTone(buzzerPin);
    delay(500);
  } else {
    // No obstacle nearby, no beeping
    noTone(buzzerPin);
  }

  delay(100); // Short delay before the next reading
}
Code Explanation
- Pin Setup:
- trigPin sends the ultrasonic pulse.
- echoPin receives the reflected pulse.
- buzzerPin controls the buzzer sound.
- Distance Calculation:
- The ultrasonic sensor sends out a pulse from the trigPin, and the time it takes for the pulse to bounce back is measured via the echoPin. The duration is used to calculate the distance in centimeters.
- Buzzer Control:
- If the distance is less than or equal to 10 cm, the buzzer emits fast beeps.
- If the distance is between 10 and 30 cm, the beeps are slower.
- At distances between 30 and 50 cm, the beeping is even slower.
- Beyond 50 cm, the buzzer remains silent.
Modifying the Code
You can adjust the distance thresholds or beep speed to suit your needs. For example, if you want to increase the beeping rate for farther distances, you can modify the if statements and delay() values accordingly.
Assembly Instructions
- Connect the ultrasonic sensor to the Arduino using jumper wires as described in the circuit diagram.
- Connect the buzzer to the Arduino.
- Upload the code to your Arduino using the Arduino IDE.
- Power the Arduino using a USB cable or external power supply.
Testing the System
After assembling the circuit and uploading the code, place the sensor in front of a wall or another obstacle. As you move the obstacle closer, you should hear the buzzer beeping faster.
If the sensor does not detect the object correctly, check the wiring of the ultrasonic sensor and ensure the pins are connected properly.
Applications
- Car parking assist: A small, low-cost system to help drivers detect nearby objects when parking.
- Garage parking: Mount this system in your garage to detect the position of your car and ensure it’s parked safely.
- Object detection: Useful in robotics or automation projects to detect the presence of nearby objects.
Conclusion
This Arduino Parking Sensor project is a great way to understand how ultrasonic sensors work and how they can be integrated into real-world applications. You now have a functional parking sensor system that mimics the capabilities of modern car parking assistance technologies. With a few tweaks, you can expand this project further by adding visual feedback using LEDs or an LCD screen. Happy tinkering!


")
