
In this project, we'll build a fun "Tug of War" game using an Arduino, a LED bar graph display, and buttons. The game mimics a classic tug-of-war, where two players compete to press their button rapidly to pull the "rope" (represented by a LED) to their side.
Components Needed
- Arduino Uno (or similar) – 1
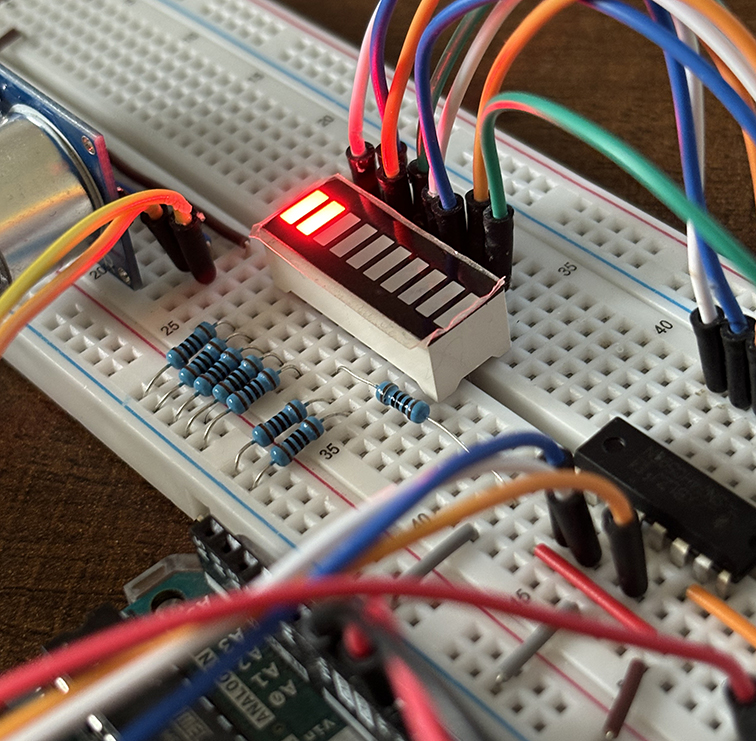
- LED bar graph display (10-segment) – 1
- Push buttons – 2
- Resistors (10kΩ for pull-downs) – 2
- Resistors (220Ω or 330Ω for LEDs) – 10
- Breadboard – 1
- Jumper wires
Wiring Diagram
| Component | Arduino Pin | Notes |
| LED bar graph pins | D2–D11 | Each pin controls one LED |
| Button 1 | D12 | Player 1's button |
| Button 2 | D13 | Player 2's button |
| 10kΩ resistors | GND | Pull-down for buttons |
| 220Ω resistors | Series with LEDs | Protect LEDs |
- LED Bar Graph:
- Connect the cathodes of the LEDs to GND through a 220Ω resistor.
- Connect each anode to Arduino pins D2 to D11.
- Buttons:
- Connect one leg of each button to GND through a 10kΩ resistor (pull-down configuration).
- Connect the other leg to D12 (Player 1) and D13 (Player 2).
Gameplay Overview
- A "marker" (one lit LED) starts in the middle of the LED bar graph.
- Players press their respective buttons to move the marker toward their end.
- The game ends when the marker reaches one side, indicating the winner.
Code
Here's the Arduino sketch for the Tug of War game:
// Tug of War Game for Arduino

const int ledPins[] = {2, 3, 4, 5, 6, 7, 8, 9, 10, 11}; // LED pins
const int numLeds = 10; // Number of LEDs
const int button1Pin = 12; // Player 1 button
const int button2Pin = 13; // Player 2 button

int markerPosition = numLeds / 2; // Start in the middle

void setup() {
   // Initialize LED pins as output
   for (int i = 0; i < numLeds; i++) {
       pinMode(ledPins[i], OUTPUT);
   }

   // Initialize button pins as input
   pinMode(button1Pin, INPUT);
   pinMode(button2Pin, INPUT);

   // Light up the starting LED
   updateLeds();
}

void loop() {
   // Read button states
   int button1State = digitalRead(button1Pin);
   int button2State = digitalRead(button2Pin);

   // Check if Player 1 presses their button
   if (button1State == HIGH) {
      markerPosition = max(0, markerPosition - 1); // Move left
      updateLeds();
      delay(200); // Debounce delay
   }

   // Check if Player 2 presses their button
   if (button2State == HIGH) {
      markerPosition = min(numLeds - 1, markerPosition + 1); // Move right
      updateLeds();
      delay(200); // Debounce delay
   }

   // Check for win condition
   if (markerPosition == 0) {
      gameOver(1); // Player 1 wins
   } else if (markerPosition == numLeds - 1) {
      gameOver(2); // Player 2 wins
   }
}

void updateLeds() {
  for (int i = 0; i < numLeds; i++) {
     digitalWrite(ledPins[i], i == markerPosition ? HIGH : LOW);
  }
}


void gameOver(int winner) {
   for (int i = 0; i < 5; i++) {

      // Flash LEDs to indicate the winner
      for (int j = 0; j < numLeds; j++) {
         digitalWrite(ledPins[j], HIGH);
      }

      delay(200);
      for (int j = 0; j < numLeds; j++) {
         digitalWrite(ledPins[j], LOW);
      }

      delay(200);
   }

   // Display winner LED permanently
   if (winner == 1) {
      digitalWrite(ledPins[0], HIGH); // Player 1 wins
   } else {
      digitalWrite(ledPins[numLeds - 1], HIGH); // Player 2 wins
   }

   while (true) {} // Stop the game
}
Explanation
- LED Control:
- The updateLeds() function ensures only one LED (the marker) is lit at any time, based on the markerPosition.
- Button Handling:
- The loop checks if either button is pressed and adjusts the marker's position accordingly.
- A debounce delay is added to prevent multiple detections from a single press.
- Win Condition:
- If the marker reaches the first or last LED, the game ends, and the LEDs flash to indicate the winner.
- Game Over:
- After flashing, the winner's LED stays lit, and the game stops.
Testing and Adjustments
- Ensure proper wiring of LEDs and buttons before uploading the code.
- Adjust the debounce delay (200 ms) if buttons feel too slow or too fast.
- Try increasing the number of LEDs for a longer game.


