

When working with Segger Embedded Studio (SES) and Nordic's nRF52 chips, one of the quickest ways to get started is by using an existing project template. It simplifies project setup, reducing the need for manual configuration, and you can focus on development right away. In this guide, I'll walk you through setting up a project using an nRF52 SES template and explain the project structure, which follows the typical SDK layout like PCA10040.
Cloning the nRF52 SES Template
To begin, we’ll use a pre-configured template available on GitHub, which already has some of the initial settings in place. Clone or download the repository from this link:
git clone https://github.com/eldstal/nrf52-ses-template.git
Once you have the project downloaded, extract the files or navigate to the directory where you cloned the repository.
Understanding the SES Project Structure
The structure of an SES project for nRF52 typically follows the layout used in Nordic's SDK. If you're using the PCA10040 SDK, the project is organized in a standard folder hierarchy. Here's a breakdown:
Project Folder: This is the root of your project, where the main.c file resides. This file contains the main application code for your project.
Project_Folder/
├── main.c
└── pca10040/
pca10040 Folder: This folder is specific to the nRF52832-based development kit (PCA10040). Inside, you'll find specific configurations for this board.
Project_Folder/
├── pca10040/
└── s132/
s132 Folder: This folder corresponds to the SoftDevice you're using, such as S132 for Bluetooth applications on nRF52832.
Project_Folder/
├── pca10040/
└── s132/
└── ses/
ses Folder: This folder contains the Segger Embedded Studio project files, including the .emProject file that opens the project in SES and flash_placement.xml which outlines the memory layout of the nRF52. If you have user-defined headers and source code, it is also advisable to put them in here.
Project_Folder/
├── pca10040/
├── s132/
└── ses/
    └── your_project.emProject
    └── flash_placement.xml
    └── Source/
       └── user-defined-source-1.c
       └── user-defined-source-2.c
    └── Include/
       └── user-defined-header-1.h
       └── user-defined-header-2.h
    └── Output/
       └── Debug/
            └── Exe/  --> .elf, .hex, .map files are here
            └── Obj/  --> .o files are here
Thus, when you open the project in SES, you'll typically navigate to pca10040 > s132 > ses to locate the .emProject file, which is the project’s entry point.
The Output folder will be created when the project successfully compiles. If you have a Debug configuration, you will see a Debug folder and inside it are the binaries you need to upload to the nRF52 SDK as well as the compiled object files.
Opening the Project in SES
Once you have your folder structure and project files set up, open the project in SES:
- In SES, go to File > Open Solution.
- Navigate to Project_Folder > pca10040 > s132 > ses and select the .emProject file.
This will open the project with pre-configured settings for the PCA10040 development kit and the S132 SoftDevice, assuming you’re working with Bluetooth.
Configuring the SDK Path
After opening the project, you'll need to configure the SDK path so SES can find the necessary files.
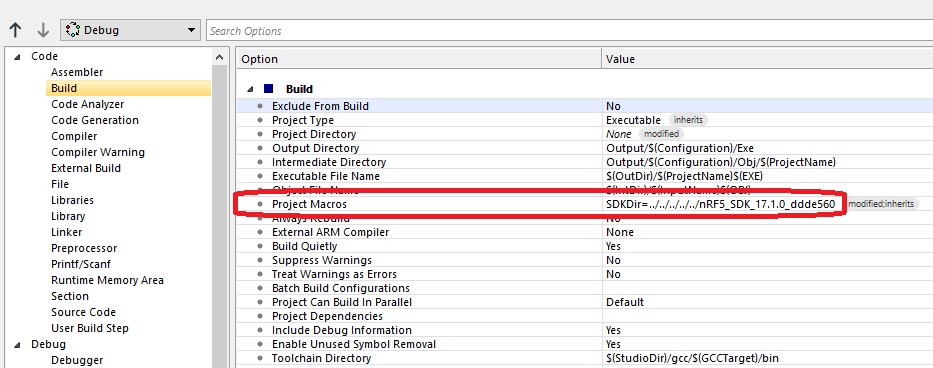
You can create a macro to specify your SDK location and use that everywhere in the project. In Project Explorer > Options, select Debug > Build. Under the Project Macros field, browse the location of your SDK file. You can also make the location relative to the .emProject file for portability. For example, my SDK is always five folders above my .emProject file:
You also need to specify the location of your libraries.
- Right-click on your project in the Project Explorer and select Options.
- Go to Common > Preprocessor > User Include Directories.
Add the paths to your nRF5 SDK installation. For example:
$(SDKDir)/components/ble/ble_advertising
$(SDKDir)/components/ble/ble_db_discovery
$(SDKDir)/components/ble/ble_dtm
$(SDKDir)/components/ble/ble_link_ctx_manager
$(SDKDir)/components/ble/ble_racp
$(SDKDir)/components/ble/ble_services/ble_ancs_c
...
This ensures that the project can locate the necessary headers, drivers, and libraries provided by the SDK.
Modifying sdk_config.h
The sdk_config.h file is the configuration hub for enabling or disabling various modules in your project. The project template includes an sdk_config.h file, but you may need to tweak it based on your needs. For example, if you want to enable UART logging, you would modify:
#define NRF_LOG_ENABLED 1
Each peripheral or library you want to use must be enabled in this file. So, depending on whether you're using Bluetooth, UART, GPIO, or other features, you'll need to adjust the sdk_config.h accordingly.
See the examples folder inside the SDK to view how each project contains different sdk_config.h files.
Customizing main.c
In your Project Folder, you'll find the main.c file, which contains the main logic of your program. The template project includes a basic structure that you can build upon. As a simple test, let's create a basic LED blink program:
#include "nrf.h"
#include "nrf_gpio.h"
#include "boards.h"
#include "nrf_delay.h"

int main(void)
{
    // Initialize LED pin
    nrf_gpio_cfg_output(LED_1);

    while (1)
    {
        // Turn LED on
        nrf_gpio_pin_set(LED_1);
        nrf_delay_ms(500);

        // Turn LED off
        nrf_gpio_pin_clear(LED_1);
        nrf_delay_ms(500);
    }
}
This code initializes one of the GPIO pins connected to an LED and makes the LED blink with a 500ms delay.
Building and Flashing the Project
Now that the code is ready, let's build and flash it onto the nRF52 device.
- Click the Build button (or press F7) to compile the project.
- Connect your PCA10040 development board to your PC via USB.
- In SES, go to Target > Download <Project Name> to flash the program to the chip.
If everything is working correctly, the LED should start blinking.
Troubleshooting
Here are a few common issues you might encounter:
- Header or library not found: Double-check that the SDK path in User Include Directories points to the correct folders.
- Configuration errors: Ensure that the sdk_config.h file is correctly set up to enable the peripherals or libraries you need.
- Flashing issues: Make sure that the correct development kit is connected and that you’ve selected the correct target device in SES.
- “.text section is larger than specified size”: open the flash_placement.xml file and remove the part that says “size = 0x4”.
<ProgramSection alignment="4" load="Yes" name=".text" size="0x4" />
Customizing the Template for Future Use
One of the best parts about using a template is that you can customize it for future projects. For example:
- Add your own commonly used libraries or peripherals to the project.
- Pre-configure frequently used settings in sdk_config.h.
- Create multiple .emProject configurations if you work with different devices or development boards.
Final Thoughts
Using the template project from GitHub saves time and effort in setting up a new project in Segger Embedded Studio for nRF52. With a solid understanding of the project structure and how to configure the SDK, you can easily start working on firmware without having to set everything up from scratch. By reusing this template and customizing it for your specific needs, you’ll speed up your development process significantly.


