

Last time we managed to display sensor data to a NodeMCU web server. The problem with that code is that we need to refresh the page manually in order to update the sensor value. A better method is to use Ajax (asynchronous javascript and XML) so that we can request data from the ESP8266 server in the background with no page reloads.
Ajax is a combination of an XMLHttpRequest object and JavaScript. The XMLHttpRequest object performs the request on the server while the javascript DOM object updates the element on the web page. Besides updating page elements without reload, ajax also makes it possible to a) request data from a server - after the page has loaded; b) receive data from a server - after the page has loaded and c) send data to a server - in the background. W3Schools has a great tutorial on Ajax.
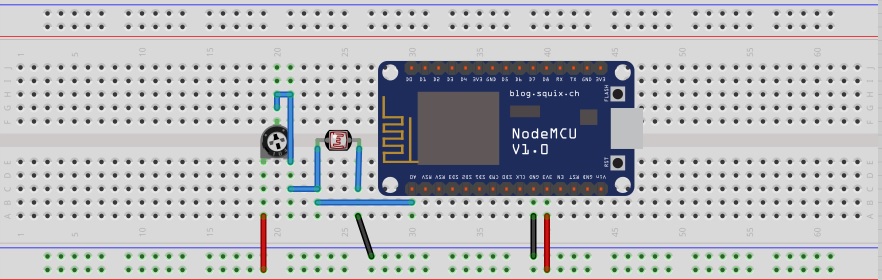
We shall now edit the sketch from last time to include the Ajax script. We will be using the same schematic:
Here is the Ajax script that we’ll be using:
function loadData(url, callback){
var xhttp = new XMLHttpRequest();
xhttp.onreadystatechange = function(){
 if(this.readyState == 4 && this.status == 200){
 callback.apply(xhttp);
 }
};
xhttp.open("GET", url, true);
xhttp.send();
}
function updateData(){
 document.getElementById("data").innerHTML = this.responseText;
}
The main Ajax script is the loadData() function. Inside this function, an XMLHttpRequest() object is created. The server waits for a readystate of 4 (done) and a http status of 200 (OK) before the web page element is updated via callback to updateData(). The request is then initiated via the open() and send() functions. Callback was necessary here to make the requests asynchronous, i.e., make the page still responsive even if there is a pending request.
In order for this function to be repeatedly called, we will be using the javascript setInterval() function. Here the loadData() function is called every second.
There are a couple of ways to get data from the sensor. What I did was save the data to a text file. This text file will then be read by the XMLHttpRequest object and then display its contents to the page element.
Full Code
#include <ESP8266WiFi.h>
#include <WiFiClient.h>
#include <ESP8266WebServer.h>

// Replace with your network credentials
const char* ssid = "<Your-WiFi-SSID>";
const char* password = "<Your-WiFi-Password>";
ESP8266WebServer server(80);   //instantiate server at port 80 (http port)

String page = "";
String text = "";
double data;

void setup(void){
 pinMode(A0, INPUT);
 delay(1000);
 Serial.begin(115200);
 WiFi.begin(ssid, password); //begin WiFi connection
 Serial.println("");

 // Wait for connection
 while (WiFi.status() != WL_CONNECTED) {
 delay(500);
 Serial.print(".");
}

 Serial.println("");
 Serial.print("Connected to ");
 Serial.println(ssid);
 Serial.print("IP address: ");
 Serial.println(WiFi.localIP());
 server.on("/data.txt", [](){
   text = (String)data;
   server.send(200, "text/html", text);
 });
 server.on("/", [](){
   page = "<h1>Sensor to Node MCU Web Server</h1><h1>Data:</h1> <h1 id=\"data\">""</h1>\r\n";
   page += "<script>\r\n";
   page += "var x = setInterval(function() {loadData(\"data.txt\",updateData)}, 1000);\r\n";
   page += "function loadData(url, callback){\r\n";
   page += "var xhttp = new XMLHttpRequest();\r\n";
   page += "xhttp.onreadystatechange = function(){\r\n";
   page += " if(this.readyState == 4 && this.status == 200){\r\n";
   page += " callback.apply(xhttp);\r\n";
   page += " }\r\n";
   page += "};\r\n";
   page += "xhttp.open(\"GET\", url, true);\r\n";
   page += "xhttp.send();\r\n";
   page += "}\r\n";
   page += "function updateData(){\r\n";
   page += " document.getElementById(\"data\").innerHTML = this.responseText;\r\n";
   page += "}\r\n";
   page += "</script>\r\n";
   server.send(200, "text/html", page);
});

 server.begin();
 Serial.println("Web server started!");
}

void loop(void){
 data = analogRead(A0);
 delay(1000);
 server.handleClient();
}
Video:
You can also add CSS to make the web page look nicer. If you want to record the sensor readings, you can send NodeMCU data to Google sheets or save it to a database.


Great tutorial!
My NodeMCU crashes though after 30 seconds with this error:
Exception (29):
epc1=0x4020dc0c epc2=0x00000000 epc3=0x00000000 excvaddr=0x00000000 depc=0x00000000
ctx: sys
sp: 3ffffcd0 end: 3fffffb0 offset: 01a0
ets Jan 8 2013,rst cause:2, boot mode:(1,6)
ets Jan 8 2013,rst cause:4, boot mode:(1,6)
wdt reset
Any ideas how to fix this?
Hi,
It looks like you have an exception and is resetting the device. I suggest you install the ESP Exception Decoder to get an idea what is causing the exception. Ultimately, you might have to re-flash your device.
Hi,
In this tuttorial you put sensor data into text file, where u put the text file? SD card (perhaps)?
Hi Sanz,
There was no SD card. The text file is dynamically created on the NodeMCU server. Like, the file was created when the NodeMCU server was running. When you stop the server, that text file will vanish also.
But it's not a textfile, it's just a global variable?
hlo,
i have run the code which u have mentioned in the tutorial above,but i m getting the error "stray '\302' in program" so can u tell how to resolve it.do i need to do changes in it???
Hi,
The code compiles on mine with no error. I think there is a stray character on the code you pasted. Try pressing the "toggle plain code" on the upper right of the code above and copy-paste that to your IDE.
Hi,
Fantastic tuttorial but i found some problem when i try to read 3 sensor using ajax method for my final project.Can you help me with my problem read 3 sensor using ajax method?
Thank You
Hi,
You can change my example so that the variable "data" is a string that contains three sensor readings. For example,
data = "Temperature: " + (String)temp_c + " ℃Humidity: " + (String)humidity + " %Pressure: " + (String)pressure + " Pa";
Here, temperature, humidity and pressure is displayed. Again, change the data variable in my original code from double to string and also remove the (String) modifier in line 33.
Feel free to ask me questions if there's something you don't understand. Good luck!
Hi,
I try change your example according to your explanation, but I got this error:
invalid operands of types 'const char [14]' and 'const char [14]' to binary 'operator+'
For this:
data = "Air Quality: " + (String)T+ "Temperature: " + (String)T + "Ax: " + (String)Ax + "Ay: " + (String)Ay + "Az: " + (String)Az + "Gx: " + (String)Gx +"Gy: " + (String)Gy +"Gz: " + (String)Gz +;
I use MQ2 gas sensor and MPU6050 which can detect temperature, acceleration and rotational movement (gyro meter).
Can you help me to solve this problem?
Thank you.
It looks like a concatenation error. Can you provide the full code?
Looks like the + right at the end...
Yeah that's it 🙂 thanks for pointing that out
Hi,
i changed the code for 3 sensors and its working. The issue i have is: The Sensor values are displayed in one row. I have no idea how to get a carriage return in HTML to have each sensor value in a single row. Can you help?
hey nice tutorial it worked. But can you tell me how can i decrease the time of update of data on server.
Hi,
You can change the time interval in the setInterval() JS function. In line 39 of my sketch, change 1000 (in milliseconds) to whichever value that suits you.
Hi,
very great serie of tutorials ; every sketchs are running without porblem ! many thanks for all of theses, they are very helpfull for my project
My next problem will be to integer a picture on the web page ..
Hi! Thanks for the tutorial.
I'm trying to do similar, but for show "Voltage" and "Current".
The problem is that Voltage and Current values I get from SPI communication with Arduino inside of
void loop(void){} function.
How can I get this values and show?
How it can do for 2 analog sensors
How can we do for two analog sensors , provided it has only one analog pin ..? Please help .
how to do if 2 or more analog sensor? thanks..
Hii I have been trying this code but I got this error.
Arduino: 1.8.8 (Windows 10), Board: "NodeMCU 1.0 (ESP-12E Module), 80 MHz, Flash, Disabled, 4M (no SPIFFS), v2 Lower Memory, Disabled, None, Only Sketch, 115200"
nodemcu_server:8:1: error: stray '\302' in program
ESP8266WebServer server(80); Â Â //instantiate server at port 80 (http port)
^
nodemcu_server:8:1: error: stray '\240' in program
nodemcu_server:8:1: error: stray '\302' in program
nodemcu_server:8:1: error: stray '\240' in program
nodemcu_server:15:1: error: stray '\302' in program
 pinMode(A0, INPUT);
^
nodemcu_server:15:1: error: stray '\240' in program
nodemcu_server:16:1: error: stray '\302' in program
 delay(1000);
^
nodemcu_server:16:1: error: stray '\240' in program
nodemcu_server:17:1: error: stray '\302' in program
 Serial.begin(115200);
^
nodemcu_server:17:1: error: stray '\240' in program
nodemcu_server:18:1: error: stray '\302' in program
 WiFi.begin(ssid, password); //begin WiFi connection
^
nodemcu_server:18:1: error: stray '\240' in program
nodemcu_server:19:1: error: stray '\302' in program
 Serial.println("");
^
nodemcu_server:19:1: error: stray '\240' in program
nodemcu_server:21:1: error: stray '\302' in program
 // Wait for connection
^
nodemcu_server:21:1: error: stray '\240' in program
nodemcu_server:22:1: error: stray '\302' in program
 while (WiFi.status() != WL_CONNECTED) {
^
nodemcu_server:22:1: error: stray '\240' in program
nodemcu_server:23:1: error: stray '\302' in program
 delay(500);
^
nodemcu_server:23:1: error: stray '\240' in program
nodemcu_server:24:1: error: stray '\302' in program
 Serial.print(".");
^
nodemcu_server:24:1: error: stray '\240' in program
nodemcu_server:27:1: error: stray '\302' in program
 Serial.println("");
^
nodemcu_server:27:1: error: stray '\240' in program
nodemcu_server:28:1: error: stray '\302' in program
 Serial.print("Connected to ");
^
nodemcu_server:28:1: error: stray '\240' in program
nodemcu_server:29:1: error: stray '\302' in program
 Serial.println(ssid);
^
nodemcu_server:29:1: error: stray '\240' in program
nodemcu_server:30:1: error: stray '\302' in program
 Serial.print("IP address: ");
^
nodemcu_server:30:1: error: stray '\240' in program
nodemcu_server:31:1: error: stray '\302' in program
 Serial.println(WiFi.localIP());
^
nodemcu_server:31:1: error: stray '\240' in program
nodemcu_server:32:1: error: stray '\302' in program
 server.on("/data.txt", [](){
^
nodemcu_server:32:1: error: stray '\240' in program
nodemcu_server:33:1: error: stray '\302' in program
 text = (String)data;
^
nodemcu_server:33:1: error: stray '\240' in program
nodemcu_server:34:1: error: stray '\302' in program
   server.send(200, "text/html", text);
^
nodemcu_server:34:1: error: stray '\240' in program
nodemcu_server:34:1: error: stray '\302' in program
nodemcu_server:34:1: error: stray '\240' in program
nodemcu_server:34:1: error: stray '\302' in program
nodemcu_server:34:1: error: stray '\240' in program
nodemcu_server:35:1: error: stray '\302' in program
 });
^
nodemcu_server:35:1: error: stray '\240' in program
nodemcu_server:36:1: error: stray '\302' in program
 server.on("/", [](){
^
nodemcu_server:36:1: error: stray '\240' in program
nodemcu_server:54:2: error: stray '\302' in program
  server.send(200, "text/html", page);
^
nodemcu_server:54:2: error: stray '\240' in program
nodemcu_server:54:2: error: stray '\302' in program
nodemcu_server:54:2: error: stray '\240' in program
nodemcu_server:57:1: error: stray '\302' in program
 server.begin();
^
nodemcu_server:57:1: error: stray '\240' in program
nodemcu_server:58:1: error: stray '\302' in program
 Serial.println("Web server started!");
^
nodemcu_server:58:1: error: stray '\240' in program
nodemcu_server:62:1: error: stray '\302' in program
 data = analogRead(A0);
^
nodemcu_server:62:1: error: stray '\240' in program
nodemcu_server:63:1: error: stray '\302' in program
 delay(1000);
^
nodemcu_server:63:1: error: stray '\240' in program
nodemcu_server:64:1: error: stray '\302' in program
 server.handleClient();
^
nodemcu_server:64:1: error: stray '\240' in program
exit status 1
stray '\302' in program
I tried toggling line code but I still got the same error.
Can You please help me fix this.
Thank you.
Hi,
It looks like a formatting concern. Have you tried toggling to plain code? Click the "<>" on the upper right.
Es posible graficar los resultados directamente desde el nodemcu?
Is it possible to graph the results directly from the nodemcu?
Yes, you can check my post: NodeMCU weather device for an example on how to graph data from sensors.
Thanks for this project. How is it possible to add an input field? I would like to be able to adjust the threshold value for my 'Smoke Alarm' project for my wife. Is there project that shows how to add an interger field?
Thanks! Will create a tutorial for that soon
server.on("/", [](){
page = "Sensor to Node MCU Web ServerData: ""\r\n";
page += "\r\n";
page += "var x = setInterval(function() {loadData(\"data.txt\",updateData)}, 1000);\r\n";
page += "function loadData(url, callback){\r\n";
page += "var xhttp = new XMLHttpRequest();\r\n";
page += "xhttp.onreadystatechange = function(){\r\n";
page += " if(this.readyState == 4 && this.status == 200){\r\n";
page += " callback.apply(xhttp);\r\n";
page += " }\r\n";
page += "};\r\n";
page += "xhttp.open(\"GET\", url, true);\r\n";
page += "xhttp.send();\r\n";
page += "}\r\n";
page += "function updateData(){\r\n";
page += " document.getElementById(\"data\").innerHTML = this.responseText;\r\n";
page += "}\r\n";
page += "\r\n";
server.send(200, "text/html", page);
});
In this function i want to put id value in array format is there possible or not.
if possible then how to write a statment
page = "Sensor to Node MCU Web ServerData: ""\r\n";