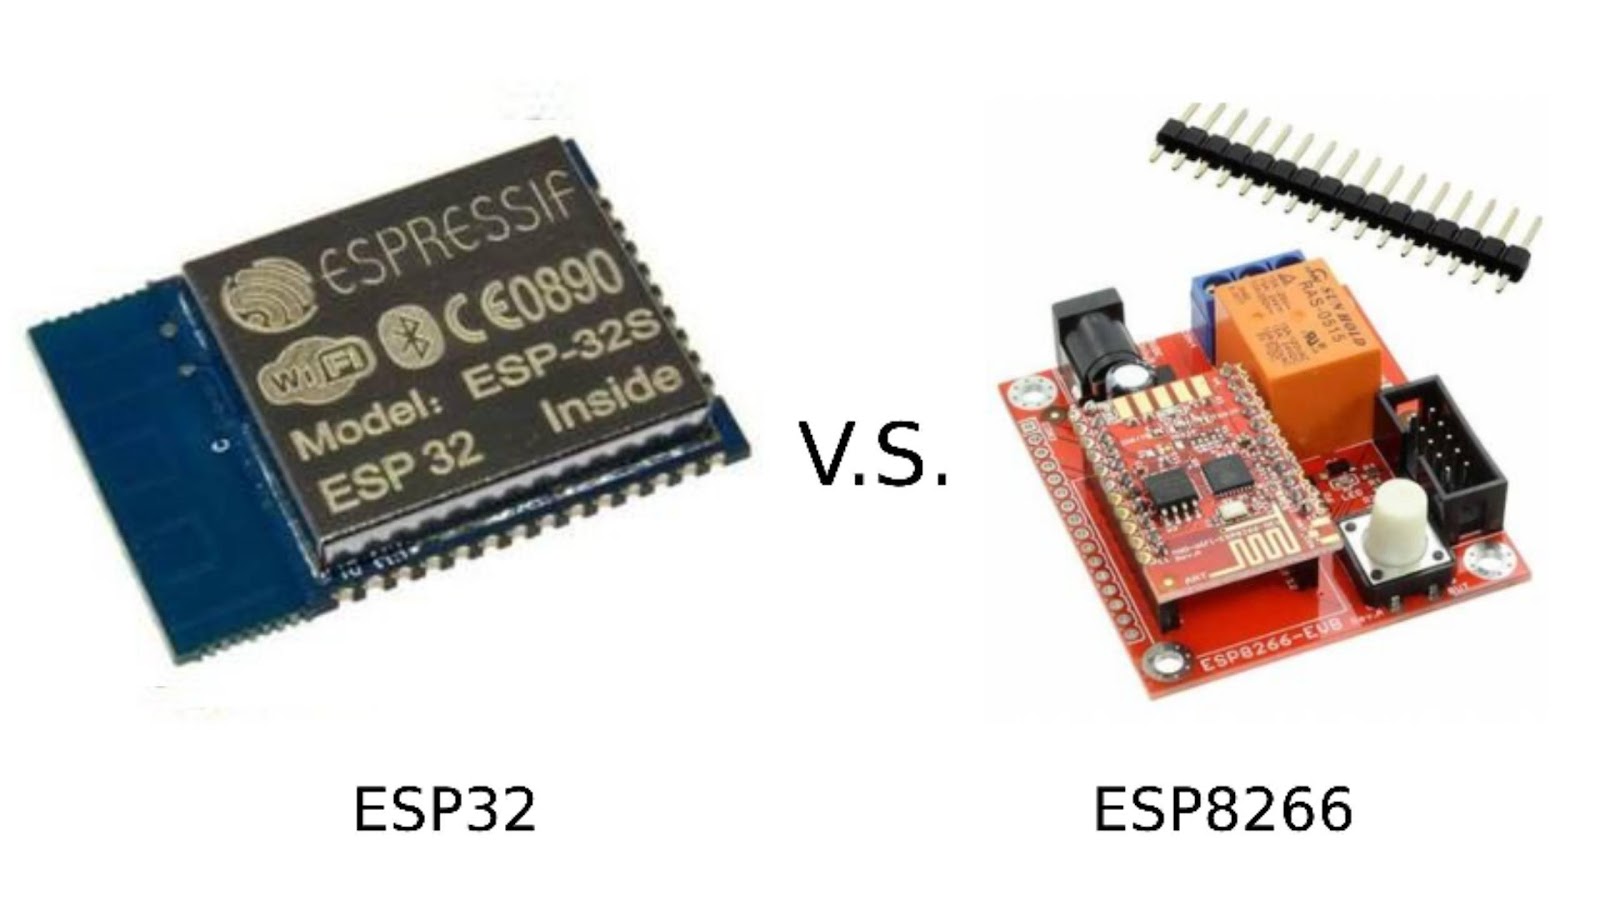
Consider a project where the ESP32 needs to read a sensor, update a display, maintain a Wi-Fi connection, and flash a status LED at the same time. You could put everything inside loop() and carefully manage the timing with millis(), but the program quickly becomes difficult to maintain as more functions are added. This is where FreeRTOS on the ESP32 becomes useful. FreeRTOS allows a program to be divided into separate tasks. Each task can perform one job independently while the FreeRTOS scheduler decides when each task gets CPU time. On dual-core ESP32 chips, tasks can even execute on different CPU cores.
In this ESP32 FreeRTOS tutorial, we'll learn how to:
- Create FreeRTOS tasks on the ESP32
- Run multiple tasks at the same time
- Use xTaskCreate() and xTaskCreatePinnedToCore()
- Run tasks on different ESP32 cores
- Use task priorities correctly
- Use vTaskDelay() and vTaskDelayUntil()
- Pass data between tasks using a FreeRTOS queue
- Check task stack usage
- Avoid common ESP32 FreeRTOS problems such as watchdog resets and task starvation
What is FreeRTOS?
FreeRTOS is a real-time operating system designed for microcontrollers. Instead of having one large program loop responsible for everything, FreeRTOS lets you divide the application into separate tasks.
For example, an ESP32 project might contain:
- Sensor Task – reads a temperature sensor every 100 ms
- Display Task – updates an OLED display every 250 ms
- Wi-Fi Task – handles network communication
- LED Task – flashes a status LED every 500 ms
These tasks don't necessarily execute at the same instant. On a single-core processor, FreeRTOS rapidly switches between ready tasks. This creates concurrency. On a dual-core ESP32, two tasks can actually execute in parallel when they are scheduled on different CPU cores. The FreeRTOS component responsible for deciding which task runs is called the scheduler.
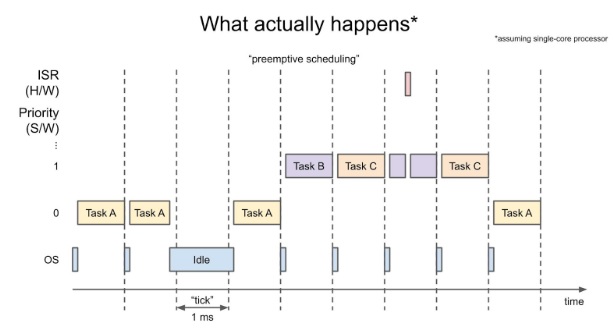
In the simplified illustration above, tasks B and C have higher priorities than task A. If several tasks are ready to run, the scheduler normally gives CPU time to the highest-priority ready task. An interrupt is different from a FreeRTOS task. When a hardware interrupt occurs, an Interrupt Service Routine or ISR executes according to the processor's interrupt-priority rules. FreeRTOS task priority numbers do not determine ISR priority.
FreeRTOS Task States
A task does not continuously consume processor time. During normal operation, a task usually moves among several states:
- Running – the task currently executing
- Ready – the task can run but is waiting for CPU time
- Blocked – the task is waiting for something such as a delay, queue, semaphore, or event
- Suspended – the task has explicitly been stopped until another task resumes it
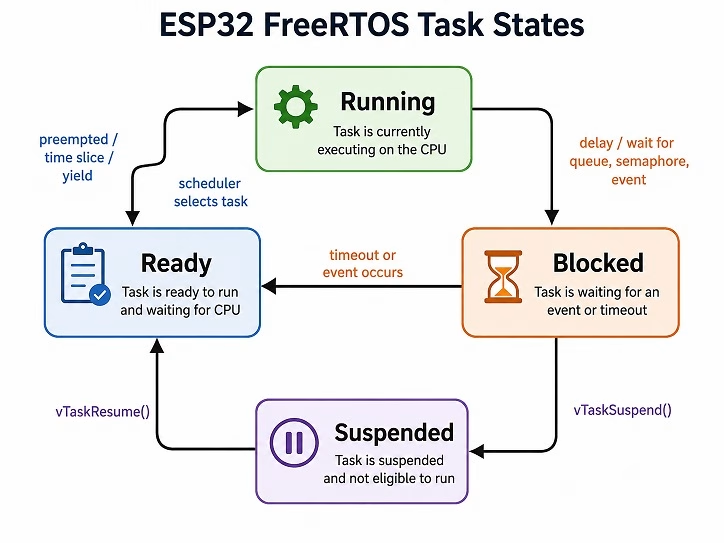
One important idea here is that a well-designed FreeRTOS task spends much of its time blocked. It should not continuously loop at full speed unless the application specifically requires that behavior.
Does ESP32 Already Use FreeRTOS?
Yes. If you are programming an ESP32 using the Arduino framework, you do not need to install a separate FreeRTOS library. The Arduino core for ESP32 is built on Espressif's ESP-IDF framework, which already includes FreeRTOS. This means functions such as:
xTaskCreate()
xTaskCreatePinnedToCore()
vTaskDelay()
vTaskSuspend()
vTaskResume()
xQueueCreate()
are available directly inside an ESP32 Arduino sketch. Even normal Arduino code on the ESP32 is already running in an environment managed by FreeRTOS.
Setting Up ESP32 in Arduino IDE
If you already have ESP32 boards working in the Arduino IDE, you can skip this section. Otherwise, go to File > Preferences and look for the Additional Board Manager URLs field. Add the ESP32 package URL:
https://dl.espressif.com/dl/package_esp32_index.json
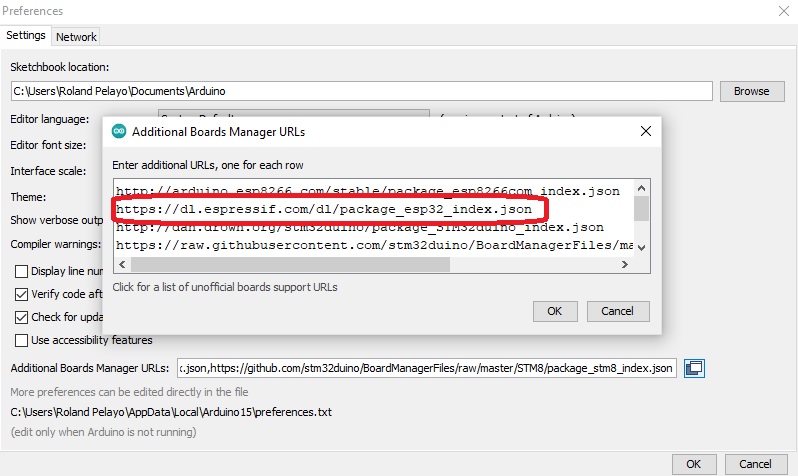
Next, open Tools > Board > Boards Manager, search for ESP32, and install the package from Espressif Systems.
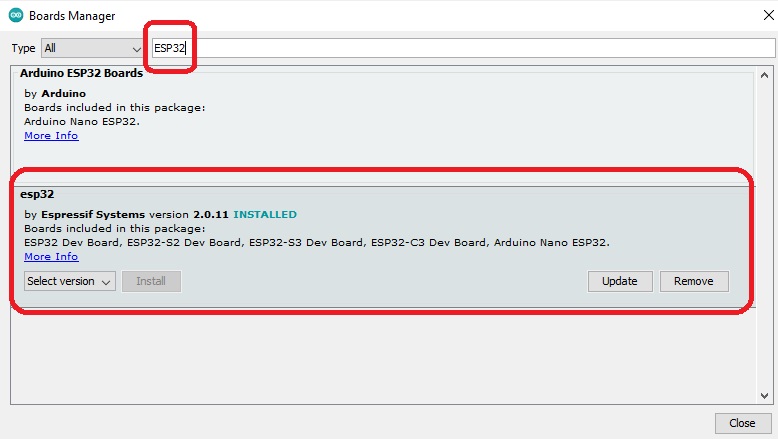
Select your ESP32 board and COM port as you normally would. No additional FreeRTOS installation is required.
Creating Your First ESP32 FreeRTOS Task
A FreeRTOS task is simply a function with a particular format:
void myTask(void *parameter)
{
  for (;;) {
    // Task code goes here
  }
}
The void *parameter argument allows data to be passed to the task when it is created. Most FreeRTOS tasks contain an infinite loop. However, unlike a normal busy while(1) loop, the task should normally contain a delay or wait for an event so that other tasks can execute. Here's a simple LED task:
static const int ledPin = 16;

void blinkTask(void *parameter)
{
  for (;;) {
    digitalWrite(ledPin, HIGH);
    vTaskDelay(pdMS_TO_TICKS(500));

    digitalWrite(ledPin, LOW);
    vTaskDelay(pdMS_TO_TICKS(500));
  }
}
Notice that I am using:
pdMS_TO_TICKS(500)instead of manually converting milliseconds using portTICK_PERIOD_MS. The macro makes the intended delay easier to read. Now we need to create the task.
xTaskCreate(
  blinkTask,       // Function containing the task
  "Blink Task",    // Task name
  2048,            // Stack size
  NULL,            // Parameter passed to task
  1,               // Priority
  NULL             // Task handle
);
A complete example is:
#include <Arduino.h>

static const int ledPin = 16;

void blinkTask(void *parameter)
{
  for (;;) {
    digitalWrite(ledPin, !digitalRead(ledPin));
    vTaskDelay(pdMS_TO_TICKS(500));
  }
}

void setup()
{
  pinMode(ledPin, OUTPUT);

  xTaskCreate(
    blinkTask,
    "Blink Task",
    2048,
    NULL,
    1,
    NULL
  );
}

void loop()
{
  delay(1000);
}
After xTaskCreate() succeeds, the scheduler can execute blinkTask() independently of the Arduino loop() function.
Understanding xTaskCreate()
The complete function contains several parameters:
xTaskCreate(
  taskFunction,
  taskName,
  stackSize,
  parameter,
  priority,
  taskHandle
);| Parameter | Purpose |
|---|---|
| taskFunction | The function containing the task code |
| taskName | A descriptive name useful while debugging |
| stackSize | Amount of stack memory reserved for the task |
| parameter | Optional pointer passed to the task function |
| priority | The task priority; higher values represent higher priorities |
| taskHandle | Optional handle used later to control or inspect the task |
One ESP32-specific detail is particularly important: in ESP-IDF's FreeRTOS implementation, task stack sizes passed to these task-creation APIs are expressed in bytes. Standard FreeRTOS documentation may describe stack depth in terms of words, so be careful when copying examples intended for another microcontroller.
xTaskCreate() vs xTaskCreatePinnedToCore()
The ESP32 also provides:
xTaskCreatePinnedToCore()This version lets you specify the CPU core on which a task may execute.
Its format is:
xTaskCreatePinnedToCore(
  taskFunction,
  taskName,
  stackSize,
  parameter,
  priority,
  taskHandle,
  coreID
);
The additional parameter is coreID.
On a dual-core ESP32:
- 0 – run the task on core 0
- 1 – run the task on core 1
- tskNO_AFFINITY – do not restrict the task to a particular core
For example:
xTaskCreatePinnedToCore(
  blinkTask,
  "Blink Task",
  2048,
  NULL,
  1,
  NULL,
  1
);
pins blinkTask to core 1.
Do You Need to Pin ESP32 Tasks to a Core?
Usually, no. If your application has no specific reason to control CPU affinity, xTaskCreate() is often the simpler choice. Core pinning becomes useful when:
- a CPU-intensive task should be isolated from another workload
- you need predictable CPU affinity
- you are diagnosing timing or performance problems
- a peripheral or software component has a core-affinity requirement
Do not assume every ESP32-family chip has two application cores. The original ESP32 and ESP32-S3 commonly used in development boards are dual-core devices, while chips such as the ESP32-C3 and ESP32-S2 are single-core.
Your code should therefore avoid blindly pinning a task to core 1 if you intend it to work across multiple ESP32 families.
ESP32 Dual-Core FreeRTOS Example
Let's prove that tasks can execute on different cores. The function:
xPortGetCoreID()returns the CPU core currently executing the task. The following sketch creates two tasks. On a dual-core ESP32, one is pinned to core 0 and the other to core 1.
#include <Arduino.h>

void taskA(void *parameter)
{
  for (;;) {
    Serial.printf("Task A running on core %d\n", xPortGetCoreID());
    vTaskDelay(pdMS_TO_TICKS(1000));
  }
}

void taskB(void *parameter)
{
  for (;;) {
    Serial.printf("Task B running on core %d\n", xPortGetCoreID());
    vTaskDelay(pdMS_TO_TICKS(1500));
  }
}

void setup()
{
  Serial.begin(115200);
  delay(1000);

#if CONFIG_FREERTOS_UNICORE

  Serial.println("Single-core ESP32 detected");

  xTaskCreate(
    taskA,
    "Task A",
    2048,
    NULL,
    1,
    NULL
  );

  xTaskCreate(
    taskB,
    "Task B",
    2048,
    NULL,
    1,
    NULL
  );

#else

  xTaskCreatePinnedToCore(
    taskA,
    "Task A",
    2048,
    NULL,
    1,
    NULL,
    0
  );

  xTaskCreatePinnedToCore(
    taskB,
    "Task B",
    2048,
    NULL,
    1,
    NULL,
    1
  );

#endif
}

void loop()
{
  delay(1000);
}
On a typical dual-core ESP32, the Serial Monitor should contain output similar to:
Task A running on core 0
Task B running on core 1
Task A running on core 0
Task B running on core 1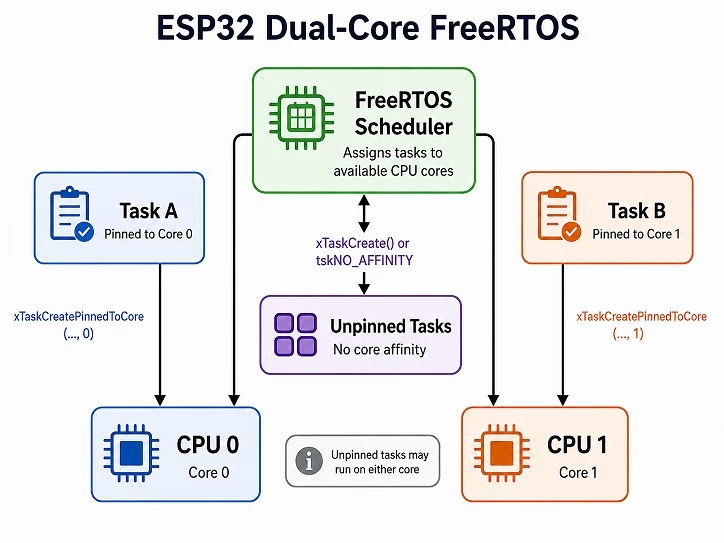
An important point here is that FreeRTOS multitasking does not require two cores. A single-core ESP32 can still run multiple tasks concurrently. Dual-core processors simply provide the additional possibility of true parallel execution.
vTaskDelay() vs delay()
Inside explicit FreeRTOS tasks, you'll commonly see:
vTaskDelay(pdMS_TO_TICKS(500));When a task calls vTaskDelay(), it enters the Blocked state for the requested number of ticks. Other ready tasks are then free to execute. Interestingly, on Arduino-ESP32 the familiar Arduino:
delay(500);is itself implemented using a FreeRTOS delay. So using delay() inside an ESP32 sketch does not freeze the entire ESP32 processor in the same way that a busy-wait loop would. However, I prefer using vTaskDelay() inside explicit FreeRTOS tasks because it makes the intended RTOS behavior clear.
Periodic Tasks with vTaskDelayUntil()
There's another problem worth considering. Suppose a sensor task needs to execute every 100 ms:
readSensor();
vTaskDelay(pdMS_TO_TICKS(100));
If readSensor() itself takes 5 ms, the actual cycle becomes approximately 105 ms. For periodic tasks where the interval matters, use vTaskDelayUntil():
void sensorTask(void *parameter)
{
  TickType_t lastWakeTime = xTaskGetTickCount();

  for (;;) {
    readSensor();

    vTaskDelayUntil(
      &lastWakeTime,
      pdMS_TO_TICKS(100)
    );
  }
}
Instead of delaying relative to the moment the function is called, vTaskDelayUntil() keeps the task aligned to a periodic schedule. This makes it useful for:
- sensor sampling
- control loops
- periodic communication
- data logging
ESP32 FreeRTOS Task Priorities
Every FreeRTOS task has a priority.
Consider:
xTaskCreate(taskA, "Task A", 2048, NULL, 1, NULL);
xTaskCreate(taskB, "Task B", 2048, NULL, 2, NULL);
Task B has the higher priority. If both tasks are ready to execute on the same CPU, FreeRTOS prefers the higher-priority task. That does not mean you should assign large priorities to everything important. A higher-priority task that never blocks can prevent lower-priority tasks from executing.
For example, this is bad:
void badTask(void *parameter)
{
  for (;;) {
    doSomething();
  }
}
If this task continually remains ready, it can consume nearly all available CPU time. A better design is:
void betterTask(void *parameter)
{
  for (;;) {
    doSomething();
    vTaskDelay(pdMS_TO_TICKS(10));
  }
}
Or even better, block the task on the actual resource or event it needs. For example:
xQueueReceive(...)
xSemaphoreTake(...)
ulTaskNotifyTake(...)
A blocked task consumes no CPU time while it waits. Poor task-priority design can lead to:
- task starvation
- unresponsive networking
- missed processing deadlines
- watchdog resets
In most beginner projects, start with low priorities such as 1 and 2 and only increase a priority when the system design provides a clear reason.
Suspending, Resuming and Deleting ESP32 Tasks
If you want to control a task after creating it, save its task handle.
TaskHandle_t ledTaskHandle = NULL;

xTaskCreate(
  blinkTask,
  "Blink Task",
  2048,
  NULL,
  1,
  &ledTaskHandle
);
You can then suspend the task:
vTaskSuspend(ledTaskHandle);Resume it:
vTaskResume(ledTaskHandle);Or permanently delete it:
vTaskDelete(ledTaskHandle);A task can also delete itself:
vTaskDelete(NULL);Suspending a task is useful when a subsystem is temporarily disabled. Deleting it is more appropriate when that task will no longer be needed and you want FreeRTOS to reclaim its allocated resources.
Passing Data Between ESP32 FreeRTOS Tasks
Separate tasks eventually need to exchange information. A tempting solution is to create a global variable:
int sensorValue;and let multiple tasks read and modify it. That can work for very simple situations, but shared data becomes dangerous when multiple tasks can access it at the same time. FreeRTOS provides synchronization and communication mechanisms specifically for this problem.
| FreeRTOS Feature | Typical Use |
|---|---|
| Queue | Pass data safely between tasks |
| Binary Semaphore | Signal that an event occurred |
| Mutex | Protect a shared resource |
| Task Notification | Lightweight signaling directly to a task |
| Event Group | Represent and wait for combinations of event flags |
For passing sensor readings between two tasks, a queue is often the best starting point.
ESP32 FreeRTOS Queue Example
Let's build a more realistic multitasking example. Our ESP32 will perform three independent jobs:
- Sensor Task – read an analog input every 100 ms
- Output Task – receive the latest sensor reading through a queue and print it
- LED Task – flash an LED every 500 ms
For minimal hardware, I'll use a potentiometer as the analog input and the Serial Monitor as our display. The same design can later be expanded to update an OLED or LCD instead.
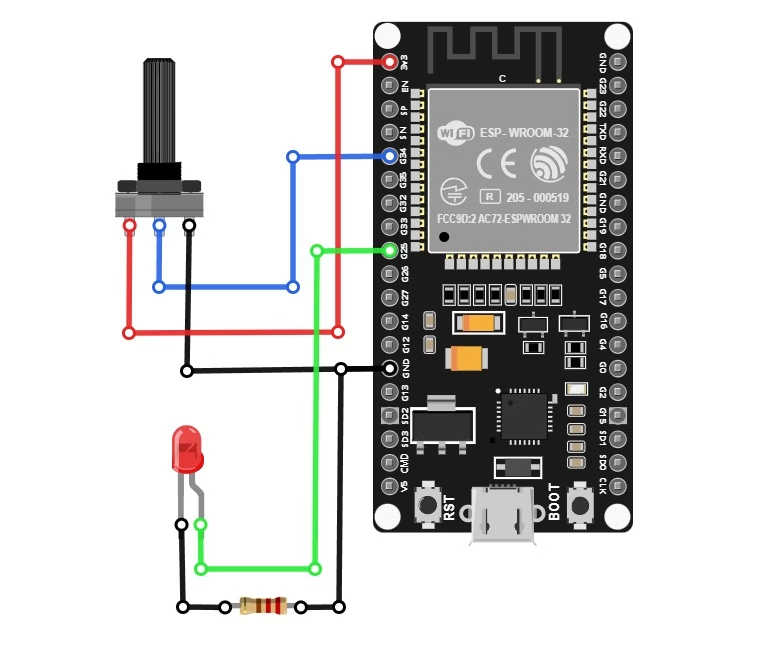
The pin numbers below assume a classic ESP32 DevKit/ESP32-WROOM-32 board. If you are using an ESP32-S3, C3, S2 or another variant, select suitable ADC and GPIO pins for your board.
Here's the complete code:
#include <Arduino.h>
#include "freertos/FreeRTOS.h"
#include "freertos/task.h"
#include "freertos/queue.h"

static const int sensorPin = 34;
static const int ledPin = 25;

QueueHandle_t sensorQueue;

void sensorTask(void *parameter)
{
  TickType_t lastWakeTime = xTaskGetTickCount();

  for (;;) {
    int sensorValue = analogRead(sensorPin);

    // Queue length is 1, so keep only the newest reading
    xQueueOverwrite(sensorQueue, &sensorValue);

    // Run this task every 100 ms
    vTaskDelayUntil(
      &lastWakeTime,
      pdMS_TO_TICKS(100)
    );
  }
}

void outputTask(void *parameter)
{
  int sensorValue;

  for (;;) {
    // Wait here until a new reading becomes available
    if (xQueueReceive(
          sensorQueue,
          &sensorValue,
          portMAX_DELAY
        ) == pdTRUE) {

      Serial.printf("ADC reading: %d\n", sensorValue);
    }
  }
}

void ledTask(void *parameter)
{
  for (;;) {
    digitalWrite(ledPin, !digitalRead(ledPin));
    vTaskDelay(pdMS_TO_TICKS(500));
  }
}

void setup()
{
  Serial.begin(115200);

  pinMode(ledPin, OUTPUT);
  analogReadResolution(12);

  // One-element queue containing an integer
  sensorQueue = xQueueCreate(1, sizeof(int));

  if (sensorQueue == NULL) {
    Serial.println("Failed to create queue.");

    while (true) {
      delay(1000);
    }
  }

  xTaskCreate(
    sensorTask,
    "Sensor Task",
    2048,
    NULL,
    2,
    NULL
  );

  xTaskCreate(
    outputTask,
    "Output Task",
    3072,
    NULL,
    1,
    NULL
  );

  xTaskCreate(
    ledTask,
    "LED Task",
    2048,
    NULL,
    1,
    NULL
  );
}

void loop()
{
  delay(1000);
}
How the Queue Example Works
First, we create the queue:
sensorQueue = xQueueCreate(1, sizeof(int));The queue can contain one integer.
The sensor task reads the ADC:
int sensorValue = analogRead(sensorPin);and places the newest value in the queue:
xQueueOverwrite(sensorQueue, &sensorValue);Because this queue only contains one item, xQueueOverwrite() is useful here. If the output task is temporarily busy, we don't need to store every historical ADC sample. We only care about the newest one.
The output task waits at:
xQueueReceive(
  sensorQueue,
  &sensorValue,
  portMAX_DELAY
);
Notice that it does not repeatedly check whether data is available. Instead, the task enters the Blocked state. As soon as the sensor task places data in the queue, FreeRTOS can wake the output task. This event-driven behavior is one of the most useful aspects of an RTOS. Meanwhile, the LED task continues blinking independently:
vTaskDelay(pdMS_TO_TICKS(500));So our application now contains three separate activities without having to manually coordinate everything inside one large loop().
[IMAGE PLACEHOLDER: Architecture diagram: Sensor Task -> FreeRTOS Queue -> Output Task, with a separate LED Task running independently under the FreeRTOS scheduler]
How Much Stack Should an ESP32 FreeRTOS Task Use?
Every FreeRTOS task needs its own stack.
For example:
xTaskCreate(
  sensorTask,
  "Sensor Task",
  2048,
  NULL,
  2,
  NULL
);
allocates a 2048-byte stack for the task. Assign too little stack and the task may overflow its stack and crash the ESP32. Assign unnecessarily large stacks to every task, and you'll waste RAM. There is no universal correct stack size because it depends on what the task does. A task that only toggles a GPIO needs much less stack than one that performs JSON parsing, network communication, or large local-array operations. Fortunately, ESP32 FreeRTOS lets us measure this.
Use:
uxTaskGetStackHighWaterMark(NULL)from inside a task.
For example:
UBaseType_t remainingStack;

remainingStack = uxTaskGetStackHighWaterMark(NULL);

Serial.printf(
  "Minimum remaining stack: %u bytes\n",
  (unsigned int)remainingStack
);
The value represents the minimum amount of unused stack that has remained during the lifetime of the task. For example, if you allocate a large stack and the high-water mark remains very large even under the heaviest workload, you may be able to reduce the allocation. Don't reduce it right to the measured limit, however. Always leave a safety margin for less common execution paths.
Checking ESP32 Heap Memory
Each dynamically created task consumes heap memory for its stack and control structures. You can check available heap using:
Serial.println(ESP.getFreeHeap());This is particularly important in applications containing:
- many FreeRTOS tasks
- Wi-Fi
- Bluetooth
- TLS/HTTPS connections
- large JSON documents
- displays with large frame buffers
Creating a separate task for every tiny operation isn't necessarily good design. Tasks have memory and scheduling overhead, so use them where they actually make the software architecture clearer.
ESP32 FreeRTOS vs Standard FreeRTOS
FreeRTOS on the ESP32 uses the same fundamental concepts found in standard FreeRTOS: tasks, queues, semaphores, mutexes, timers, notifications and the scheduler.
However, Espressif's implementation contains changes and extensions required by the ESP32 architecture and ESP-IDF.
| Feature | Standard FreeRTOS | ESP32 / ESP-IDF FreeRTOS |
|---|---|---|
| Task creation | xTaskCreate() | xTaskCreate() plus ESP32 core-affinity APIs |
| Core affinity | Not part of the traditional portable task API | xTaskCreatePinnedToCore() can specify CPU affinity |
| Unpinned tasks | Depends on the target/port | Tasks can use tskNO_AFFINITY on SMP-capable targets |
| Task stack-size argument | Traditionally specified in stack words | ESP-IDF task-creation APIs use bytes |
| Scheduler startup | Standalone ports may explicitly start the scheduler | ESP-IDF/Arduino runtime starts FreeRTOS for you |
| Hardware integration | Depends on the platform port | Integrated with ESP-IDF networking, drivers and ESP32 hardware |
This is why code copied directly from a FreeRTOS tutorial written for an AVR, STM32 or another architecture sometimes needs small changes before being used on the ESP32.
Common ESP32 FreeRTOS Problems
ESP32 Resets with a Watchdog Error
One common cause is a task that runs continuously without blocking or yielding. For example:
for (;;) {
  doHeavyProcessing();
}
may prevent important system or idle tasks from getting sufficient CPU time. Whenever possible, let the task block on an event or include an appropriate delay.
A Lower-Priority Task Never Runs
Check whether a higher-priority task is always in the Ready state. Higher-priority work should normally block when it has nothing to do.
ESP32 Crashes Randomly After Adding a Task
Check the task's stack allocation. A stack overflow may initially appear as an unrelated crash because memory can become corrupted. Measure the task with:
uxTaskGetStackHighWaterMark()and increase the allocation if necessary.
Shared Variables Sometimes Contain Incorrect Data
You may have a race condition. If multiple tasks access the same data or hardware peripheral, use an appropriate synchronization mechanism such as:
- queue
- mutex
- semaphore
- task notification
Simply marking a variable volatile does not make complex multi-task access automatically thread-safe.
xTaskCreatePinnedToCore() Fails on Core 1
Make sure your particular ESP32 chip actually has two application CPU cores. For example, the ESP32-C3 and ESP32-S2 are single-core devices.
If the task has no real core-affinity requirement, using:
xTaskCreate()also makes the code more portable across ESP32 families.
Creating More Tasks Makes the ESP32 Less Stable
More tasks are not automatically better. Every task uses:
- stack memory
- FreeRTOS control structures
- scheduler time
A good design divides the application into logical concurrent activities, not one task per function.
ESP32 FreeRTOS FAQ
Does ESP32 use FreeRTOS by default?
Yes. ESP32 applications built using the Arduino-ESP32 framework already run on top of ESP-IDF and FreeRTOS. You don't need to install a separate FreeRTOS library.
Can ESP32 run multiple tasks?
Yes. FreeRTOS can schedule many tasks on both single-core and dual-core ESP32 chips. The practical number of tasks depends mainly on available RAM, stack requirements, task behavior and the other software running in the system.
Does ESP32 FreeRTOS use both CPU cores?
On dual-core ESP32 chips, FreeRTOS can schedule work across both processors. Tasks can also be explicitly pinned to a particular CPU using xTaskCreatePinnedToCore(). Single-core ESP32 variants naturally run all tasks on one CPU.
What is xTaskCreatePinnedToCore()?
It is an ESP32 FreeRTOS task-creation function that adds a CPU core-affinity parameter to the normal task-creation arguments. This allows a task to be pinned to core 0 or core 1 on supported dual-core processors.
What is the difference between xTaskCreate() and xTaskCreatePinnedToCore()?
Use xTaskCreate() when you don't care which CPU executes the task. Use xTaskCreatePinnedToCore() when the application has a specific reason to control CPU affinity. For most basic projects, xTaskCreate() is sufficient.
What is the difference between delay() and vTaskDelay() on ESP32?
Arduino-ESP32's delay() uses FreeRTOS internally. When writing explicit FreeRTOS tasks, however, vTaskDelay() makes the RTOS behavior clearer and works naturally with FreeRTOS tick-based timing. For periodic execution where timing drift matters, consider vTaskDelayUntil().
How do ESP32 FreeRTOS tasks communicate?
FreeRTOS provides several mechanisms including queues, semaphores, mutexes, task notifications, and event groups. Queues are especially useful when one task needs to safely pass data to another.
How much stack should I allocate to an ESP32 FreeRTOS task?
It depends on the task. Start with a reasonable allocation for the task's complexity, exercise every major execution path, then measure the remaining stack with uxTaskGetStackHighWaterMark(). Adjust the allocation while maintaining a safe margin.
Summary
FreeRTOS becomes increasingly valuable as an ESP32 project grows beyond a simple Arduino loop(). Instead of manually coordinating sensor reads, communications, LEDs, displays and other operations, you can divide the application into logical tasks and let the FreeRTOS scheduler manage when those tasks execute.
The basic process is:
- Create each task as a separate function.
- Create the tasks using xTaskCreate() or xTaskCreatePinnedToCore().
- Give important tasks appropriate priorities without starving lower-priority work.
- Use vTaskDelay(), queues, semaphores or other blocking mechanisms instead of continuously busy-looping.
- Use queues or synchronization primitives when tasks need to communicate or share resources.
- Measure stack and heap usage instead of guessing memory requirements.
Our first example showed two tasks executing independently. We then expanded the idea into a more realistic ESP32 FreeRTOS application where one task samples an analog input, another receives that data through a queue, and a third task controls an LED. Once you're comfortable with these concepts, the next FreeRTOS features worth learning are mutexes, semaphores, task notifications, event groups and software timers. These are what allow larger ESP32 applications to remain organized even when Wi-Fi, sensors, displays and other peripherals are all operating at the same time.