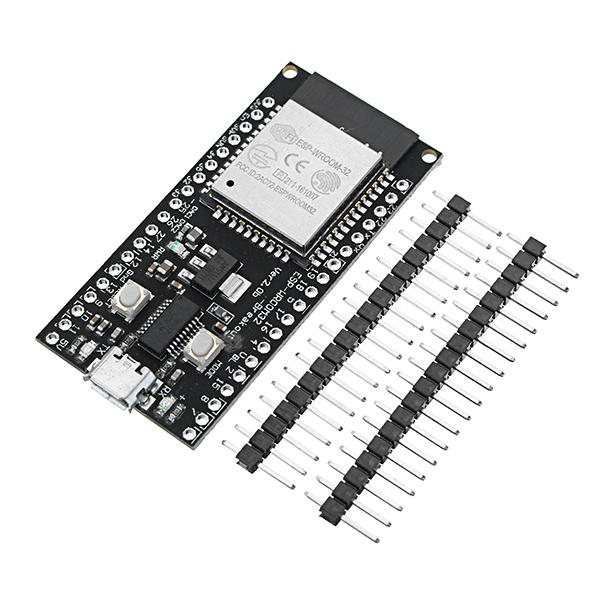
Have you ever connected to Wi-Fi at a hotel, airport, or coffee shop and had a webpage automatically appear? That webpage is called a captive portal. Captive portals are normally used for perfectly sensible things such as accepting terms of service, entering login credentials, or configuring an IoT device. We're going to use one for something considerably less productive. In this project, the ESP32 creates a Wi-Fi access point called "Free WiFi".
When someone connects, their phone detects the ESP32 captive portal and displays a convincing "Continue to Wi-Fi" button. But pressing the button does not provide Internet access. Instead, it reveals a short Rickroll video stored directly in the ESP32's flash memory and starts playing it. No Internet connection is required. No YouTube redirect is required. The ESP32 itself hosts the entire prank.
How the ESP32 Captive Portal Rickroll Works
The project uses three main features of the ESP32:
- Wi-Fi Access Point mode
- DNS captive portal
- HTTP web server
The architecture is much simpler than you might expect:
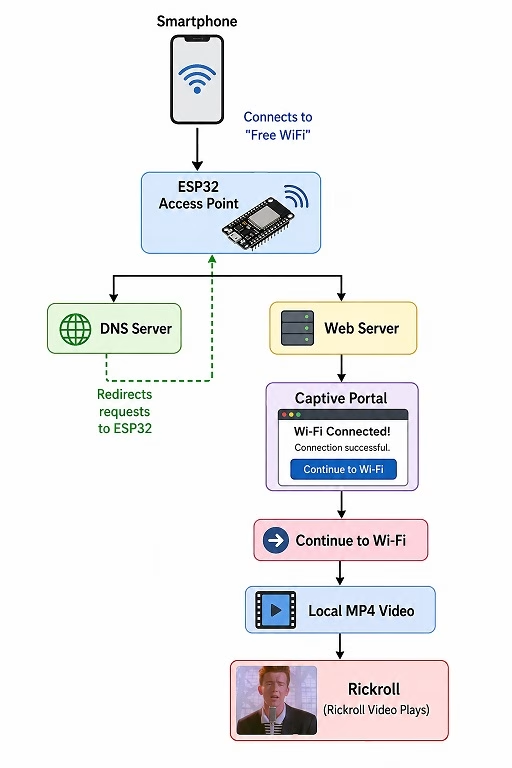
When a smartphone connects to a Wi-Fi network, the operating system normally performs an Internet connectivity check. If the expected response isn't received, the phone assumes that the Wi-Fi network requires authentication and opens a captive portal. Our ESP32 deliberately takes advantage of this behavior. A DNS server running on the ESP32 responds to requests by directing them back to the ESP32 itself. The ESP32 then serves our fake Wi-Fi connection page.
Why Store the Rickroll Video on the ESP32?
My first version of this experiment redirected the user to the actual Rick Astley video on YouTube. That created an interesting problem. The ESP32 access point needed to provide real Internet access, which meant simultaneously using AP and Station modes, enabling NAPT, forwarding DNS requests, and routing traffic through another Wi-Fi network. It worked, but it made a ridiculous little prank considerably more complicated than necessary.
There was another problem: modern browsers don't reliably autoplay YouTube videos. The better solution is to store a small video directly in the ESP32's flash memory.
Now the entire system is:
Phone
   |
Wi-Fi
   |
ESP32
   |
LittleFS
   |
rickroll.mp4
The ESP32 doesn't require Internet access at all. This also makes the project much more useful as an introduction to hosting static files from an ESP32.
What You Need
The hardware requirements are minimal:
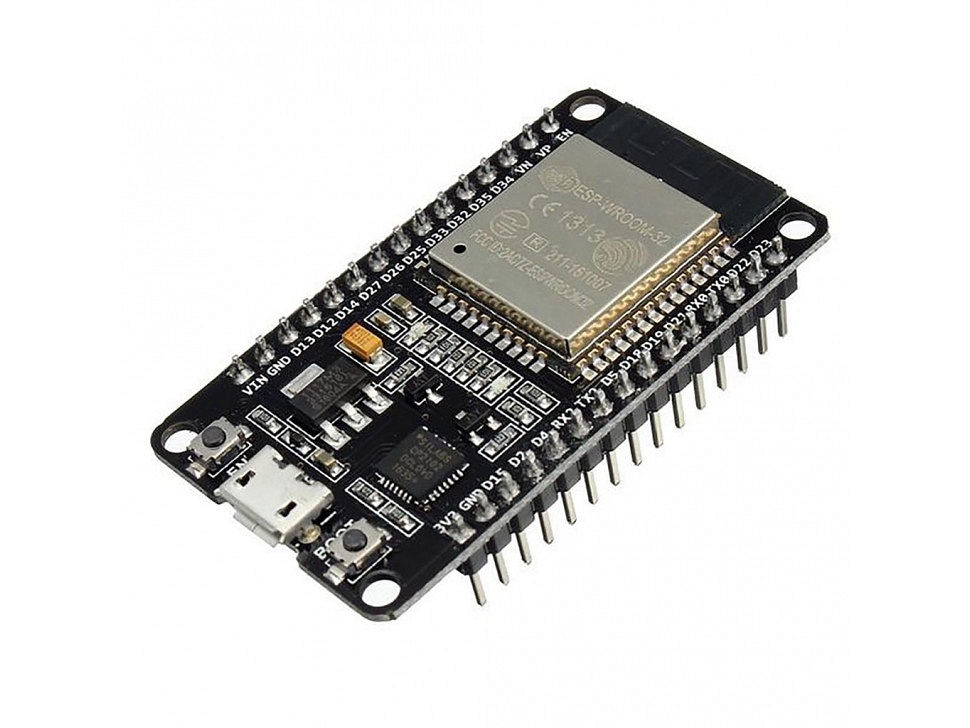
- ESP32 development board
- USB cable
- Computer with Arduino IDE
- Smartphone for testing
- Short MP4 video
No sensors, displays, or external components are required. For my test, I compressed an approximately eight-second clip to:
Resolution: 320 x 180
Frame rate: 15 FPS
Video: H.264
Audio: AAC mono
File size: about 259 KB
That is small enough to fit comfortably inside a suitable LittleFS partition on a typical 4 MB ESP32. For a project you redistribute publicly, use a short video that you have permission to distribute.
Arduino-ESP32 Version
This tutorial uses the newer Arduino-ESP32 networking API. I tested the project using esp32 core v. 3.3.11:
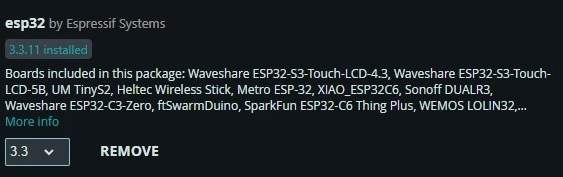
The code uses functions such as:
WiFi.AP.begin();
WiFi.AP.create();
WiFi.AP.enableDhcpCaptivePortal();
If you see errors such as:
'class WiFiClass' has no member named 'AP'you are probably using an older Arduino-ESP32 2.x installation.
Open:
Tools -> Board -> Boards Manager
Search for:
esp32
and update esp32 by Espressif Systems to a compatible 3.x release.
Preparing the Video with LittleFS
Instead of putting the MP4 inside the Arduino sketch as a huge byte array, we're going to store it in LittleFS. LittleFS is a filesystem stored inside part of the ESP32's flash memory. Your Arduino project should look like this:
esp32_rick_roll/
|
+-- esp32_rick_roll.ino
|
+-- data/
    |
    +-- rickroll.mp4
The filename used by this tutorial is:
rickroll.mp4
and the ESP32 will access it as:
/rickroll.mp4
Selecting a Partition Scheme
Make sure your selected ESP32 partition layout provides enough filesystem space for the MP4. For a typical 4 MB ESP32, a partition scheme providing around 1.5 MB for the filesystem is more than enough for our roughly 259 KB clip. I used the default partition scheme for this project, which provides 1.5 MB for the LittleFS partition.
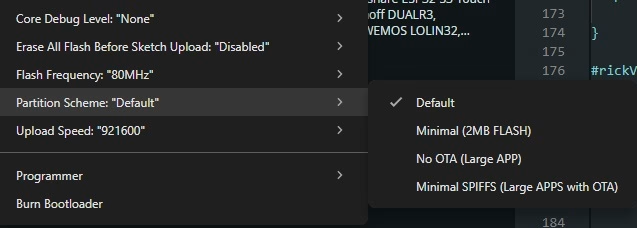
Uploading the MP4 to LittleFS
Place the rick roll video inside the sketch's data folder. Then use your Arduino IDE ESP32 LittleFS filesystem uploader to upload the contents of the folder.
ESP32 Captive Portal Rickroll Code
Here is the complete sketch.
#include <Arduino.h>
#include <WiFi.h>
#include <Network.h>
#include <DNSServer.h>
#include <WebServer.h>
#include <LittleFS.h>

const char* AP_SSID = "Free WiFi";
const char* VIDEO_PATH = "/rickroll.mp4";

DNSServer dnsServer;
WebServer server(80);

// ============================================================
// CAPTIVE PORTAL HTML
// ============================================================

const char portalPage[] PROGMEM = R"rawliteral(
<!DOCTYPE html>
<html>
<head>
<meta name="viewport" content="width=device-width,initial-scale=1.0,maximum-scale=1.0,user-scalable=no">
<title>Free WiFi</title>

<style>
* {
  box-sizing: border-box;
}

html, body {
  margin: 0;
  padding: 0;
  width: 100%;
  height: 100%;
  background: #111;
  font-family: Arial, Helvetica, sans-serif;
  color: white;
}

body {
  display: flex;
  align-items: center;
  justify-content: center;
}

#portal {
  width: 90%;
  max-width: 420px;
  padding: 35px 25px;
  text-align: center;
  background: #222;
  border-radius: 15px;
}

#portal h2 {
  margin-top: 0;
}

#continueButton {
  border: 0;
  border-radius: 8px;
  padding: 15px 30px;
  margin-top: 15px;
  font-size: 18px;
  font-weight: bold;
  background: white;
  color: #111;
  cursor: pointer;
}

#videoContainer {
  display: none;
  position: fixed;
  inset: 0;
  width: 100%;
  height: 100%;
  background: black;
}

#rickVideo {
  width: 100%;
  height: 100%;
  object-fit: contain;
  background: black;
}

#fallback {
  display: none;
  position: absolute;
  left: 0;
  right: 0;
  bottom: 20px;
  text-align: center;
  color: white;
}
</style>
</head>

<body>
<div id="portal">
  <h2>Wi-Fi Connected!</h2>
  <p>Connection successful.</p>
  <button id="continueButton" onclick="activateRickroll()">Continue to Wi-Fi</button>
</div>

<div id="videoContainer">
  <video id="rickVideo" loop playsinline preload="auto">
    <source src="/rickroll.mp4" type="video/mp4">
  </video>
  <div id="fallback">Tap the video for sound</div>
</div>

<script>
const video = document.getElementById("rickVideo");
const portal = document.getElementById("portal");
const videoContainer = document.getElementById("videoContainer");
const fallback = document.getElementById("fallback");

async function activateRickroll() {
  portal.style.display = "none";
  videoContainer.style.display = "block";

  video.currentTime = 0;
  video.muted = false;
  video.volume = 1.0;

  try {
    await video.play();
  } catch (error) {
    fallback.style.display = "block";
  }
}

videoContainer.addEventListener("click", async function() {
  try {
    video.muted = false;
    video.volume = 1.0;
    await video.play();
    fallback.style.display = "none";
  } catch (error) {}
});
</script>
</body>
</html>
)rawliteral";

// ============================================================
// CAPTIVE PORTAL
// ============================================================

void showPortal() {
  server.sendHeader("Cache-Control", "no-store, no-cache, must-revalidate");
  server.send(200, "text/html", portalPage);
}

// ============================================================
// HTTP RANGE ERROR
// ============================================================

void sendRangeError(size_t fileSize) {
  server.sendHeader("Content-Range", String("bytes */") + String(fileSize));
  server.send(416, "text/plain", "");
}

// ============================================================
// STREAM PARTIAL VIDEO
// ============================================================

void streamFileRange(File& file, size_t start, size_t end) {
  size_t fileSize = file.size();

  if (start >= fileSize) {
    sendRangeError(fileSize);
    return;
  }

  if (end >= fileSize) {
    end = fileSize - 1;
  }

  if (end < start) {
    sendRangeError(fileSize);
    return;
  }

  size_t contentLength = end - start + 1;

  server.sendHeader("Accept-Ranges", "bytes");
  server.sendHeader(
    "Content-Range",
    String("bytes ") + String(start) + "-" + String(end) + "/" + String(fileSize)
  );
  server.sendHeader("Cache-Control", "public, max-age=3600");
  server.setContentLength(contentLength);
  server.send(206, "video/mp4", "");

  file.seek(start);

  NetworkClient client = server.client();
  uint8_t buffer[1024];
  size_t remaining = contentLength;

  while (remaining > 0 && client.connected()) {
    size_t amount = min(remaining, sizeof(buffer));
    size_t bytesRead = file.read(buffer, amount);

    if (bytesRead == 0) {
      break;
    }

    client.write(buffer, bytesRead);
    remaining -= bytesRead;
    delay(0);
  }
}

// ============================================================
// STREAM COMPLETE VIDEO
// ============================================================

void streamWholeFile(File& file) {
  size_t fileSize = file.size();

  server.sendHeader("Accept-Ranges", "bytes");
  server.sendHeader("Cache-Control", "public, max-age=3600");
  server.setContentLength(fileSize);
  server.send(200, "video/mp4", "");

  NetworkClient client = server.client();
  uint8_t buffer[1024];

  while (file.available() && client.connected()) {
    size_t bytesRead = file.read(buffer, sizeof(buffer));

    if (bytesRead == 0) {
      break;
    }

    client.write(buffer, bytesRead);
    delay(0);
  }
}

// ============================================================
// VIDEO REQUEST HANDLER
// ============================================================

void handleVideo() {
  if (!LittleFS.exists(VIDEO_PATH)) {
    Serial.println("ERROR: Video not found!");
    server.send(404, "text/plain", "Video not found");
    return;
  }

  File video = LittleFS.open(VIDEO_PATH, "r");

  if (!video) {
    server.send(500, "text/plain", "Could not open video");
    return;
  }

  String range = server.header("Range");

  if (range.length() > 0 && range.startsWith("bytes=")) {
    range.remove(0, 6);

    int dash = range.indexOf('-');

    if (dash >= 0) {
      String startString = range.substring(0, dash);
      String endString = range.substring(dash + 1);

      size_t start = startString.toInt();
      size_t end = endString.length() == 0
        ? video.size() - 1
        : endString.toInt();

      streamFileRange(video, start, end);
      video.close();
      return;
    }
  }

  streamWholeFile(video);
  video.close();
}

// ============================================================
// UNKNOWN HTTP REQUEST
// ============================================================

void handleNotFound() {
  server.sendHeader("Location", "/", true);
  server.send(302, "text/plain", "");
}

// ============================================================
// SETUP
// ============================================================

void setup() {
  Serial.begin(115200);
  delay(500);

  Serial.println();
  Serial.println("ESP32 Local Rickroll");

  // Mount LittleFS
  if (!LittleFS.begin(false)) {
    Serial.println("LittleFS mount failed!");
    return;
  }

  Serial.println("LittleFS mounted.");

  // Check video
  if (LittleFS.exists(VIDEO_PATH)) {
    File video = LittleFS.open(VIDEO_PATH, "r");

    Serial.print("Video found: ");
    Serial.print(video.size());
    Serial.println(" bytes");

    video.close();
  } else {
    Serial.println("WARNING: /rickroll.mp4 not found!");
  }

  // Start Wi-Fi access point
  WiFi.AP.begin();

  if (!WiFi.AP.create(AP_SSID)) {
    Serial.println("Could not create AP!");
    return;
  }

  Serial.print("WiFi AP: ");
  Serial.println(AP_SSID);

  Serial.print("IP address: ");
  Serial.println(WiFi.AP.localIP());

  WiFi.AP.enableDhcpCaptivePortal();

  // Start captive DNS
  if (dnsServer.start()) {
    Serial.println("Captive DNS started.");
  } else {
    Serial.println("DNS server failed!");
  }

  // Collect HTTP Range header for MP4 streaming
  const char* headerKeys[] = {"Range"};
  server.collectHeaders(headerKeys, 1);

  // Web routes
  server.on("/", HTTP_GET, showPortal);
  server.on("/rickroll.mp4", HTTP_GET, handleVideo);

  // Android
  server.on("/generate_204", HTTP_GET, showPortal);
  server.on("/gen_204", HTTP_GET, showPortal);

  // Apple
  server.on("/hotspot-detect.html", HTTP_GET, showPortal);

  // Windows
  server.on("/connecttest.txt", HTTP_GET, showPortal);
  server.on("/ncsi.txt", HTTP_GET, showPortal);
  server.on("/fwlink", HTTP_GET, showPortal);

  server.onNotFound(handleNotFound);
  server.begin();

  Serial.println("Web server started.");
  Serial.println();
  Serial.println("Connect to: Free WiFi");
}

// ============================================================
// LOOP
// ============================================================

void loop() {
  server.handleClient();
  delay(5);
}
How the Code Works
Let's break the project into its individual pieces.
Creating the ESP32 Wi-Fi Access Point
The ESP32 first starts its Access Point interface:
WiFi.AP.begin();We then create the network:
WiFi.AP.create(
    "Free WiFi"
);
The ESP32 now appears in your phone's available Wi-Fi networks as:
Free WiFiBy default, the ESP32 access point normally uses an address similar to:
192.168.4.1Triggering the Captive Portal
The next important line is:
WiFi.AP.enableDhcpCaptivePortal();This advertises the ESP32's captive portal information through DHCP on compatible systems.
We also start:
dnsServer.start();The DNS server responds to client DNS requests with the ESP32 access point address.
Conceptually:
example.com
     |
     v
ESP32 DNS Server
     |
     v
192.168.4.1
Modern phones also make their own connectivity-check requests after joining Wi-Fi. The sketch includes handlers for several common endpoints:
/generate_204
/gen_204
/hotspot-detect.html
/connecttest.txt
/ncsi.txt
/fwlink
Each one returns our captive portal page. The exact appearance and behavior depend on the operating system. You may see something similar to:
Sign in to Wi-Fi networkor the portal may appear automatically.
Why the Video Doesn’t Play Immediately
Earlier versions of this project used:
autoplay
muted
loop
inside the video element. That caused the Rickroll to appear as soon as the captive portal opened. That's not the behavior we want. The final version instead uses:
<video
  id="rickVideo"
  loop
  playsinline
  preload="auto">
There is no:
autoplayattribute.
The video container itself is initially hidden:
#videoContainer {
    display: none;
}
So the victim initially sees only:
Wi-Fi Connected!

Connection successful.

[ Continue to Wi-Fi ]
The MP4 may be preloaded in the background, but it remains paused and invisible.
Starting the Rickroll with Sound
The button calls:
activateRickroll()The first thing we do is hide the fake Wi-Fi page:
portal.style.display =
  "none";
Then reveal the video:
videoContainer.style.display =
  "block";
We restart it from the beginning:
video.currentTime = 0;and enable audio:
video.muted = false;

video.volume = 1.0;
Finally:
await video.play();The important detail here is that `play()` is being requested as the result of an actual button press. Modern mobile browsers generally place stricter restrictions on media that tries to autoplay with sound without any user interaction.
Our:
Continue to Wi-Fibutton provides that interaction. Some captive portal browsers may still impose additional restrictions, so the page also allows another tap directly on the video as a fallback.
Why the Code Supports HTTP Range Requests
You might notice that serving the MP4 is considerably more complicated than serving the HTML page. That's because browsers often don't request an entire video file in one operation. They may send an HTTP header similar to:
Range: bytes=0-65535This means:
Send me only bytes 0 through 65535.Our ESP32 recognizes this request and returns:
HTTP 206 Partial Contenttogether with the requested part of the MP4. Supporting byte ranges makes the ESP32 behave more like a proper video server and improves compatibility with HTML5 video players. For a tiny static webpage, none of this would be necessary. For an MP4 player, it's worth implementing correctly.
Testing the ESP32 Rickroll
Upload both:
- the Arduino sketch
- the LittleFS filesystem containing `rickroll.mp4`
Then open Serial Monitor at:
115200 baudYou should see something similar to:
ESP32 Local Rickroll

LittleFS mounted.

Video found: 265000 bytes

WiFi AP: Free WiFi

IP address: 192.168.4.1

Captive DNS started.

Web server started.

Connect to: Free WiFi
The exact video size will depend on your MP4. Now open Wi-Fi settings on your smartphone.
Connect to:
Free WiFiYour phone should detect the captive portal. The page initially displays:
Wi-Fi Connected!

Connection successful.

[ Continue to Wi-Fi ]
Nothing suspicious yet.
Press:
Continue to Wi-FiThe fake Wi-Fi page disappears and the locally hosted video starts. If the captive portal browser allows audio following the button press, you now have the full Rickroll.
Troubleshooting
The ESP32 says the video was not found
If Serial Monitor shows:
WARNING: /rickroll.mp4 not found!make sure the filesystem contains:
/rickroll.mp4Your local Arduino folder should contain:
data/rickroll.mp4and you must upload the LittleFS filesystem separately from uploading the sketch.
LittleFS fails to mount
Check that the selected partition scheme includes filesystem storage. Also confirm that you uploaded a LittleFS image compatible with the partition layout currently selected.
LittleFS upload says COM port is busy
Close:
- Arduino Serial Monitor
- Serial Plotter
- other Arduino IDE instances
- PuTTY or other serial terminals
Then retry.
The captive portal doesn’t appear
Captive portal detection varies between devices. You can manually open:
http://192.168.4.1while connected to:
Free WiFito verify that the web server itself is functioning.
The video appears before pressing Continue
Make sure your video element does not contain:
autoplayand that:
#videoContainer {
    display: none;
}
is present. The video should only become visible inside:
activateRickroll()after the button is pressed.
The video plays but has no sound
Some captive portal browsers impose stricter media restrictions than normal Chrome or Safari windows. The button press gives us the best opportunity to start audible playback, but behavior can still vary by device. The sketch therefore also lets the user tap the displayed video again to retry playback with sound.
Why This Project Is More Than Just a Prank
The Rickroll is obviously the least serious part of this project. Underneath it, we're demonstrating several useful ESP32 concepts:
- Wi-Fi Access Point mode
- DNS
- captive portal detection
- HTTP servers
- LittleFS
- serving static files from flash
- HTML, CSS and JavaScript hosted by an ESP32
- HTML5 video
- HTTP byte-range requests
These same techniques can be used for much more practical projects. For example, an IoT device could create a temporary Wi-Fi network and use a captive portal for:
- Wi-Fi configuration
- device setup
- sensor calibration
- network diagnostics
- configuration menus
- firmware settings
LittleFS can similarly store:
- HTML pages
- CSS files
- JavaScript
- images
- configuration files
- audio
- small videos
So although our application is deliberately ridiculous, the underlying techniques are quite useful.
A Note on Responsible Use
Use this project on your own devices or with people who are in on the joke. Captive portals can also be abused to imitate login pages and collect credentials.
This project doesn't ask the user for:
- passwords
- email addresses
- account information
- personal information
The fake Continue button simply starts a locally hosted video. Also be mindful of the media you distribute with your project. If you publish downloadable project files, use video and audio that you have permission to redistribute.
Conclusion
This may be one of the least necessary uses of an ESP32 I've built, but it's also a surprisingly good demonstration of the board's networking capabilities. The ESP32 creates its own Wi-Fi access point and uses DNS and DHCP captive portal features to encourage a connected smartphone to open a locally hosted webpage. The portal initially looks like an ordinary Wi-Fi connection screen.
Once the user presses the "Continue to Wi-Fi" button, JavaScript reveals an MP4 stored in LittleFS and requests playback with sound. Because everything is hosted directly on the ESP32, the project doesn't need an Internet connection, an external web server, or YouTube. All it takes is an ESP32, approximately 259 KB of questionable video content, and a victim willing to connect to suspiciously free Wi-Fi.
Never gonna give ESP32 up.