Consider a project requirement, where you have to read from an analog sensor, update a display and flash an LED simultaneously. This might be a challenging coding assignment if you haven’t heard of an RTOS before.
RTOS allows you to process multiple “tasks” concurrently. This is in contrast with a traditional “loop” where each line of code executes one at a time. In this ESP32 FreeRTOS tutorial, I will introduce you to real-time operating systems.
An RTOS manages how tasks are handled by a microcontroller. Each task is given a certain interval of time -- which are short enough for us humans not to notice.
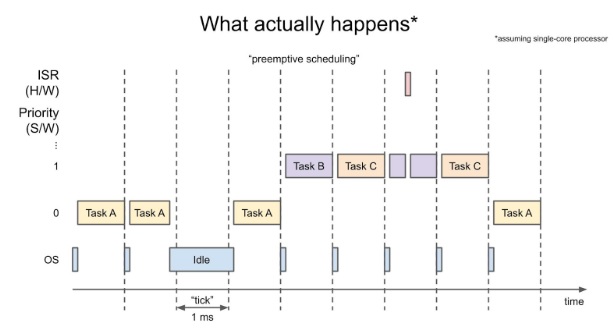
A task can have a priority higher than another. In this case, the higher priority tasks (B and C) execute first before a lower priority task (A). Note that an ISR still takes higher priority against tasks.
Setting Up FreeRTOS for ESP32
Fortunately, FreeRTOS already comes with the ESP32 library for Arduino. If this is your first time using an ESP32 with the Arduino IDE, then read on.
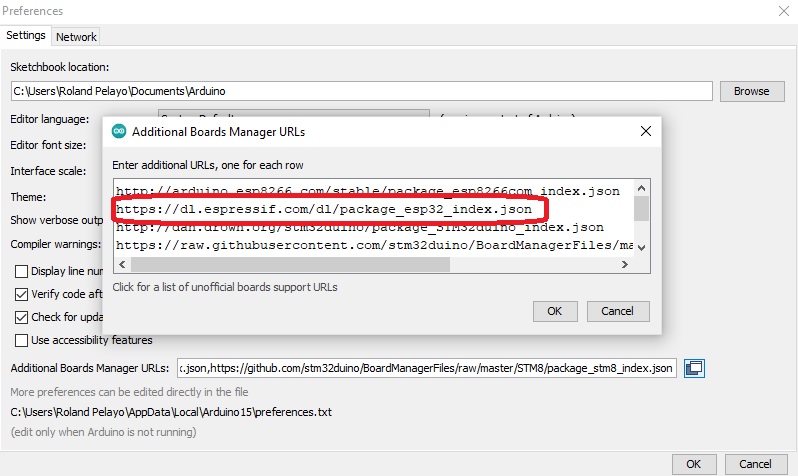
Go to File > Preferences and look for the Additional Board Manager URLs field. Click on the button on the right side of the input field and add the following line:
https://dl.espressif.com/dl/package_esp32_index.json
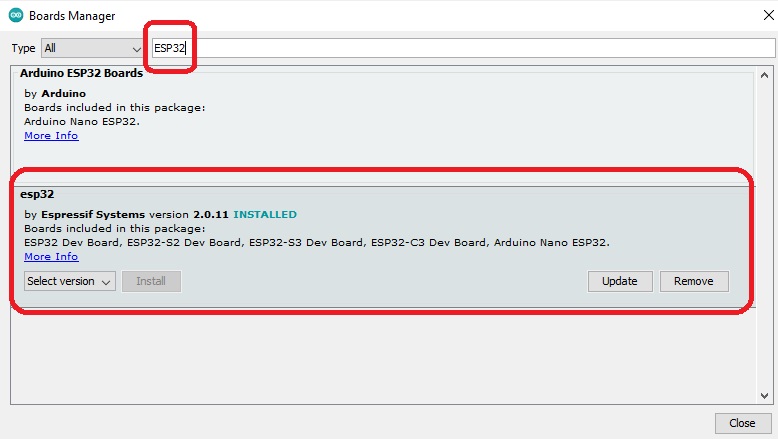
Next, go to Tools > Board > Boards Manager. Search “ESP32”, look for the one from Espressif Systems, and install it.
This should allow you to code, with FreeRTOS, any supported ESP32 board using the Arduino IDE.
ESP32 FreeRTOS vs Vanilla RTOS
FreeRTOS on the ESP32 has several differences compared to the "vanilla" FreeRTOS you might find on other microcontrollers. Here’s a breakdown of some key differences and features specific to FreeRTOS on the ESP32:
1. Dual-Core Support
One of the major differences in ESP32’s FreeRTOS implementation is support for dual-core processors. The ESP32 has two cores: core 0 and core 1. With FreeRTOS for ESP32, tasks can be assigned (or pinned) to run on a specific core, or allowed to run on both cores depending on the system’s load.
Core Affinity: You can pin tasks to a specific core using the xTaskCreatePinnedToCore function. This allows greater control over task execution. For example:
xTaskCreatePinnedToCore(
    myTaskFunction,   // Task function
    "Task Name",      // Task name
    stackSize,        // Stack size
    NULL,             // Task parameters
    taskPriority,     // Priority
    NULL,             // Task handle
    app_cpu           // Core on which to run the task
);
- In contrast, in standard FreeRTOS (on single-core microcontrollers), there’s no concept of pinning tasks to cores.
2. Task Creation Functions
In vanilla FreeRTOS, you typically create tasks using xTaskCreate, but ESP32's FreeRTOS adds xTaskCreatePinnedToCore for multi-core control. Both functions serve the same purpose, but the latter allows specifying the core to run the task on.
- ESP32: Uses xTaskCreatePinnedToCore for assigning tasks to specific cores.
- Vanilla FreeRTOS: Only uses xTaskCreate as there’s no dual-core support.
3. ISR Management
FreeRTOS for ESP32 has optimized handling for Interrupt Service Routines (ISRs). ISRs are critical for time-sensitive operations, and ESP32’s implementation ensures they take higher priority than tasks. The hardware abstraction layer in ESP32 provides better integration of ISR functions with FreeRTOS, making it easier to manage concurrency.
4. Pre-configured for Arduino
The ESP32’s integration with the Arduino framework comes with FreeRTOS support built-in, meaning you don’t have to manually set up FreeRTOS in your project. This can be convenient for users of the Arduino IDE. You can immediately start using FreeRTOS features like task creation, delays, and inter-task communication without needing to configure the OS separately.
- Vanilla FreeRTOS: Usually, you have to set up the FreeRTOS kernel yourself, especially when working with other platforms or development environments.
5. Hardware Support and Optimization
ESP32’s FreeRTOS version takes advantage of the ESP32’s unique hardware features, such as Wi-Fi, Bluetooth, and hardware timers. The ESP-IDF (Espressif IoT Development Framework) includes FreeRTOS components that are optimized for these hardware resources, ensuring better performance for real-time tasks while communicating over Wi-Fi or Bluetooth.
6. Tick Rate and Time Slicing
In vanilla FreeRTOS, the tick rate (how often the RTOS scheduler is called) is typically customizable. On the ESP32, you still have the ability to modify the tick rate, but it defaults to a value optimized for low-power applications and multitasking scenarios common in IoT devices.
7. Memory Management
Memory handling in FreeRTOS on the ESP32 is slightly different due to the more complex memory architecture of the ESP32 (e.g., external RAM, internal SRAM, and flash memory). The ESP32’s FreeRTOS has optimizations that take into account these memory types, and there are specific APIs provided to allocate memory from either internal or external RAM.
8. Timers and Soft Timers
ESP32’s FreeRTOS provides additional support for hardware timers and software timers. ESP32’s software timers are part of the FreeRTOS standard, but they are often used to handle tasks that need to be executed after a certain delay or periodically. The ESP32 offers better integration of software timers for its specific hardware features.
9. Idle Tasks and Power Management
ESP32’s FreeRTOS implementation is highly optimized for low-power applications. The Idle Task in FreeRTOS is responsible for putting the processor into a low-power state when no other tasks are running. In the ESP32, the idle task is extended with features to manage deep sleep and light sleep modes efficiently, a key feature for battery-powered IoT devices.
10. FreeRTOS Hooks and ESP32-Specific Extensions
FreeRTOS for ESP32 provides additional hooks and extensions that can be used to interact with specific hardware features or to fine-tune performance. Some of these include specific hooks for dealing with task stack overflows, and support for ESP32-specific peripherals like Wi-Fi and Bluetooth.
Example Code
Here is an example code for ESP32 using FreeRTOS, using Arduino platform:
// Use only core 1
#if CONFIG_FREERTOS_UNICORE
static const BaseType_t app_cpu = 0;
#else
static const BaseType_t app_cpu = 1;
#endif

// Pins
static const int led_pin_1 = 16; //LED_BUILTIN;
static const int led_pin_2 = 12;

// Our task: blink an LED
void toggleLED1(void *parameter)
{
  while(1){
    digitalWrite(led_pin_1, !digitalRead(led_pin_1));
    vTaskDelay(500 / portTICK_PERIOD_MS);
  }
}


void toggleLED2(void *parameter)
{
  while(1){
    digitalWrite(led_pin_2, !digitalRead(led_pin_2));
    vTaskDelay(300 / portTICK_PERIOD_MS);
  }

}

void setup() {
  // put your setup code here, to run once:

  // Configure pins
  pinMode(led_pin_1, OUTPUT);
  pinMode(led_pin_2, OUTPUT);

  // Task to run forever
  xTaskCreatePinnedToCore(    // Use xTaskCreate() in vanilla FreeRTOS
              toggleLED1,      // Function to be called
              "Toggle LED1",   // Name of task
              1024,           // Stack size (bytes in ESP32, words in FreeRTOS)
              NULL,           // Parameter to pass to function
              1,              // Task priority (0 to to configMAX_PRIORITIES - 1)
              NULL,           // Task handle
              app_cpu);       // Run on one core for demo purposes (ESP32 only)

  xTaskCreatePinnedToCore(    // Use xTaskCreate() in vanilla FreeRTOS
              toggleLED2,      // Function to be called
              "Toggle LED2",   // Name of task
              1024,           // Stack size (bytes in ESP32, words in FreeRTOS)
              NULL,           // Parameter to pass to function
              1,              // Task priority (0 to to configMAX_PRIORITIES - 1)
              NULL,           // Task handle
              app_cpu);       // Run on one core for demo purposes (ESP32 only)

   // If this was vanilla FreeRTOS, you'd want to call vTaskStartScheduler() in
  // main after setting up your tasks.
}

void loop() {
  // put your main code here, to run repeatedly:
}
In the given example code, we are demonstrating how to utilize FreeRTOS on the ESP32 to manage multiple tasks simultaneously—specifically, controlling two LEDs that blink at different rates. Let’s break down the key sections of the code to explain what each part is doing:
Core Definitions
At the start, we determine which core the tasks will run on. The ESP32 has two cores, so FreeRTOS tasks can be pinned to a specific core if needed. If the ESP32 is configured to run on a single core (CONFIG_FREERTOS_UNICORE), the tasks will run on core 0 (app_cpu = 0). Otherwise, it defaults to core 1 (app_cpu = 1).
Pin Definitions
We define two pin numbers for the LEDs:
static const int led_pin_1 = 16; // First LED

static const int led_pin_2 = 12; // Second LED
These correspond to the physical pins on the ESP32 that control the LEDs.
Task 1: Blinking LED 1
The first task, toggleLED1, is a function that continuously toggles the state of led_pin_1. Inside the while(1) loop, the LED is turned on or off based on its current state using digitalWrite and digitalRead. The vTaskDelay function pauses the task for 500 milliseconds between toggles:
void toggleLED1(void *parameter) {
  while(1){
    digitalWrite(led_pin_1, !digitalRead(led_pin_1));
    vTaskDelay(500 / portTICK_PERIOD_MS);
  }
}
This means the first LED will blink on and off every half second.
Task 2: Blinking LED 2
The second task, toggleLED2, is nearly identical to the first, except that it operates on a different pin (led_pin_2) and blinks at a different rate (300 milliseconds):
void toggleLED2(void *parameter) {
  while(1){
    digitalWrite(led_pin_2, !digitalRead(led_pin_2));
    vTaskDelay(300 / portTICK_PERIOD_MS);
  }
}
This results in the second LED blinking faster than the first.
Setup Function
In the setup function, the pins are configured as outputs:
pinMode(led_pin_1, OUTPUT);

pinMode(led_pin_2, OUTPUT);
Next, the two tasks (toggleLED1 and toggleLED2) are created using the xTaskCreatePinnedToCore function, which pins them to the designated core (app_cpu). Each task is assigned the same priority (1) and a stack size of 1024 bytes:
xTaskCreatePinnedToCore(toggleLED1, "Toggle LED1", 1024, NULL, 1, NULL, app_cpu);

xTaskCreatePinnedToCore(toggleLED2, "Toggle LED2", 1024, NULL, 1, NULL, app_cpu);
The Loop
The loop function in this case is empty since FreeRTOS is handling the task scheduling. Both tasks are running independently in the background, thanks to FreeRTOS. This allows the ESP32 to toggle two LEDs simultaneously at different intervals without needing to block or pause one task while waiting for the other.
Summary
This example demonstrates the power of FreeRTOS by showing how it can manage two concurrent tasks. In a traditional loop-based approach, the tasks would have to be carefully timed, and one task could block the other. FreeRTOS, however, allows each task to run independently, with delays only affecting their respective operations.
This same approach can be extended to more complex tasks, such as reading from sensors, updating displays, and handling other time-sensitive events—all without affecting each other’s timing.