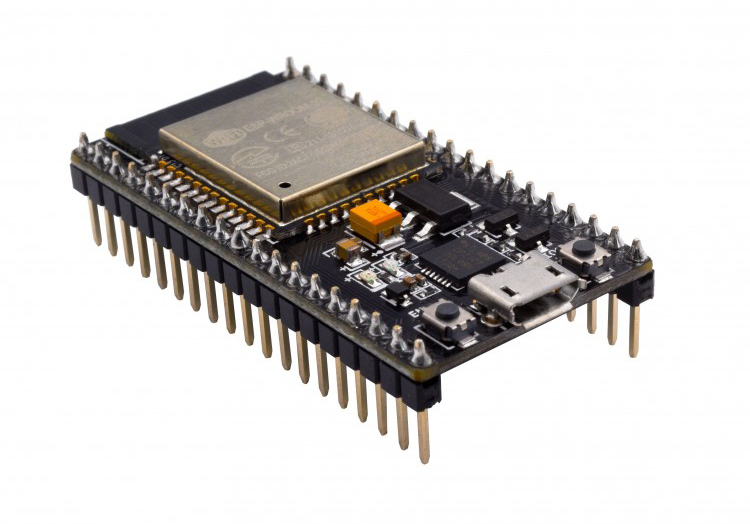
The ESP32 is powerful enough to host a small web server directly on the board. This means you can control LEDs, read sensor values, update a webpage, or build a simple browser-based dashboard without needing a separate computer or cloud server.
One of the most useful libraries for this is the ESP32 Async Web Server library. Unlike a basic web server that handles one request at a time in a more blocking way, an asynchronous web server can respond to browser requests more efficiently while your ESP32 continues running the rest of your program.
In this tutorial, you will learn how to use an ESP32 Async Web Server event handler. We will start with simple route handlers, then control an LED from a web page, handle missing pages with onNotFound(), and finally use Server-Sent Events to push live data from the ESP32 to the browser.
What Is an ESP32 Async Web Server Event Handler?
In an ESP32 Async Web Server sketch, an event handler is a callback function that runs when something happens.
For example:
- A browser requests the homepage
- A user clicks a button on the webpage
- The browser requests a URL like /led/on
- A page is not found
- The ESP32 sends live sensor data to the browser
In the ESPAsyncWebServer library, the most common event handlers are route handlers. A route handler tells the ESP32 what to do when a specific URL is requested.
For example:
server.on("/", HTTP_GET, [](AsyncWebServerRequest *request) {
  request->send(200, "text/plain", "Hello from ESP32!");
});
This handler runs when a browser visits the root URL /.
Required Libraries
For this tutorial, you need:
- ESP32 board package installed in Arduino IDE
- ESPAsyncWebServer library
- AsyncTCP library
In Arduino IDE, install the required libraries using the Library Manager or by adding the libraries manually from their repositories.
You will also need an ESP32 development board such as an ESP32 DevKit, ESP32-WROOM board, or similar.
Circuit Diagram
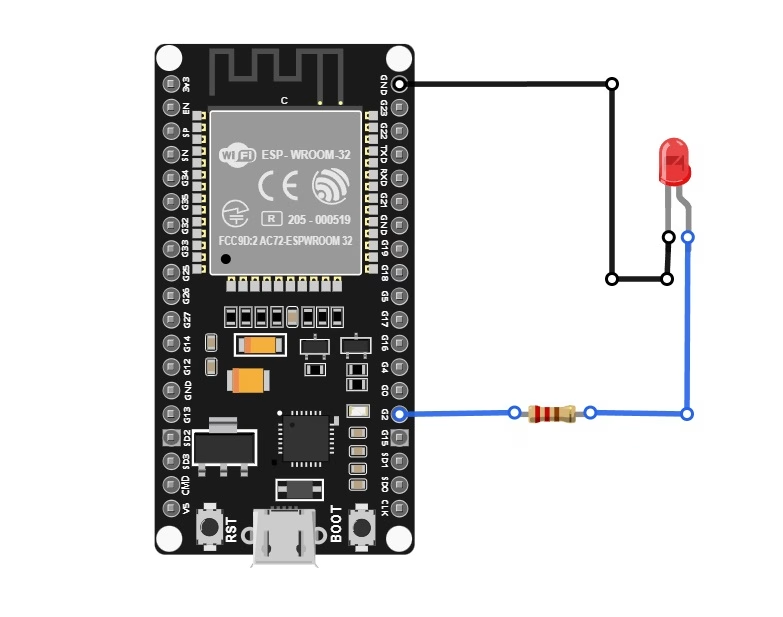
For the example project, connect one LED to the ESP32.
| LED Pin | ESP32 Connection |
|---|---|
| LED anode through resistor | GPIO 2 |
| LED cathode | GND |
Most ESP32 development boards also have a built-in LED, but the pin can vary depending on the board. GPIO 2 is commonly used in examples, but check your specific board if the LED does not turn on.
Use a 220 ohm to 330 ohm resistor in series with the LED.
Basic ESP32 Async Web Server Example
Let us start with a very simple Async Web Server sketch.
Replace YOUR_WIFI_SSID and YOUR_WIFI_PASSWORD with your Wi-Fi credentials.
#include <WiFi.h>
#include <AsyncTCP.h>
#include <ESPAsyncWebServer.h>

const char* ssid = "YOUR_WIFI_SSID";
const char* password = "YOUR_WIFI_PASSWORD";

AsyncWebServer server(80);

void setup() {
  Serial.begin(115200);

  WiFi.begin(ssid, password);
  Serial.print("Connecting to WiFi");

  while (WiFi.status() != WL_CONNECTED) {
    delay(500);
    Serial.print(".");
  }

  Serial.println();
  Serial.print("Connected! IP address: ");
  Serial.println(WiFi.localIP());

  server.on("/", HTTP_GET, [](AsyncWebServerRequest *request) {
    request->send(200, "text/plain", "Hello from ESP32 Async Web Server!");
  });

  server.begin();
}

void loop() {
}
Upload the sketch to your ESP32 and open the Serial Monitor. After the ESP32 connects to Wi-Fi, it will print its IP address.
Open that IP address in your browser. You should see:
Hello from ESP32 Async Web Server!
Notice that the loop() is empty. With ESPAsyncWebServer, you do not need to call server.handleClient() inside the loop.
Handling Web Page Requests
The most common use of an event handler is responding to a page request.
This line creates a handler for the homepage:
server.on("/", HTTP_GET, [](AsyncWebServerRequest *request) {
  request->send(200, "text/plain", "Hello from ESP32!");
});
Here is what each part means:
| Code | Meaning |
|---|---|
| server.on() | Creates a route handler |
| "/" | The URL path |
| HTTP_GET | The HTTP method |
| AsyncWebServerRequest *request | The browser request object |
| request->send() | Sends a response back to the browser |
You can add more routes like this:
server.on("/status", HTTP_GET, [](AsyncWebServerRequest *request) {
  request->send(200, "text/plain", "ESP32 is running");
});

server.on("/about", HTTP_GET, [](AsyncWebServerRequest *request) {
  request->send(200, "text/plain", "ESP32 Async Web Server Tutorial");
});
When the browser visits /status, the ESP32 responds with ESP32 is running.
ESP32 Async Web Server LED Control Example
Now let us make a web page with two buttons: one to turn the LED on and another to turn it off.
#include <WiFi.h>
#include <AsyncTCP.h>
#include <ESPAsyncWebServer.h>

const char* ssid = "YOUR_WIFI_SSID";
const char* password = "YOUR_WIFI_PASSWORD";

const int ledPin = 2;
bool ledState = false;

AsyncWebServer server(80);

const char index_html[] PROGMEM = R"rawliteral(
<!DOCTYPE html>
<html>
<head>
  <title>ESP32 Async Web Server</title>
  <meta name="viewport" content="width=device-width, initial-scale=1">
  <style>
    body {
      font-family: Arial;
      text-align: center;
      margin-top: 50px;
    }

    button {
      font-size: 20px;
      padding: 12px 24px;
      margin: 10px;
      cursor: pointer;
    }

    .on {
      background-color: #4CAF50;
      color: white;
    }

    .off {
      background-color: #f44336;
      color: white;
    }
  </style>
</head>
<body>
  <h1>ESP32 Async Web Server</h1>
  <p>LED State: <span id="ledState">Unknown</span></p>

  <button class="on" onclick="controlLED('on')">Turn ON</button>
  <button class="off" onclick="controlLED('off')">Turn OFF</button>

  <script>
    function controlLED(state) {
      fetch('/led/' + state)
        .then(response => response.text())
        .then(data => {
          document.getElementById('ledState').innerText = data;
        });
    }
  </script>
</body>
</html>
)rawliteral";

void setup() {
  Serial.begin(115200);

  pinMode(ledPin, OUTPUT);
  digitalWrite(ledPin, LOW);

  WiFi.begin(ssid, password);
  Serial.print("Connecting to WiFi");

  while (WiFi.status() != WL_CONNECTED) {
    delay(500);
    Serial.print(".");
  }

  Serial.println();
  Serial.print("ESP32 IP Address: ");
  Serial.println(WiFi.localIP());

  server.on("/", HTTP_GET, [](AsyncWebServerRequest *request) {
    request->send_P(200, "text/html", index_html);
  });

  server.on("/led/on", HTTP_GET, [](AsyncWebServerRequest *request) {
    ledState = true;
    digitalWrite(ledPin, HIGH);
    request->send(200, "text/plain", "ON");
  });

  server.on("/led/off", HTTP_GET, [](AsyncWebServerRequest *request) {
    ledState = false;
    digitalWrite(ledPin, LOW);
    request->send(200, "text/plain", "OFF");
  });

  server.begin();
}

void loop() {
}
In this example, the web page does not reload when you click the buttons. The browser uses fetch() to send a request to the ESP32.
When you click the ON button, the browser requests:
/led/on
The ESP32 runs this event handler:
server.on("/led/on", HTTP_GET, [](AsyncWebServerRequest *request) {
  ledState = true;
  digitalWrite(ledPin, HIGH);
  request->send(200, "text/plain", "ON");
});
When you click the OFF button, the browser requests:
/led/off
The ESP32 then turns the LED off and sends a response back to the browser.
Handling URL Parameters
You can also send values through the URL. For example:
/set?led=on
Here is an example handler:
server.on("/set", HTTP_GET, [](AsyncWebServerRequest *request) {
  if (request->hasParam("led")) {
    String value = request->getParam("led")->value();

    if (value == "on") {
      digitalWrite(ledPin, HIGH);
      request->send(200, "text/plain", "LED turned ON");
    }
    else if (value == "off") {
      digitalWrite(ledPin, LOW);
      request->send(200, "text/plain", "LED turned OFF");
    }
    else {
      request->send(400, "text/plain", "Invalid LED value");
    }
  }
  else {
    request->send(400, "text/plain", "Missing led parameter");
  }
});
Now you can control the LED using these URLs:
http://ESP32-IP-ADDRESS/set?led=on
http://ESP32-IP-ADDRESS/set?led=off
This is useful when you want to pass values such as PWM brightness, servo angle, relay state, or sensor settings.
Using onNotFound()
The onNotFound() handler runs when the browser requests a URL that does not exist.
Add this before server.begin():
server.onNotFound([](AsyncWebServerRequest *request) {
  request->send(404, "text/plain", "Page not found");
});
Now if the browser visits a wrong URL, such as:
/random-page
The ESP32 responds with:
Page not found
This is useful for debugging because you can immediately see when the browser is requesting a route that your sketch does not handle.
You can also print the missing URL to the Serial Monitor:
server.onNotFound([](AsyncWebServerRequest *request) {
  Serial.print("Not found: ");
  Serial.println(request->url());
  request->send(404, "text/plain", "Page not found");
});
Using Server-Sent Events with ESP32
Route handlers are useful when the browser asks the ESP32 for something. But what if the ESP32 needs to send live updates to the browser automatically?
For that, you can use Server-Sent Events, also called SSE.
Server-Sent Events allow the ESP32 to push data to the browser. This is useful for:
- Live temperature readings
- Sensor dashboards
- GPIO status updates
- ADC values
- Distance sensor readings
- System status messages
In ESPAsyncWebServer, this is done using AsyncEventSource.
ESP32 Async Web Server EventSource Example
The following example sends a counter value from the ESP32 to the browser every second.
#include <WiFi.h>
#include <AsyncTCP.h>
#include <ESPAsyncWebServer.h>

const char* ssid = "YOUR_WIFI_SSID";
const char* password = "YOUR_WIFI_PASSWORD";

AsyncWebServer server(80);
AsyncEventSource events("/events");

unsigned long lastEventTime = 0;
int counter = 0;

const char index_html[] PROGMEM = R"rawliteral(
<!DOCTYPE html>
<html>
<head>
  <title>ESP32 Server-Sent Events</title>
  <meta name="viewport" content="width=device-width, initial-scale=1">
  <style>
    body {
      font-family: Arial;
      text-align: center;
      margin-top: 50px;
    }

    #counter {
      font-size: 48px;
      font-weight: bold;
      color: #0066cc;
    }
  </style>
</head>
<body>
  <h1>ESP32 Async Web Server Events</h1>
  <p>Live Counter:</p>
  <div id="counter">0</div>

  <script>
    const source = new EventSource('/events');

    source.addEventListener('counter', function(event) {
      document.getElementById('counter').innerText = event.data;
    });

    source.onerror = function(error) {
      console.log('EventSource error:', error);
    };
  </script>
</body>
</html>
)rawliteral";

void setup() {
  Serial.begin(115200);

  WiFi.begin(ssid, password);
  Serial.print("Connecting to WiFi");

  while (WiFi.status() != WL_CONNECTED) {
    delay(500);
    Serial.print(".");
  }

  Serial.println();
  Serial.print("ESP32 IP Address: ");
  Serial.println(WiFi.localIP());

  server.on("/", HTTP_GET, [](AsyncWebServerRequest *request) {
    request->send_P(200, "text/html", index_html);
  });

  events.onConnect([](AsyncEventSourceClient *client) {
    Serial.println("Client connected to events");

    if (client->lastId()) {
      Serial.printf("Client reconnected. Last message ID: %u\n", client->lastId());
    }

    client->send("Connected to ESP32 events", NULL, millis(), 1000);
  });

  server.addHandler(&events);

  server.begin();
}

void loop() {
  if (millis() - lastEventTime > 1000) {
    lastEventTime = millis();
    counter++;

    String counterString = String(counter);
    events.send(counterString.c_str(), "counter", millis());
  }
}
In the browser, this line creates a connection to the ESP32 event source:
const source = new EventSource('/events');
This JavaScript event handler listens for events named counter:
source.addEventListener('counter', function(event) {
  document.getElementById('counter').innerText = event.data;
});
On the ESP32 side, this line sends the event:
events.send(counterString.c_str(), "counter", millis());
The second argument, "counter", is the event name. The browser listens for the same event name using addEventListener().
Complete LED and Event Handler Example
Here is a more complete example that combines LED control and live status updates.
#include <WiFi.h>
#include <AsyncTCP.h>
#include <ESPAsyncWebServer.h>

const char* ssid = "YOUR_WIFI_SSID";
const char* password = "YOUR_WIFI_PASSWORD";

const int ledPin = 2;
bool ledState = false;

AsyncWebServer server(80);
AsyncEventSource events("/events");

unsigned long lastStatusTime = 0;

const char index_html[] PROGMEM = R"rawliteral(
<!DOCTYPE html>
<html>
<head>
  <title>ESP32 LED Event Handler</title>
  <meta name="viewport" content="width=device-width, initial-scale=1">
  <style>
    body {
      font-family: Arial;
      text-align: center;
      margin-top: 40px;
    }

    button {
      font-size: 20px;
      padding: 12px 24px;
      margin: 10px;
    }

    #status {
      font-size: 28px;
      font-weight: bold;
    }
  </style>
</head>
<body>
  <h1>ESP32 Async Web Server Event Handler</h1>

  <p>LED Status:</p>
  <div id="status">Waiting...</div>

  <button onclick="setLED('on')">Turn ON</button>
  <button onclick="setLED('off')">Turn OFF</button>

  <script>
    function setLED(state) {
      fetch('/led/' + state);
    }

    const source = new EventSource('/events');

    source.addEventListener('led', function(event) {
      document.getElementById('status').innerText = event.data;
    });
  </script>
</body>
</html>
)rawliteral";

void sendLedStatus() {
  if (ledState) {
    events.send("ON", "led", millis());
  } else {
    events.send("OFF", "led", millis());
  }
}

void setup() {
  Serial.begin(115200);

  pinMode(ledPin, OUTPUT);
  digitalWrite(ledPin, LOW);

  WiFi.begin(ssid, password);
  Serial.print("Connecting to WiFi");

  while (WiFi.status() != WL_CONNECTED) {
    delay(500);
    Serial.print(".");
  }

  Serial.println();
  Serial.print("ESP32 IP Address: ");
  Serial.println(WiFi.localIP());

  server.on("/", HTTP_GET, [](AsyncWebServerRequest *request) {
    request->send_P(200, "text/html", index_html);
  });

  server.on("/led/on", HTTP_GET, [](AsyncWebServerRequest *request) {
    ledState = true;
    digitalWrite(ledPin, HIGH);
    sendLedStatus();
    request->send(200, "text/plain", "LED ON");
  });

  server.on("/led/off", HTTP_GET, [](AsyncWebServerRequest *request) {
    ledState = false;
    digitalWrite(ledPin, LOW);
    sendLedStatus();
    request->send(200, "text/plain", "LED OFF");
  });

  events.onConnect([](AsyncEventSourceClient *client) {
    Serial.println("Event client connected");
    client->send(ledState ? "ON" : "OFF", "led", millis(), 1000);
  });

  server.addHandler(&events);

  server.onNotFound([](AsyncWebServerRequest *request) {
    request->send(404, "text/plain", "Page not found");
  });

  server.begin();
}

void loop() {
  if (millis() - lastStatusTime > 5000) {
    lastStatusTime = millis();
    sendLedStatus();
  }
}
In this version, clicking a button sends a request to the ESP32. The ESP32 changes the LED state, then sends an event back to the browser. The browser updates the displayed LED status without reloading the page.
ESP32 Async Web Server vs Regular WebServer
The regular ESP32 WebServer library usually requires code like this inside the loop:
server.handleClient();
With ESPAsyncWebServer, you normally do not need that. The server handles requests asynchronously using callbacks.
For simple projects, the regular WebServer library is easier to understand. But for more responsive pages, real-time updates, dashboards, and projects with multiple clients, ESPAsyncWebServer is often a better choice.
Use the regular WebServer library if:
- You are building a very simple project
- You want fewer dependencies
- You are still learning basic web server concepts
Use ESPAsyncWebServer if:
- You want responsive web controls
- You want Server-Sent Events
- You want WebSocket support
- You want to serve pages without blocking your main code
- You are building an ESP32 dashboard or control panel
Common Errors and Fixes
ESPAsyncWebServer.h: No such file or directory
This means the ESPAsyncWebServer library is not installed correctly.
Make sure you installed:
#include <ESPAsyncWebServer.h>
You also need the AsyncTCP library for ESP32:
#include <AsyncTCP.h>
AsyncTCP.h: No such file or directory
Install the AsyncTCP library. ESPAsyncWebServer depends on it when used with ESP32.
The Web Page Does Not Open
Check the Serial Monitor and make sure the ESP32 is connected to Wi-Fi. The ESP32 and your computer or phone must usually be connected to the same network.
Also make sure you are entering the correct IP address printed by the ESP32.
The LED Does Not Turn On
Check your LED polarity. The longer leg is usually the anode and should go through a resistor to the GPIO pin. The shorter leg is usually the cathode and should go to GND.
Also check if your board really uses GPIO 2 for the LED. Some ESP32 boards use a different built-in LED pin.
Buttons Work But Page Does Not Update
If the LED changes but the text on the page does not update, check the browser console. There may be a JavaScript error.
Also make sure the event name in the ESP32 code matches the JavaScript listener.
For example, this ESP32 event:
events.send("ON", "led", millis());
must match this JavaScript event listener:
source.addEventListener('led', function(event) {
  document.getElementById('status').innerText = event.data;
});
Do Not Use Long delay() Calls
Although the web server itself is asynchronous, you should still avoid long blocking code in your sketch. Long delay() calls, slow loops, or blocking sensor reads can make your project feel less responsive.
Use millis() timing instead when possible.
Final Thoughts
The ESP32 Async Web Server library is a powerful way to build web-controlled ESP32 projects. With event handlers, you can respond to browser requests, control GPIO pins, read URL parameters, handle missing pages, and push live updates to the browser using Server-Sent Events.
For beginner projects, start with simple route handlers like /led/on and /led/off. Once that works, add a web page with buttons. After that, try Server-Sent Events to display live sensor readings without refreshing the page.
This makes ESP32 Async Web Server useful for home automation, IoT dashboards, sensor monitors, relay controls, robotics projects, and browser-based embedded interfaces. ESP32-based dashboards and control panels can also be used in industrial automation applications for local equipment monitoring and control.