
When working with IoT, it’s often necessary to track a device’s location for monitoring. Global Positioning Service (GPS) remains the number 1 option for large-area tracking. This project will show you how you can use a GPS with an ESP32 and have the location plotted on Google Maps.
This project will be in two parts: first, we’ll be programming the ESP32 via Arduino IDE and have it host a web server. Second, we will send the GPS data, read by the ESP32 from the GPS device, to an external web server. The local and external servers will contain HTML and JavaScript which allows us to use the Google Maps API. You’ll need an API key for using Google Maps which is obtainable through a free trial account.
This same ESP32 GPS setup can also be adapted for simple fleet monitoring, such as tracking a service van or cargo truck. While the ESP32 handles the location-tracking side, regular maintenance and quality cargo truck parts are still important for keeping the vehicle reliable.
Hardware Needed
- ESP32 Dev Board
- GY-NEO6MV2 GPS Module
- Connecting Wires
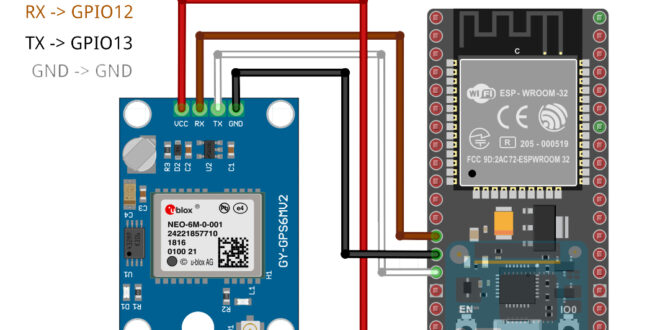
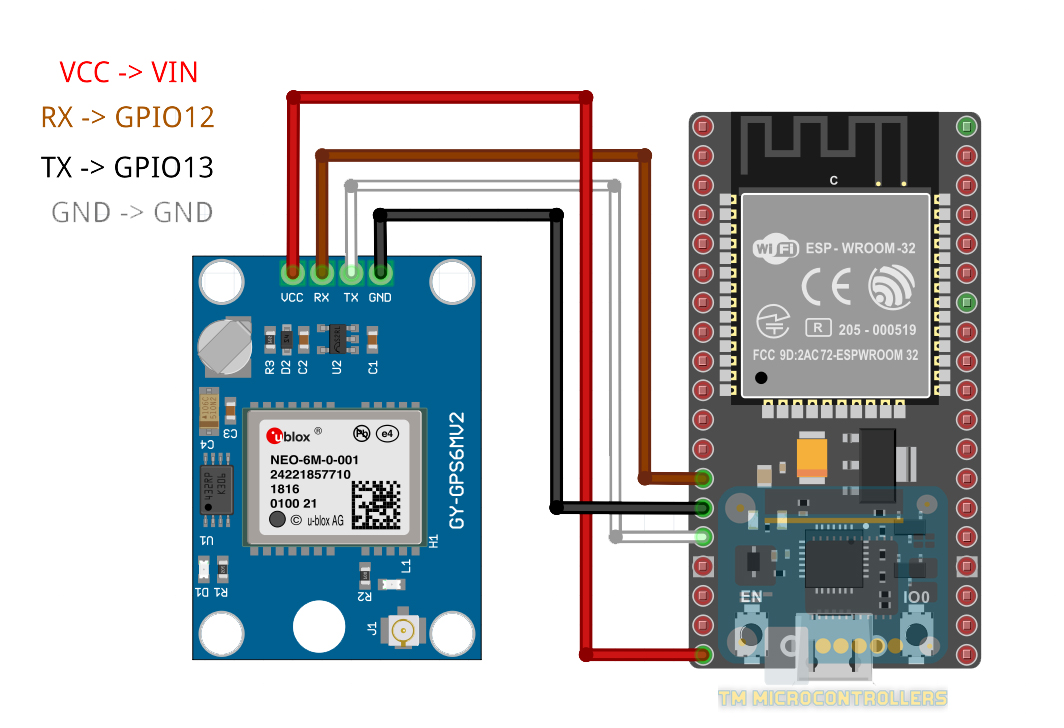
Wiring
Source Code
Download the full project code here: https://github.com/kurimawxx00/esp32-google-maps
Viewing ESP32 Location on Local Server
About 80% of the code is from the ESP32 Web server code. We only need to add the following libraries:
Arduino's SoftwareSerial is not natively supported by ESP32 so you’ll need to download, through Library Manager, a modified version:

TinyGPS is also installable via Library Manager:

Once these libraries are installed, we’ll need to declare the following objects somewhere before setup():
TinyGPS gps;
SoftwareSerial ss;
To read the GPS coordinates, we use:
gps.f_get_position(&flat, &flon, &age);
This function returns the latitude and longitude to variables flat and flon which are floats. The variable age is a double.
We call this function every time a user/client accesses the <ESP32 IP Address>/loc page. Since we need a String to send via HTTP, the flat and flon variables are converted first.
server.on("/loc", [](){
   gps.f_get_position(&flat, &flon, &age);
   text = floatToString(flat,TinyGPS::GPS_INVALID_F_ANGLE, 10, 6) + ',';
   text += floatToString(flon,TinyGPS::GPS_INVALID_F_ANGLE, 11, 6);
   if(text.indexOf("v") > 0){
      text = "7.207573, 125.395874";
   }
   Serial.println(text);
   server.send(200, "text/plain", text);
   smartdelay(500);
});
When the GPS data is invalid, the floatToString() function returns “inv”. We just use the indexOf function to search for “v” to check if the data is valid. If invalid, then data defaults to a coordinate.
The function smartdelay() is important here as it manages data coming from the GPS device. Removing this might cause the project to not work.
See the full local server ESP32 code here.
Web Page Files
The rest of the project files contain web page HTML, JS, and CSS converted into C++ header files. The HTML and CSS are just copies of Google’s Simple Map example. Most of the work is on the JS file.
Basically, on the JS code we have three functions: initMap(), getPosition(), and changeMarkerPosition(). The initMap() function loads the map and plots an initial marker. Also inside this function is a setInterval() which acquires the position of the device every second.

For every setInterval() trigger, the getPosition() function is called. This contains an XMLHttpRequest() to the <ESP32 IP Address>/loc page. If the request is successful, the GPS coordinates is retrieved.
After the latitude and longitude are extracted, the changeMarkerPosition() function then repositions the marker using the setPosition() function. Finally, in order for the map to move with the marker, we set its center the same as the updated GPS coordinates.
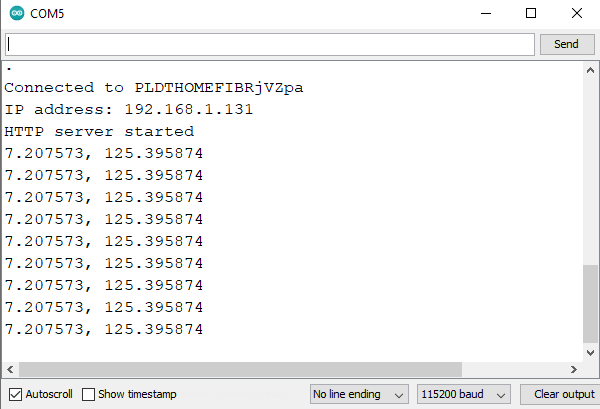
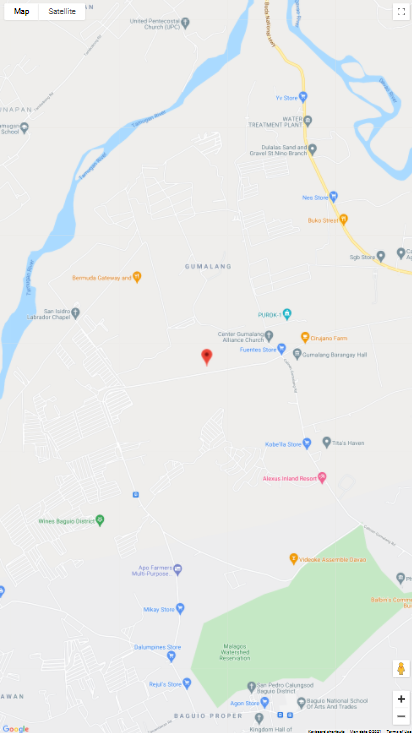
Upload the sketch, and open the serial monitor to know the ESP32’s IP address. Then, visit that address using your preferred browser. The GPS device might take some time to warm up so invalid values might show. But after a minute or so, the marker should now be pointed at the ESP32’s current location.
Sending GPS Data to External Web Server
A more practical application of this project is to have the web page files stored on an external web server. First, we need to upload the HTML, JS and CSS files in the server and then change some lines in the ESP32 code. The ESP32 will now act as a client and will send GPS data via HTTP POST.
The ESP32 code's loop() function contains the parts where the GPS data is acquired and the sending to the server:
void loop(void) {
  // Send GPS data every second
  gps.f_get_position(&flat, &flon, &age);
  gpsData = "lat="+floatToString(flat,TinyGPS::GPS_INVALID_F_ANGLE, 10, 6) + "&lng=";
  gpsData += floatToString(flon,TinyGPS::GPS_INVALID_F_ANGLE, 11, 6);
  if(gpsData.indexOf("v") > 0){
      gpsData = "lat=7.207573&lng=125.395874";
  }
  Serial.println(gpsData);
  smartdelay(1000);

  HTTPClient client;

  client.begin(server);
  client.addHeader("Connection","keep-alive");
  client.addHeader("Content-Length",String(gpsData.length()));
  client.addHeader("Content-Type", "text/plain");
  int httpResponseCode = client.POST(gpsData);

  Serial.println(client.getString());
  if(httpResponseCode > 0){
    Serial.println("Data successfully sent to server!");
  }else{
    Serial.print("Server upload failed. ");
    Serial.println(client.errorToString(httpResponseCode).c_str());
  }
  // Free resources
  client.end();
}
We also need to remove the part where the ESP32 acts as a web server. See the full code here.
Then, we add a gps.php file, to capture the POST data from the ESP32:
<?php
    $inp = file_get_contents("php://input");
    if(!empty($inp)){
        $s = explode("&",$inp);
        $a = explode("=",$s[0]);
        $b = explode("=",$s[1]);
        // Replace this with another method that saves to DB
        $file = fopen("gps_data.txt", "w") or die("Unable to open file!");
        $txt = $a[1] . "," . $b[1];
        fwrite($file, $txt);
        fclose($file);
    }else{
        // Replace this with another method to reads from DB
        $file = fopen("gps_data.txt", "r") or die("Unable to open file!");
        echo fread($file,filesize("gps_data.txt"));
        fclose($file);
    }
?>
Aside from capturing POST data, the PHP file above also provides the last transmitted GPS data sent. In this prototype, the data is stored in a text file. If security is a concern, then just change what's inside the if-else statement to saving to and reading from a MySQL database.
We also update the JS file, particularly the getPosition() function, so that it may read from the text file using JQuery GET:
function getPosition(){
    var gpsData = null;
    $.get("gps_data.txt", function(data){
      gpsData = data;
      console.log(gpsData);
      vals = gpsData.split(",");
      lat = parseFloat(vals[0]);
      lng = parseFloat(vals[1]);

      if(!isNaN(lat) || !isNaN(lng)){
          changeMarkerPosition();
      }else{ return; }
    },"text");
}
Noticed that we are now using JQuery GET for acquiring data from the text file. This is to consider the negative performance effects brought by synchronous calls (XMLHTTPRequest) especially that we are now using a remote server. Although there is an async method for XMLHTTPRequest, I prefer the shorter JQuery GET method.
Finally, the index.html is also updated to include support for JQuery.
All project files are available at https://github.com/kurimawxx00/esp32-google-maps


