
Stepper motors are widely used in various applications due to their precise control over position and speed. They are commonly found in 3D printers, CNC machines, and robotics. In this article, we’ll explore how to control a stepper motor using an ESP32 microcontroller and set up a simple web server to control the motor remotely. We’ll begin by understanding how stepper motors work and then dive into the ESP32-based control system with example code.
How Stepper Motors Work
A stepper motor is a type of DC motor that moves in discrete steps rather than continuous motion. It consists of a rotor (the moving part) and stator coils (stationary electromagnets). By energizing these coils in a specific sequence, the rotor moves in precise steps. The main parameters that define a stepper motor are:
- Step Angle: The angular displacement the rotor makes with each step, typically ranging from 1.8° to 7.5°.
- Steps per Revolution: The number of steps required to complete one full rotation.
- Microstepping: By controlling the current in the coils, it is possible to achieve smaller steps between the standard step positions, improving resolution and smoothness.
There are two main types of stepper motors:
- Unipolar Stepper Motors: These have a common center tap on each coil and are simpler to drive.
- Bipolar Stepper Motors: These require more complex control but offer more torque.
Step Sequence
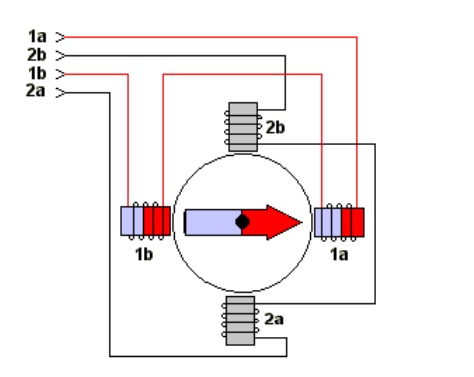
To make the motor move, the stator coils are energized in a specific sequence. For example, a simple 4-step sequence for a bipolar motor would be:
- Coil 1A energized
- Coil 2B energized
- Coil 1B reversed
- Coil 2A reversed
Repeating this sequence makes the motor turn. By reversing the sequence, the motor turns in the opposite direction.
Advantages of Stepper Motors
- Precise control: The motor moves a specific amount with each pulse, allowing accurate control over position.
- Holding torque: Stepper motors can hold their position when stopped.
Disadvantages
- Power consumption: They draw power even when stationary to maintain position.
- Resonance issues: At certain speeds, stepper motors may resonate, leading to inefficient performance.
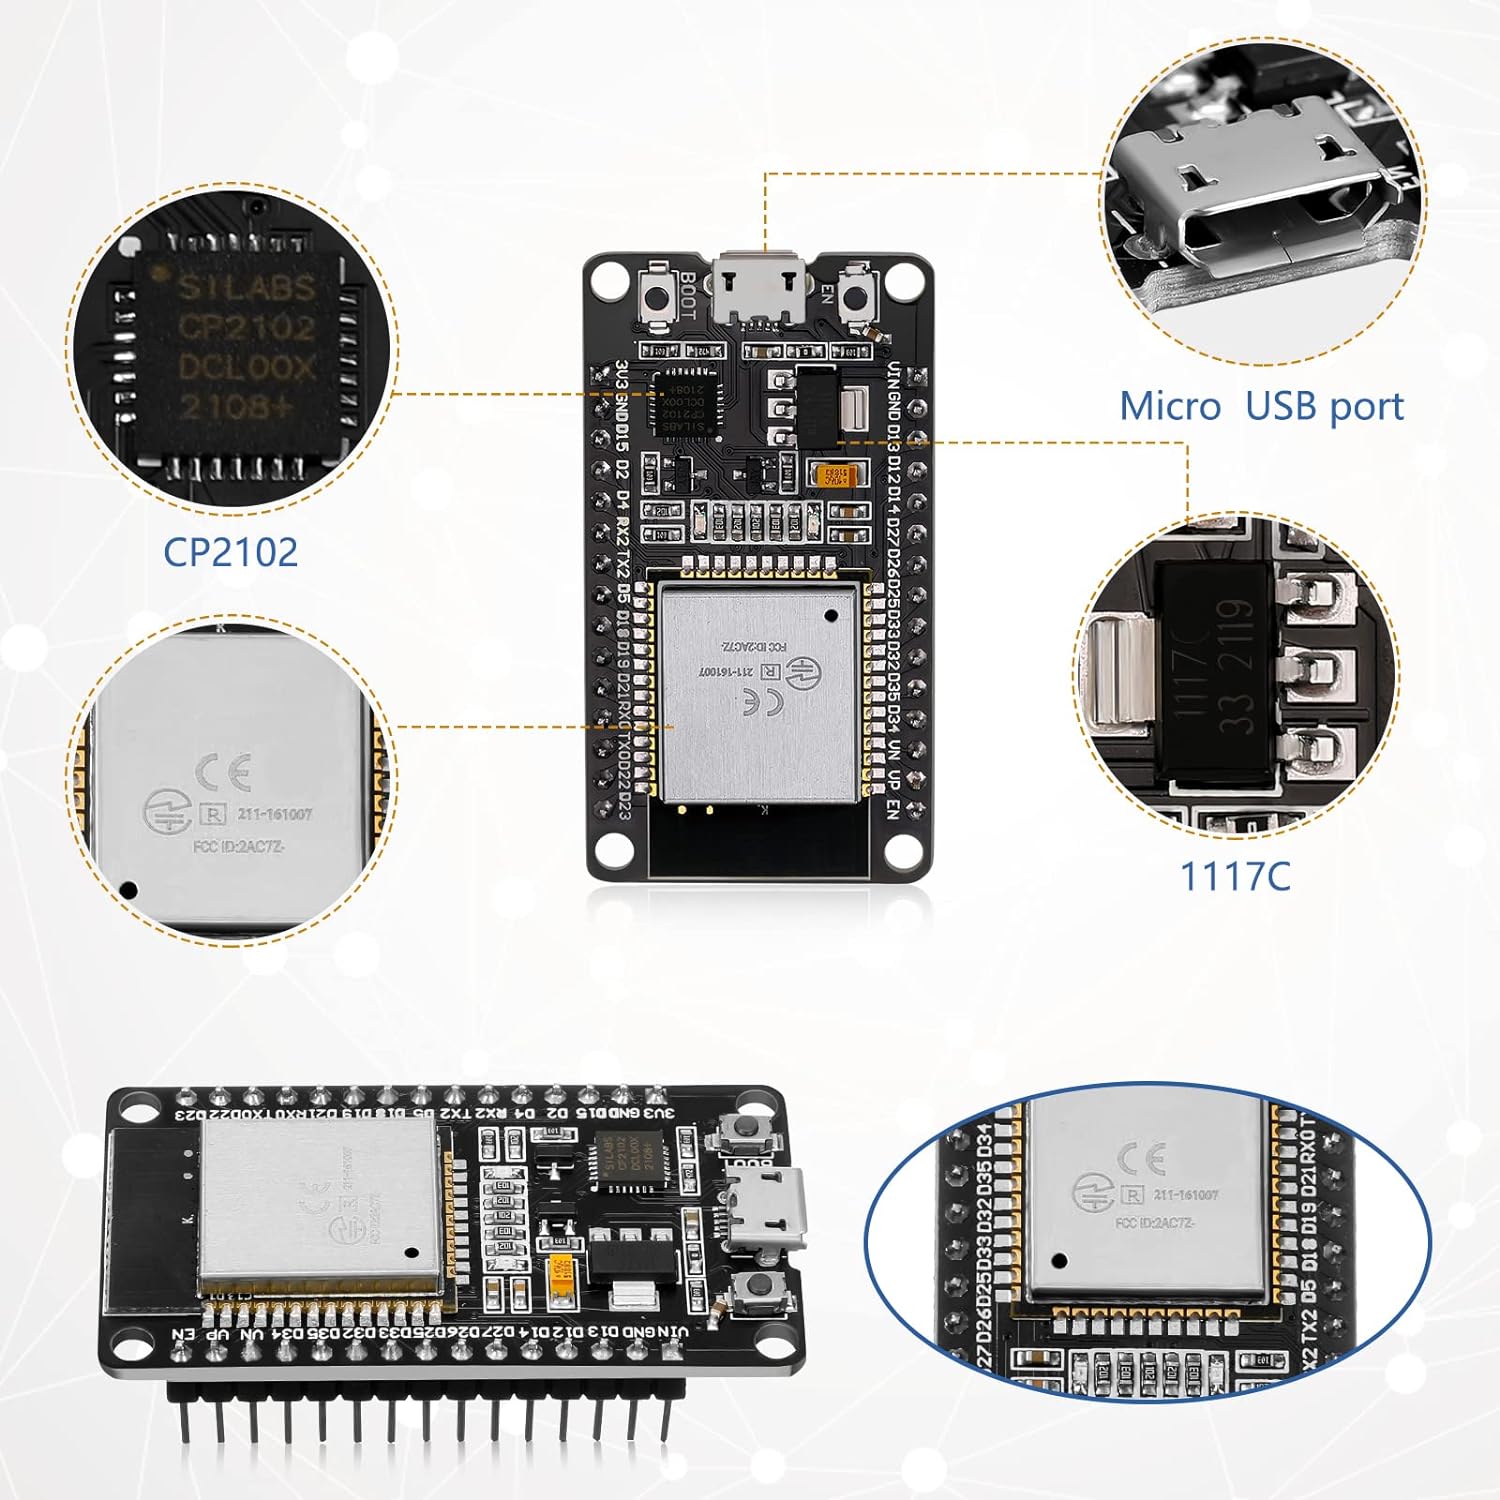
Setting Up ESP32 to Control a Stepper Motor
The ESP32 is a powerful microcontroller with built-in Wi-Fi capabilities, making it an excellent choice for hosting a web server to control devices remotely. In this project, we’ll use the ESP32 to control a stepper motor through a web interface.
Components Needed
- ESP32 development board
- Stepper motor (e.g., 28BYJ-48 or NEMA 17)
- ULN2003 or L298N motor driver (to drive the motor)
- Breadboard and jumper wires
- Power supply for the motor (5V or 12V depending on the motor)
Wiring Diagram
The wiring for this project depends on the type of motor driver you use. Below is a general guide:
ESP32 to ULN2003 (for 28BYJ-48)
-
- IN1 → GPIO 19
- IN2 → GPIO 18
- IN3 → GPIO 17
- IN4 → GPIO 16
- Connect the ULN2003 power supply to 5V (ESP32 Vin) and GND.

ESP32 to L298N (for NEMA 17)
-
- IN1 → GPIO 19
- IN2 → GPIO 18
- IN3 → GPIO 17
- IN4 → GPIO 16
- Connect the motor power supply to the L298N (12V for NEMA 17).

Example Code: Stepper Motor Control via Webserver
The following code demonstrates how to set up a web server using the ESP32 to control a stepper motor. When a user accesses the web page, they can control the motor's direction and number of steps.
Install the Required Libraries
You’ll need the Stepper library to control the motor. Install it in your Arduino IDE.
#include <WiFi.h>
#include <WebServer.h>
#include <Stepper.h>

// Replace with your network credentials
const char* ssid = "your_SSID";
const char* password = "your_PASSWORD";

// Motor steps per revolution (adjust according to your motor)
const int stepsPerRevolution = 2048; // 28BYJ-48 stepper motor

// Define the stepper and its pins
Stepper myStepper(stepsPerRevolution, 16, 17, 18, 19);

// Create a web server object
WebServer server(80);

void setup() {
// Start the Serial Monitor
   Serial.begin(115200);

// Connect to Wi-Fi
   WiFi.begin(ssid, password);
   while (WiFi.status() != WL_CONNECTED) {
      delay(1000);
      Serial.println("Connecting to WiFi...");
   }
   Serial.println("Connected to WiFi");
   Serial.print("IP Address: ");
   Serial.println(WiFi.localIP());

// Define web server routes
   server.on("/", handleRoot);
   server.on("/left", handleLeft);
   server.on("/right", handleRight);

// Start the server
   server.begin();
   Serial.println("Server started");

// Set the motor speed (RPM)
   myStepper.setSpeed(10);
}

void loop() {
// Handle client requests
   server.handleClient();
}

// Function to handle the root path
void handleRoot() {
   String html = "<html><body><h1>Stepper Motor Control</h1>";
   html += "<a href=\"/left\">Turn Left</a><br>";
   html += "<a href=\"/right\">Turn Right</a>";
   html += "</body></html>";
   server.send(200, "text/html", html);
}

// Function to turn the motor left
void handleLeft() {
   myStepper.step(-stepsPerRevolution); // Rotate 1 revolution counterclockwise
   server.send(200, "text/plain", "Motor turning left");
}

// Function to turn the motor right
void handleRight() {
   myStepper.step(stepsPerRevolution); // Rotate 1 revolution clockwise
   server.send(200, "text/plain", "Motor turning right");
}
Code Breakdown
- WiFi Setup: The ESP32 connects to your local Wi-Fi network using the provided SSID and password.
- Web Server Setup: A web server is started, and routes for "/" (home), "/left", and "/right" are defined.
- Motor Control: When the user accesses
, the motor turns one revolution counterclockwise. When/left
is accessed, the motor turns one revolution clockwise./right - Stepper Motor Setup: The Stepper object controls the motor's pins, and the
function moves the motor by a specified number of steps.step()
How It Works
- Connect the ESP32 to your Wi-Fi network. After uploading the code to the ESP32, open the Serial Monitor to view the assigned IP address.
- Open a browser and enter the ESP32’s IP address to access the web interface.
- Use the provided links to rotate the stepper motor left or right.
Conclusion
Controlling a stepper motor through an ESP32 web server offers a powerful way to manage motorized systems remotely. You can extend this project by adding more features, such as speed control, real-time position tracking, or integration with mobile apps. By leveraging the ESP32’s Wi-Fi capabilities, you can easily develop a versatile motor control system for various applications.


