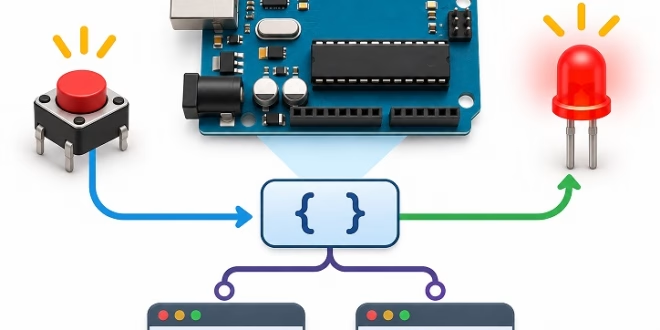
An Arduino sketch normally calls a function when it reaches a specific line of code. A callback reverses that relationship: you give another function, class, or library a function to call, and that code decides when to run it. The callback might execute immediately, after a button press, or when an interrupt occurs.
For example, the following sketch passes sayHello() to a function named runTwice(). The receiving function calls the callback twice. Notice that the caller passes sayHello without parentheses.
void sayHello() {
  Serial.println("Hello");
}

void runTwice(void (*callback)()) {
  callback();
  callback();
}

void setup() {
  Serial.begin(9600);
  runTwice(sayHello);  // pass the function, do not call it here
}

void loop() {}
The expected Serial Monitor output at 9600 baud is:
Hello
Hello
This tutorial starts with the function-pointer syntax behind callbacks, then uses an Arduino Uno R3, pushbuttons, and LEDs to show why callbacks are useful in real hardware. We will also cover callback tables, C++ lambdas, captured variables, context pointers, object methods, interrupts, and the memory tradeoffs between callback approaches.
What Is a Callback Function in Arduino?
A callback is a function supplied to code that will invoke it. In a direct call, your sketch writes sayHello(). In a callback-based design, your sketch registers sayHello and lets the receiving code call it. That separation lets a reusable button class report an event without knowing whether the application should toggle an LED, send a message, or start a motor.
You may have used this idea already with the core function attachInterrupt():
attachInterrupt(digitalPinToInterrupt(2), onPulse, RISING);Here, onPulse names an interrupt handler. It is passed without (), which would attempt to execute it immediately. On the Arduino Uno R3, external interrupts are available on digital pins 2 and 3; the interrupt callback must return void and take no parameters. See the Arduino attachInterrupt reference.
The AVR version of Arduino's Wire library also uses callbacks when the Uno acts as an I2C peripheral (also called a slave). These signatures must match the library's requirements:
| Arduino API | Callback signature | When the callback runs |
|---|---|---|
attachInterrupt() |
void handler() |
When the configured external interrupt occurs |
Wire.onReceive() |
void handler(int count) |
When the board receives bytes as an I2C peripheral |
Wire.onRequest() |
void handler() |
When an I2C controller requests data from the board |
These callbacks are supplied by your sketch, but the core or library chooses when to invoke them. As we will see, the code that makes the call also determines whether your callback runs in ordinary program flow or inside an interrupt.
Declaring a Function Pointer
A callback often uses a function pointer, which holds the address of a function with a particular return type and parameter list. This declaration creates a pointer named action to a function that accepts no arguments and returns nothing:
void (*action)();Read it from the inside out: action is a pointer, the empty parentheses mean the function accepts no parameters, and void means it returns no value. The parentheses around *action matter; void *action(); would declare a function returning a void * pointer instead.
In this complete sketch, one pointer selects between two different LED operations:
void turnOn() {
  digitalWrite(LED_BUILTIN, HIGH);
  Serial.println("LED on");
}

void turnOff() {
  digitalWrite(LED_BUILTIN, LOW);
  Serial.println("LED off");
}

void (*action)() = nullptr;

void setup() {
  Serial.begin(9600);
  pinMode(LED_BUILTIN, OUTPUT);

  action = turnOn;
  action();

  action = turnOff;
  action();

  Serial.print("Pointer bytes: ");
  Serial.println(sizeof(action));
}

void loop() {}
On a classic Uno R3, the expected output is:
LED on
LED off
Pointer bytes: 2
A regular function pointer occupies two bytes on the ATmega328P used by the Uno R3 and typically four bytes on ESP32 boards. That size does not depend on how long the callback function is; its executable code is stored separately.
Simplifying the Syntax With typedef and using
Function-pointer declarations become easier to read if you give the type an alias. Both of these are valid in the Arduino C++ environment:
typedef void (*Callback)();           // traditional syntax
using Operation = int (*)(int, int);  // C++11 alias syntax

Callback onPress = nullptr;          // function taking no parameters
Operation calculate = nullptr;       // two int parameters, int result
The return type and parameter types must match the function you assign. A function taking bool cannot be substituted for one taking no arguments merely because both are named handlers.
Passing a Function to Another Function
Suppose three LED pins need the same series of operations: configure them, set them HIGH, and report their status. Instead of repeating three separate loops, write one forEachPin() function and pass the operation as a callback.
const byte leds[] = {9, 10, 11};
const byte LED_COUNT = sizeof(leds) / sizeof(leds[0]);

void makeOutput(byte pin) {
  pinMode(pin, OUTPUT);
}

void turnOn(byte pin) {
  digitalWrite(pin, HIGH);
}

void report(byte pin) {
  Serial.print("Pin ");
  Serial.print(pin);
  Serial.println(digitalRead(pin) ? " is HIGH" : " is LOW");
}

void forEachPin(const byte pins[], byte count, void (*action)(byte)) {
  for (byte i = 0; i < count; i++) {
    action(pins[i]);
  }
}

void setup() {
  Serial.begin(9600);
  forEachPin(leds, LED_COUNT, makeOutput);
  forEachPin(leds, LED_COUNT, turnOn);
  forEachPin(leds, LED_COUNT, report);
}

void loop() {}
With LEDs and individual series resistors connected to pins 9, 10, and 11, the Serial Monitor should show:
Pin 9 is HIGH
Pin 10 is HIGH
Pin 11 is HIGH
The signature void (*action)(byte) tells the compiler that the callback accepts a pin number and returns nothing. Each call of forEachPin() traverses the array, but the supplied function controls what happens to each pin. You can reuse this pattern for a collection of sensor channels or output devices, too.
Arduino Callback Hardware Example: Pushbutton and LED
A button is a more interesting callback source because the event does not occur at a predictable moment. We will write a reusable Button class that reads the switch in loop() and invokes a registered function when it detects a stable new press. The class will not contain any LED-specific code.
Parts and Wiring
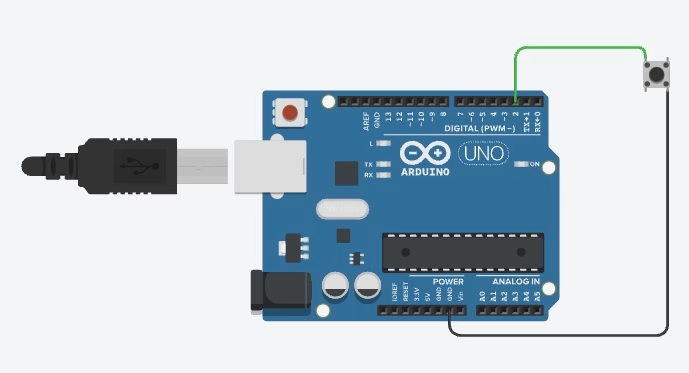
Use a classic Arduino Uno R3, one normally open pushbutton, a breadboard, and jumper wires. The example uses the Uno's built-in LED, so you do not need an external LED or current-limiting resistor.
| Part | Connection |
|---|---|
| Pushbutton, one contact | Arduino Uno R3 D2 |
| Pushbutton, opposite contact | Arduino Uno R3 GND |
| Status LED | Built-in LED (LED_BUILTIN), no extra wiring |
The sketch enables INPUT_PULLUP, which holds D2 HIGH while the button is released. Pressing the button connects D2 to GND and reads LOW. On a four-leg tactile switch, use contacts on opposite sides of the internal switch, not two legs that are already internally connected.
Complete Button Callback Sketch With Debouncing
Mechanical contacts bounce briefly, producing several transitions during a single press. A useful debounce routine must distinguish the most recent raw input from the stable accepted state. The class below accepts a change only after the raw input has remained unchanged for at least 50 ms.
class Button {
  public:
    explicit Button(byte inputPin) : pin(inputPin) {}

    void begin() {
      pinMode(pin, INPUT_PULLUP);
      bool initial = (digitalRead(pin) == LOW);
      lastRawPressed = initial;
      stablePressed = initial;
      lastChange = millis();
    }

    void onPress(void (*callback)()) {
      pressHandler = callback;
    }

    void update() {
      const bool rawPressed = (digitalRead(pin) == LOW);
      const unsigned long now = millis();

      if (rawPressed != lastRawPressed) {
        lastRawPressed = rawPressed;
        lastChange = now;
      }

      if (now - lastChange >= 50 && rawPressed != stablePressed) {
        stablePressed = rawPressed;
        if (stablePressed && pressHandler != nullptr) {
          pressHandler();
        }
      }
    }

  private:
    byte pin;
    bool lastRawPressed = false;
    bool stablePressed = false;
    unsigned long lastChange = 0;
    void (*pressHandler)() = nullptr;
};

Button button(2);

void toggleLed() {
  digitalWrite(LED_BUILTIN, !digitalRead(LED_BUILTIN));
}

void setup() {
  pinMode(LED_BUILTIN, OUTPUT);
  digitalWrite(LED_BUILTIN, LOW);
  button.begin();
  button.onPress(toggleLed);
}

void loop() {
  button.update();
}
Upload the sketch, then press and release the button. The built-in LED should switch state once for each clean press. The 50 ms period is a software debounce setting, not a measured property of this particular switch. Short presses that do not remain stable for that long may be ignored.
Three pieces connect the reusable class to your application:
- Register:
onPress(toggleLed)stores the function pointer inpressHandler. - Detect:
update()reads the switch and waits for a stable transition usingmillis(). - Invoke: when a released button becomes stably pressed,
pressHandler()runs, after a null-pointer check.
The callback runs from loop(), not inside an interrupt. That distinction is important: it permits work that would be inappropriate inside an interrupt service routine. The class still needs regular calls to update(); long blocking delays elsewhere in your sketch can make it miss a short press.
For the broader class structure, see Arduino Programming: Classes. To package a reusable button class into separate source files, see Arduino Library: How to Create Your Own.
Arrays of Function Pointers: A Serial Command Table
A callback pointer can also be stored in a struct. That gives you a compact lookup table in which each serial command is paired with a function. It is particularly useful for small command interpreters and menus.
struct Command {
  char key;
  void (*run)();
};

void ledOn() {
  digitalWrite(LED_BUILTIN, HIGH);
  Serial.println("LED on");
}

void ledOff() {
  digitalWrite(LED_BUILTIN, LOW);
  Serial.println("LED off");
}

void showUptime() {
  Serial.print(millis() / 1000UL);
  Serial.println(" s since reset");
}

const Command commands[] = {
  {'1', ledOn},
  {'0', ledOff},
  {'t', showUptime}
};

const byte COMMAND_COUNT = sizeof(commands) / sizeof(commands[0]);

void handleKey(char key) {
  for (byte i = 0; i < COMMAND_COUNT; i++) {
    if (commands[i].key == key) {
      commands[i].run();
      return;
    }
  }
  Serial.println("Unknown command");
}

void setup() {
  Serial.begin(9600);
  pinMode(LED_BUILTIN, OUTPUT);
}

void loop() {
  if (Serial.available() > 0) {
    char key = Serial.read();
    if (key != '\n' && key != '\r') {
      handleKey(key);
    }
  }
}
Open the Serial Monitor at 9600 baud and send individual commands. The 1 command turns the LED on, 0 turns it off, and t reports the current uptime in whole seconds. An unrecognized key prints Unknown command. The uptime depends on when you send the command, so there is no fixed expected number.
The expression commands[i].run() calls the function stored in the matching table entry. On an Uno R3, this Command layout is typically three bytes per entry: one byte for key and two bytes for the function pointer. You can confirm with sizeof(Command); other architectures may add padding.
The same table-of-functions technique works well for a small state machine or menu. It pairs naturally with Arduino Programming: Structs and Arduino Programming: Arrays.
Lambda Callbacks: Writing the Function in Place
Not every callback deserves a separately named function. C++11 provides lambda expressions, which let you write a short function at the point where you need it. This is a lambda that takes a pin number and sets the pin HIGH:
[](byte pin) {
  digitalWrite(pin, HIGH);
}[]: the capture list; empty here because the lambda uses no surrounding local variables.(byte pin): the parameters passed to the lambda.{ ... }: the code to execute.
A lambda without captures can convert to a compatible ordinary function pointer. This means the forEachPin() function from earlier does not need any changes:
const byte leds[] = {9, 10, 11};
const byte LED_COUNT = sizeof(leds) / sizeof(leds[0]);

void forEachPin(const byte pins[], byte count, void (*action)(byte)) {
  for (byte i = 0; i < count; i++) {
    action(pins[i]);
  }
}

void setup() {
  Serial.begin(9600);

  forEachPin(leds, LED_COUNT, [](byte pin) {
    pinMode(pin, OUTPUT);
    digitalWrite(pin, HIGH);
  });

  forEachPin(leds, LED_COUNT, [](byte pin) {
    Serial.print("Pin ");
    Serial.print(pin);
    Serial.println(digitalRead(pin) ? " is HIGH" : " is LOW");
  });
}

void loop() {}
The output is again:
Pin 9 is HIGH
Pin 10 is HIGH
Pin 11 is HIGH
For the same reason, the button class can accept a captureless lambda instead of the named toggleLed() function:
button.onPress([]() {
  digitalWrite(LED_BUILTIN, !digitalRead(LED_BUILTIN));
});
The classic Arduino AVR toolchain supports C++11 lambdas. A named function is still easier to maintain if the handler becomes long or is reused in several places.
Lambda Captures and Their Limits
A lambda defined inside a function can use ordinary local variables from that surrounding function only if it captures them. Capturing by value creates a copy; capturing by reference lets the lambda work with the original variable.
void setup() {
  Serial.begin(9600);

  int threshold = 500;
  auto isAbove = [threshold](int value) {
    return value > threshold;  // value capture
  };
  Serial.println(isAbove(620));  // 1 (true)

  int count = 0;
  auto addOne = [&count]() {
    count++;  // reference capture
  };
  addOne();
  addOne();
  Serial.println(count);  // 2
}

void loop() {}
Here, [threshold] makes the lambda hold a copy of the threshold, whereas [&count] lets the lambda increment the original counter. Both lambdas are invoked while their local variables still exist, so the reference capture is safe in this example.
A capturing lambda is an object with stored state; it cannot implicitly convert to a plain void (*)() function pointer. Therefore, this does not work with the earlier button class:
int count = 0;
button.onPress([&count]() {
  count++;
});  // error: capturing lambda is not a plain function pointer
There is another trap: if you store a callback that captures a local variable by reference and call it after that variable goes out of scope, the reference becomes invalid. For stored asynchronous callbacks, either arrange a state object that lives long enough or use a callback API with a context pointer.
Passing State to a Callback With a Context Pointer
C and embedded libraries often pair a function pointer with a void * context pointer. The caller registers a function and an address. When an event occurs, the library passes that address back to the function, allowing one callback to serve several independent devices.
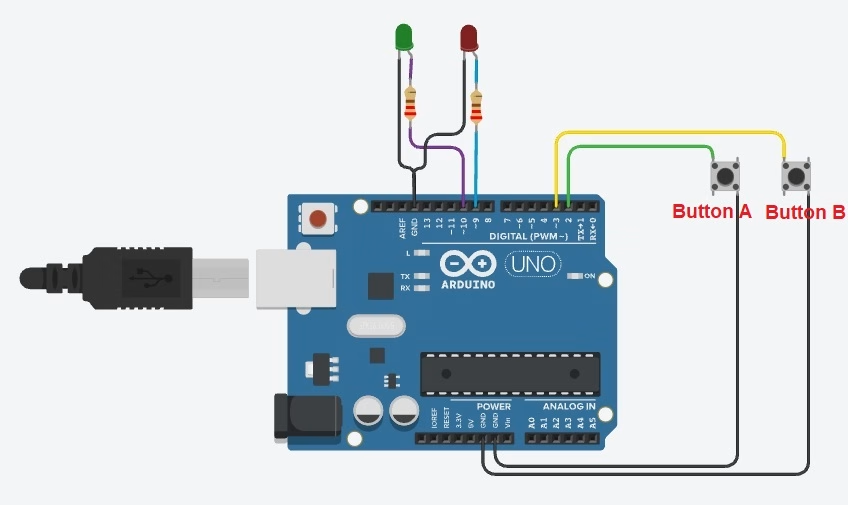
We can extend the pushbutton example to drive two LEDs with two buttons. Both buttons will register the same function, but each passes the address of its own Led structure.
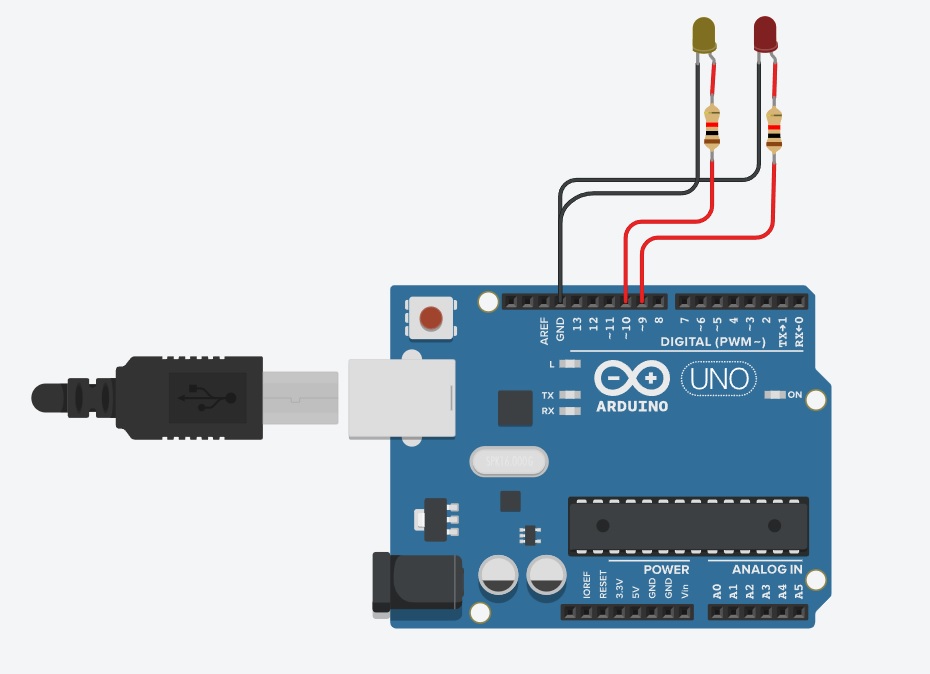
Wiring for Two Buttons and Two LEDs
| Component | Connection |
|---|---|
| Button A | D2 to GND (internal pull-up enabled) |
| Button B | D3 to GND (internal pull-up enabled) |
| Red LED anode | D9 through its own 220 Ω resistor |
| Green LED anode | D10 through its own 220 Ω resistor |
| Both LED cathodes | GND |
Complete Context-Pointer Callback Example
struct Led {
  byte pin;
  bool lit;
};

class Button {
  public:
    explicit Button(byte inputPin) : pin(inputPin) {}

    void begin() {
      pinMode(pin, INPUT_PULLUP);
      bool initial = (digitalRead(pin) == LOW);
      lastRawPressed = initial;
      stablePressed = initial;
      lastChange = millis();
    }

    void onPress(void (*callback)(void *), void *context) {
      pressHandler = callback;
      pressContext = context;
    }

    void update() {
      const bool rawPressed = (digitalRead(pin) == LOW);
      const unsigned long now = millis();

      if (rawPressed != lastRawPressed) {
        lastRawPressed = rawPressed;
        lastChange = now;
      }

      if (now - lastChange >= 50 && rawPressed != stablePressed) {
        stablePressed = rawPressed;
        if (stablePressed && pressHandler != nullptr) {
          pressHandler(pressContext);
        }
      }
    }

  private:
    byte pin;
    bool lastRawPressed = false;
    bool stablePressed = false;
    unsigned long lastChange = 0;
    void (*pressHandler)(void *) = nullptr;
    void *pressContext = nullptr;
};

Led red = {9, false};
Led green = {10, false};
Button buttonA(2);
Button buttonB(3);

void toggleLed(void *context) {
  Led *led = static_cast<Led *>(context);
  led->lit = !led->lit;
  digitalWrite(led->pin, led->lit ? HIGH : LOW);
}

void setup() {
  pinMode(red.pin, OUTPUT);
  pinMode(green.pin, OUTPUT);
  digitalWrite(red.pin, LOW);
  digitalWrite(green.pin, LOW);

  buttonA.begin();
  buttonB.begin();
  buttonA.onPress(toggleLed, &red);
  buttonB.onPress(toggleLed, &green);
}

void loop() {
  buttonA.update();
  buttonB.update();
}
Press button A to change the red LED; press button B to change the green LED. Both routes call toggleLed(void *context). The static_cast<Led *> operation turns the generic pointer back into a pointer to the correct data type. The arrow operator then accesses the chosen LED's members.
The context address must still point to a valid object when the callback eventually runs. The global red and green objects in this sketch have the entire program lifetime, so their addresses remain valid. This design is also used by the ESP32 Arduino function attachInterruptArg(); consult the Espressif GPIO interrupt documentation for its API and interrupt rules.
Using a Template to Accept Capturing Lambdas
The void * approach is a good fit for C-style event registration. When a callback is invoked immediately and does not need to be stored, a C++ function template gives you another option. It accepts many types of callable objects, including capturing lambdas.
const byte leds[] = {9, 10, 11};
const byte LED_COUNT = sizeof(leds) / sizeof(leds[0]);

template <typename Action> void forEachPin(
    const byte pins[], byte count, Action action) {
  for (byte i = 0; i < count; i++) {
    action(pins[i]);
  }
}

void setup() {
  Serial.begin(9600);

  int total = 0;
  forEachPin(leds, LED_COUNT, [&total](byte pin) {
    total += pin;
  });

  Serial.println(total);  // 30
}

void loop() {}
The template accepts the specific type of the lambda with its captured reference. In this example, it prints 30, because 9 + 10 + 11 = 30. The callback runs before setup() returns, so the reference to total remains valid.
On some Arduino toolchain versions, automatic prototype generation can stumble on templates split awkwardly across declarations. Keeping the template <typename Action> declaration with its function definition, or putting the template into a header, avoids that common sketch-preprocessor issue.
std::function With Capturing Lambdas on ESP32
Boards using a more complete C++ standard library, including common ESP32 Arduino configurations, can use std::function. It stores many kinds of callable objects behind one interface, including lambdas that capture values.
For this example, connect an external LED to GPIO18 through a 220 Ω resistor, with the LED cathode connected to GND on an ESP32 development board. The sketch deliberately avoids assuming that every ESP32 variant has a built-in LED on GPIO2.
#include <functional>

const byte LED_PIN = 18;
std::function<void()> action;

void setup() {
  pinMode(LED_PIN, OUTPUT);
  digitalWrite(LED_PIN, LOW);

  byte selectedPin = LED_PIN;
  action = [selectedPin]() {
    digitalWrite(selectedPin, !digitalRead(selectedPin));
  };
}

void loop() {
  if (action) {
    action();  // call the stored capturing lambda
  }
  delay(500);
}
Here, the lambda captures the pin number by value. The captured copy stays with the callback after setup() returns, and loop() calls it every 500 ms. This is a periodic callback demonstration rather than a button-triggered event.
std::function can consume more memory than a raw function pointer and, depending on the captured object and library implementation, may allocate dynamically. The classic Arduino Uno AVR toolchain generally lacks the complete <functional> header, so use ordinary function pointers, templates, or context pointers there. Espressif's Arduino core uses std::function in facilities such as its Ticker library.
Using an Object Member Function as a Callback
An ordinary non-static member function is different from a free function. It needs an object to operate on, and a plain void (*)() callback slot does not include an object pointer. This is why code such as button.onPress(presses.increment) does not compile.
Three common approaches are available:
- Captureless lambda wrapper: have the wrapper call a member function on a global or static object.
- Static member function: a
staticmember does not need a particular object and can match an ordinary function-pointer type. - Context pointer: pass an object address through a
void *argument and cast it back in the handler.
This example uses the first approach. Place the complete Button class from the first button example above this code in the same sketch:
class Counter {
  public:
    void increment() {
      count++;
      Serial.println(count);
    }

  private:
    unsigned int count = 0;
};

Button button(2);
Counter presses;

void setup() {
  Serial.begin(9600);
  button.begin();

  button.onPress([]() {
    presses.increment();
  });
}

void loop() {
  button.update();
}
If you press the button three times with a release between presses, the expected Serial Monitor output is 1, 2, then 3. No capture is needed because presses is a global object. For static class members, see Arduino Programming: Static Variables.
Callbacks in Interrupts and Arduino Libraries
A callback's name does not tell you where it executes. The polling-based button class calls its handler in normal sketch code. By contrast, the classic Uno's external interrupt and AVR Wire peripheral callbacks execute in an interrupt context, where interrupt restrictions apply.
| Callback source | Execution context on classic Uno R3 | Practical rule |
|---|---|---|
Button::update() |
Normal loop() execution |
Can perform ordinary application work; keep polling responsive |
attachInterrupt() |
Hardware interrupt service routine | Keep handler short; avoid blocking operations |
Wire.onReceive() / Wire.onRequest() |
AVR TWI interrupt context | Copy data or set a flag; defer longer processing |
The following Uno sketch counts falling edges on D2 using a captureless lambda as an interrupt handler:
volatile unsigned int pulses = 0;

void setup() {
  Serial.begin(9600);
  pinMode(2, INPUT_PULLUP);

  attachInterrupt(digitalPinToInterrupt(2), []() {
    pulses++;  // interrupt context; keep this brief
  }, FALLING);
}

void loop() {
  noInterrupts();
  unsigned int snapshot = pulses;
  interrupts();

  Serial.println(snapshot);
  delay(1000);
}
A signal transitioning from HIGH to LOW at D2 increments the counter. The main loop briefly disables interrupts while copying the two-byte unsigned int on the 8-bit Uno, then prints the snapshot. The volatile qualifier tells the compiler the value can change outside ordinary program flow; it does not make a multi-byte read atomic.
If you use a mechanical pushbutton as the pulse source, its contacts can bounce and produce multiple interrupts from one physical press. Add hardware filtering or debounce in the main program if you need to count actual button presses instead of electrical edges.
- Keep ISR callbacks short: update a small counter, flag, or buffer, then return.
- Do not block: avoid
delay()and routineSerial.print()calls inside an ISR. - Share data deliberately: use
volatilewhere appropriate and protect non-atomic shared accesses. - Check each library: callback execution context varies with the board core and library; do not assume every callback runs as an ISR.
For interrupt handling, debouncing, and pin restrictions, see the Arduino Interrupt Tutorial and the official Arduino interrupt reference.
What Does a Callback Cost in Memory?
On the Uno R3, the data needed to identify a callback is small, but the complete cost depends on how your sketch is compiled. The compiler may inline direct function calls, omit unused code, or introduce tables and wrapper functions for indirect calls. A lambda without captures does not require captured-state storage, yet it is not guaranteed to generate exactly the same flash image as a separately named function.
| Item | Typical consideration for Uno R3 |
|---|---|
| Ordinary function pointer | 2 bytes per stored pointer |
One Command entry containing a char and function pointer |
Typically 3 bytes; check sizeof(Command) |
| Captureless lambda used as callback | No captured-state data; compiled code size may differ |
| Context pointer added to callback registration | One additional pointer, normally 2 bytes, plus any alignment or related state |
Capturing lambda or std::function |
Storage depends on captures, type, toolchain, and possible dynamic allocation |
To assess a real build, compile both versions with the same board package and options. Compare the IDE's flash/SRAM report and, where necessary, measure execution time in your specific application. Fixed microsecond figures from a different build cannot predict the overhead of your callback.
Common Callback Errors and Fixes
The most frequent callback mistakes involve mismatched function signatures, calling a function instead of passing it, and losing track of state or object lifetimes.
| Compiler message or symptom | Likely cause | Fix |
|---|---|---|
invalid use of void expression |
Using onPress(toggleLed()) calls a void function instead of passing it. |
Use onPress(toggleLed). |
invalid conversion from void (*)(bool) to void (*)() |
Callback takes the wrong parameters. | Match the required return type and parameters exactly. |
no known conversion ... lambda ... to void (*)() |
The lambda captures local state. | Use an empty capture list, a context pointer, or an API accepting a callable object. |
ledPin is not captured |
The lambda uses a local without listing it in []. |
Capture a safe copy or reference. |
invalid use of non-static member function |
A member function needs a particular object. | Use a wrapper, static member, or context pointer. |
assignment of function ... |
Missing parentheses around *action. |
Declare void (*action)();. |
auto in lambda parameter ... only available with C++14 |
A generic lambda is being compiled in C++11 mode. | Use a concrete parameter type, or a core/toolchain supporting newer C++. |
functional: No such file or directory |
The AVR toolchain does not provide the expected C++ library header. | Use a raw callback pointer, context pointer, or template. |
Action has not been declared |
The Arduino sketch preprocessor interferes with a template definition/prototype. | Keep the template with its definition or move it to a header. |
| Board crashes or restarts when an event occurs | A null, stale, or otherwise invalid callback/context pointer was invoked. | Initialize pointers, guard against null, and ensure targets outlive callbacks. |
| One button press generates multiple callbacks | Contact bounce or incorrect debounce state tracking. | Track raw and stable input separately; verify wiring and sampling interval. |
An Uno may warn or reject a mismatched callback signature depending on compiler flags and the exact types. Do not treat a warning as permission to call a function through an incompatible pointer type: the resulting behavior is not reliable.
Frequently Asked Questions
What Is the Difference Between a Callback and an Interrupt?
An interrupt is a hardware or software event that redirects CPU execution to a handler. A callback is a programming technique in which code calls a function supplied by another part of the program. attachInterrupt() combines both: you register a callback to handle a hardware interrupt.
Can I Use Lambdas on an Arduino Uno?
Yes. Captureless and capturing lambdas are supported by the classic AVR Arduino toolchain's C++11 mode. A captureless lambda can convert to a compatible function pointer. A capturing lambda cannot, so it requires a template or a callback mechanism that can store state.
How Do I Pass Data to an Arduino Callback?
If the callback signature already includes parameters, the caller can pass values directly. For state owned by your application, register a context pointer (such as void *) along with the callback or use a C++ callable object whose lifetime and memory behavior you understand.
Can I Remove or Replace a Registered Callback?
Yes, if the API supports it. In the example Button class, button.onPress(nullptr) clears the registered function, because update() checks for a null pointer. The Arduino core offers detachInterrupt() for external interrupts.
Are Callbacks Always Asynchronous?
No. The first runTwice() example invokes the callback immediately before returning. The button class invokes it later when update() sees an event. "Callback" describes how a function is supplied and invoked, not necessarily when or on which thread it runs.
Conclusion
Function pointers let you pass behavior to other code. On an Arduino Uno, this makes even a small program more reusable: the same button class can drive an LED, update a counter, or send a command without knowing what the application will do.
Start with an ordinary function pointer and a simple registration method. Add a context pointer when several devices need independent state, or use a template or capturing lambda when the application benefits from C++ callable objects. Most importantly, understand whether the callback runs in the main loop or interrupt context, and make sure any captured variables and context pointers remain valid until the callback finishes.
For the related mechanics, continue with Arduino Programming: Pointers, Arduino Programming: Classes, and the Arduino Interrupt Tutorial.
References
- Arduino: attachInterrupt() reference
- Arduino language API reference
- ArduinoCore-avr Wire callback declarations
- Espressif: Arduino-ESP32 GPIO / attachInterruptArg()
- Arduino-ESP32 Ticker callback types