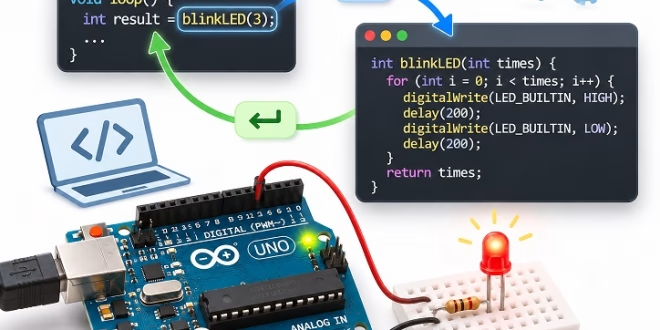
A function is a named block of code that does one job. Arduino functions let you write that job once and then run it from anywhere in your sketch with a single line.
The sketch below defines a function called blink() and uses it three times:
void blink() {
  digitalWrite(LED_BUILTIN, HIGH);
  delay(200);
  digitalWrite(LED_BUILTIN, LOW);
  delay(200);
}

void setup() {
  pinMode(LED_BUILTIN, OUTPUT);
}

void loop() {
  blink();
  blink();
  blink();
  delay(1000);
}
After the upload, the on-board LED flashes three times, pauses for a second, and starts again. Notice how short loop() is, because the details of one flash live inside blink().
This tutorial is the first part of the Arduino programming series on this site, and it assumes nothing beyond a basic sketch such as Blink. You will learn how to write and call a function, how to pass values in with parameters, and how to get a result back with a return value. Toward the end, the tutorial explains pass by reference, which lets a function change the variables of its caller.
What Is a Function in Arduino?
You have used functions since your very first sketch. Every Arduino program contains at least two of them:
- setup(): runs once when the board powers up or resets.
- loop(): runs again and again for as long as the board has power.
Commands such as pinMode(), digitalWrite(), and delay() are functions too. Someone else wrote them, and your sketch simply calls them by name. If you are curious about what happens inside, see How pinMode, digitalWrite and digitalRead Work.
Writing your own functions brings three benefits:
- Less repetition: you type a piece of code once and reuse it as often as you like.
- Easier reading: a good name such as
blink()orreadTemperature()tells you what the code does before you read a single line of it. - Simpler fixes: when something needs to change, you change it in one place.
Think of a function as a recipe card. You write the steps on the card once, and from then on, the name of the recipe is enough to get the whole dish.
How to Write a Function in Arduino
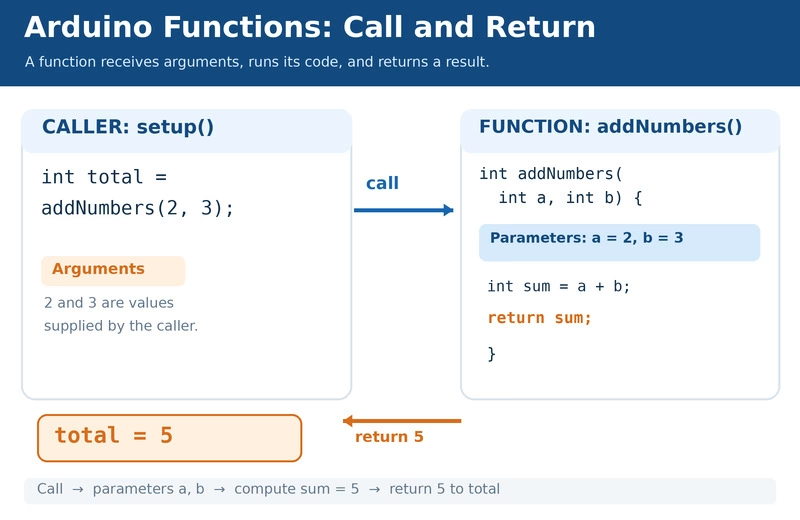
The sketch below contains a function that adds two numbers, followed by a call to it:
int addNumbers(int a, int b) {
  int sum = a + b;
  return sum;
}

void setup() {
  Serial.begin(9600);

  int total = addNumbers(2, 3);        // call the function
  Serial.println(total);               // prints 5
}

void loop() {}
Its first four lines are the function definition. Every definition has the same four parts:
| Part | In the example | Meaning |
|---|---|---|
| Return type | int |
The kind of value that the function gives back. Write void when it gives nothing back. |
| Name | addNumbers |
The word you use to run the function. |
| Parameters | (int a, int b) |
The values that the function receives. Leave the parentheses empty when it needs none. |
| Body | Everything between { and } |
The code that runs each time. |
Defining a function does not run it. To run it, you call the function by writing its name followed by parentheses, as setup() does here. Three things happen when the sketch reaches that call:
- First, the values 2 and 3 travel into the parameters
aandb. - Next, the body of
addNumbers()runs and calculates the sum. - The
returnline then sends the result back, and the sketch continues where it left off, with 5 stored intotal.
A few naming rules apply. Function names may contain letters, digits, and underscores, and they must not start with a digit. Capital letters matter as well, so blink() and Blink() are two different names.
Arduino Function Example: Sending SOS With the On-Board LED
To see why functions matter, consider a sketch that flashes SOS in Morse code: three short flashes, three long flashes, and three short flashes again. This example needs only the on-board LED, so there is nothing to wire.
Without functions, every flash takes four lines, and the sketch begins like this:
void loop() {
  digitalWrite(LED_BUILTIN, HIGH);
  delay(200);
  digitalWrite(LED_BUILTIN, LOW);
  delay(200);
  digitalWrite(LED_BUILTIN, HIGH);
  delay(200);
  digitalWrite(LED_BUILTIN, LOW);
  delay(200);
  // ...seven more flashes follow in the same way
}
Writing every flash separately makes the sketch long and difficult to maintain. A timing change would have to be repeated throughout the code. Two small functions remove that repetition:
void dot() {
  digitalWrite(LED_BUILTIN, HIGH);
  delay(200);
  digitalWrite(LED_BUILTIN, LOW);
  delay(200);
}

void dash() {
  digitalWrite(LED_BUILTIN, HIGH);
  delay(600);
  digitalWrite(LED_BUILTIN, LOW);
  delay(200);
}

void setup() {
  pinMode(LED_BUILTIN, OUTPUT);
}

void loop() {
  dot();  dot();  dot();         // S
  dash(); dash(); dash();        // O
  dot();  dot();  dot();         // S
  delay(2000);                   // pause before the next SOS
}
Now loop() reads almost like the message itself. Repeated instructions appear in just two places, so you can change the dot or dash timing without editing nine separate flashes. This is a simplified SOS pattern for demonstrating functions; standard Morse code also requires longer gaps between letters. Depending on the compiler and optimization settings, reusable functions can also reduce program size.
Function Parameters: Passing Values In
The functions dot() and dash() are almost identical. Only one number differs between them: the time that the LED stays on. A parameter turns that number into an input, so one function can do both jobs:
void flash(int onTime) {
  digitalWrite(LED_BUILTIN, HIGH);
  delay(onTime);                 // use the value that the caller passed in
  digitalWrite(LED_BUILTIN, LOW);
  delay(200);
}
Inside the function, onTime works like a variable, and each call fills it with a new value. Writing flash(200); produces a dot, and flash(600); produces a dash.
Two terms are easy to mix up:
- Parameter: the variable in the function definition, such as
onTime. - Argument: the actual value in a call, such as 200.
A function can have several parameters, separated by commas. The final version of the SOS sketch passes the pin, the number of flashes, and the on-time:
void blink(byte pin, int times, int onTime) {
  for (int i = 0; i < times; i++) {
    digitalWrite(pin, HIGH);
    delay(onTime);
    digitalWrite(pin, LOW);
    delay(200);
  }
}

void setup() {
  pinMode(LED_BUILTIN, OUTPUT);
}

void loop() {
  blink(LED_BUILTIN, 3, 200);    // S: three short flashes
  blink(LED_BUILTIN, 3, 600);    // O: three long flashes
  blink(LED_BUILTIN, 3, 200);    // S
  delay(2000);
}
When you call a function, the arguments must come in the same order as the parameters, and their types must fit. In blink(LED_BUILTIN, 3, 600), the pin goes to pin, the 3 goes to times, and the 600 goes to onTime. This version produces the same flashes as before in only 19 lines.
Return Values: Getting a Result Back
Parameters carry values into a function. A return value carries one value back out, and two things make this work:
- Return type: the word before the function name states what kind of value comes back, such as
int,float, orbool. - Keyword return: the line with
returnends the function and hands the value to the caller.
The sketch below contains two functions with return values. One converts a 10-bit analog reading between 0 and 1023 into volts, and the other answers a yes-or-no question. The conversion assumes an Arduino Uno R3 with a nominal 5 V ADC reference:
float toVolts(int reading) {
  return reading * 5.0 / 1023.0;         // the result goes back to the caller
}

bool isLow(float volts) {
  return volts < 3.3;                    // true or false
}

void setup() {
  Serial.begin(9600);

  float volts = toVolts(512);            // store the returned value
  Serial.println(volts);                 // prints 2.50

  Serial.println(toVolts(1023));         // or use it directly: prints 5.00

  if (isLow(volts)) {
    Serial.println("Voltage is low");
  }
}

void loop() {}
Open the Serial Monitor at 9600 baud to see the result:
2.50
5.00
Voltage is low
You can store a returned value in a variable, pass it straight to another function, or test it in an if statement. In a real project, the reading would come from a pin, as in toVolts(analogRead(A0)). On an Uno R3, the calculation is an approximation because the actual reference voltage may not be exactly 5.00 V. Other Arduino boards may use a different voltage reference or ADC resolution, so adapt the formula before copying it into a sensor project.
Functions that return nothing use the return type void, like blink() and flash() earlier. Whatever the type, a function returns at most one value directly. A later section shows a way around that limit.
Local Variables and Scope
A variable that you declare inside a function is a local variable. It exists only while that function runs, and no other function can see it. Variables declared outside all functions are global variables, which every function can use. The part of a sketch where a variable is visible is its scope.
To compare the two kinds, the sketch below uses one variable of each:
int counter = 0;                 // global: every function can use it

void countUp() {
  int step = 1;                  // local: exists only inside countUp()
  counter = counter + step;
}

void setup() {
  Serial.begin(9600);

  countUp();
  countUp();
  Serial.println(counter);       // prints 2
}

void loop() {}
After two calls, the sketch prints 2. The function could change counter, because that variable is global. By contrast, a line such as Serial.println(step); inside setup() would stop the build with the error 'step' was not declared in this scope, since step belongs to countUp() alone.
Three facts about local variables are worth remembering:
- Parameters are local too:
onTimeinflash()exists only inside that function. - Names can repeat: two functions may each have a local variable called
iwithout any conflict. - Values do not survive: a local variable starts fresh on every call. To keep a value between calls, declare the variable
static, as the static variables tutorial explains.
As a rule of thumb, prefer local variables and parameters, and reserve global variables for values that many functions really share.
Pass by Value vs. Pass by Reference
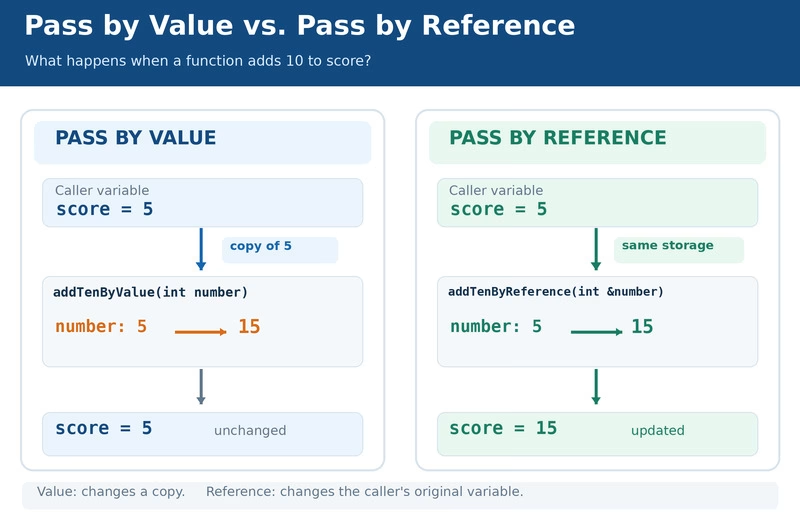
When you pass a variable to a function, the function normally receives a copy of its value. This is pass by value. Whatever the function does to the copy, the original stays the same.
Sometimes you want the opposite: a function that changes the caller's variable. For that purpose, add an ampersand (&) between the type and the name of the parameter. The parameter then becomes a reference, which is a second name for the original variable, and the technique is pass by reference.
To see both behaviors side by side, run the sketch below:
void addTenByValue(int number) {
  number = number + 10;          // changes only the copy
}

void addTenByReference(int &number) {
  number = number + 10;          // changes the caller's variable
}

void setup() {
  Serial.begin(9600);

  int score = 5;

  addTenByValue(score);
  Serial.println(score);         // prints 5

  addTenByReference(score);
  Serial.println(score);         // prints 15
}

void loop() {}
Its output confirms the difference:
5
15
The first function added 10 to a copy, so score kept its value of 5. Only the second function worked on score itself.
Returning Two Results With Reference Parameters
Pass by reference also solves the problem that a function returns only one value. In the next sketch, the caller provides two variables, and the function fills them:
void splitTime(unsigned long totalSeconds, int &minutes, int &seconds) {
  minutes = totalSeconds / 60;
  seconds = totalSeconds % 60;
}

void setup() {
  Serial.begin(9600);

  int minutes;
  int seconds;

  splitTime(125, minutes, seconds);      // the function fills both variables

  Serial.print(minutes);
  Serial.print(" min ");
  Serial.print(seconds);
  Serial.println(" s");
}

void loop() {}
On the Serial Monitor, this sketch prints 2 min 5 s, since 125 seconds make 2 minutes and 5 seconds.
When to Use Each Method
The table below gives a simple guide:
| Situation | Method | Example parameter |
|---|---|---|
| The function only reads a small value | Pass by value | int onTime |
| The function must change the caller's variable | Pass by reference | int &minutes |
| The function reads a large struct | Pass by const reference, which avoids the copy and forbids changes |
const Reading &r |
Built-in arrays behave differently from ordinary scalar values. When passed to a parameter such as int values[], the array is not copied; the parameter effectively receives a pointer to its first element. Changes to those elements therefore affect the original array. For more on arrays, see the arrays tutorial. The structs tutorial shows the const reference in use, and the pointers tutorial introduces another way to access variables indirectly.
Two Extras: Default Values and Overloading
Two more features make functions convenient to call. Neither is essential for a first sketch, so feel free to return to this section later.
A default value lets the caller leave out an argument. Write the default after the parameter, and give defaults only to the last parameters in the list:
void blink(byte pin, int times = 1, int onTime = 200) {
  for (int i = 0; i < times; i++) {
    digitalWrite(pin, HIGH);
    delay(onTime);
    digitalWrite(pin, LOW);
    delay(200);
  }
}

void setup() {
  pinMode(LED_BUILTIN, OUTPUT);
}

void loop() {
  blink(LED_BUILTIN);            // one flash of 200 ms
  blink(LED_BUILTIN, 3);         // three flashes of 200 ms
  blink(LED_BUILTIN, 3, 600);    // three flashes of 600 ms
  delay(2000);
}
All three calls are valid, because omitted arguments use their defaults. For a simple .ino sketch, placing a function with default arguments above its first call avoids problems with Arduino's automatic function-prototype generation. Alternatively, declare the function explicitly before the call, with the default values in the declaration and not repeated in its later definition.
Overloading means that several functions share one name but differ in their parameters. The compiler picks the version that matches the argument:
void report(int value) {
  Serial.print("Whole number: ");
  Serial.println(value);
}

void report(float value) {
  Serial.print("Decimal number: ");
  Serial.println(value);
}

void setup() {
  Serial.begin(9600);

  int count = 42;
  float temperature = 23.5;

  report(count);                 // runs the int version
  report(temperature);           // runs the float version
}

void loop() {}
This sketch prints Whole number: 42 and Decimal number: 23.50. You have relied on overloading all along, since Serial.println() accepts whole numbers, decimal numbers, and text alike.
Where to Put Functions in a Sketch
In a sketch file, your functions can appear above setup(), between setup() and loop(), or below loop(). Their position does not change when they run, because only a call runs a function.
This freedom is a convenience provided by the Arduino build process. In ordinary C++, the compiler needs to see a declaration before a function is called. For .ino files, Arduino generally generates these declarations automatically. A declaration is also called a function prototype, and it looks like the function header with a semicolon at the end:
void blink(byte pin, int times, int onTime);You rarely need to write prototypes yourself, but three situations call for care:
- Default values: automatic prototypes may not preserve what you intend. Put the definition above the first call, or write an explicit declaration with the default arguments.
- Your own types: when a parameter uses a struct or enum you defined, declare that type before the function prototype that uses it.
- Extra files:
.cppfiles are compiled as ordinary C++ and receive no generated prototypes. Additional.inotabs are combined by the Arduino build process and generally participate in prototype generation.
For larger sketches, many programmers place setup() and loop() first and group their own functions below, or move them to a second tab.
Common Function Errors and Fixes
Error messages about functions look cryptic at first, yet each one points to a specific mistake. The table below lists the messages that beginners meet most often. Two of them are only warnings, so set Compiler warnings to All in the Arduino IDE preferences to see them.
| Message | Cause | Fix |
|---|---|---|
'Blink' was not declared in this scope |
The call misspells the name or uses the wrong capital letters. | Match the name in the definition exactly. |
too few arguments to function 'void blink(byte, int, int)' |
The call supplies fewer values than the function has parameters. | Add the missing arguments. |
too many arguments to function 'void blink(byte, int, int)' |
The call supplies more values than the function has parameters. | Remove the extra arguments. |
variable or field 'flash' declared void |
A parameter has no type, as in void flash(onTime). |
Write the type before each parameter, as in void flash(int onTime). |
void value not ignored as it ought to be |
The sketch tries to store or print the result of a void function. |
Change the return type and add a return line, or drop the assignment. |
no return statement in function returning non-void (warning) |
A function promises a value but has no return line. |
End the function with return and a value. |
a function-definition is not allowed here before '{' token |
A closing brace is missing above, so the new function starts inside another one. | Count the braces of the function above. |
expected unqualified-id before '{' token |
A semicolon follows the first line of the function definition. | Remove the semicolon. |
'step' was not declared in this scope |
The sketch uses a local variable outside its function. | Pass the value as a parameter, return it, or make the variable global. |
cannot bind non-const lvalue reference of type 'int&' to an rvalue of type 'int' |
A call passes a plain number to a reference parameter, as in addTen(5). |
Pass a variable instead. |
statement is a reference, not call, to function 'blink' (warning) |
The call lacks its parentheses, so nothing runs. | Write blink();. |
The sixth row deserves a closer look. A function that promises a return value but reaches the end without returning one has undefined behavior. It might appear to return 0 in one build, but another build may produce a different result. Do not rely on any value in that situation.
Frequently Asked Questions
What Is the Difference Between a Parameter and an Argument?
A parameter is the variable in the function definition, and an argument is the value that a call puts into it. In flash(600), the argument 600 fills the parameter onTime.
Can an Arduino Function Return More Than One Value?
Not directly, because return hands back a single value. Use reference parameters, as in the splitTime() example, or return a struct that groups several values.
Do Functions Make a Sketch Slower?
A function call can add some overhead, but modern compilers may inline short functions and eliminate the call entirely. The exact effect depends on the board, build settings, and function body. For ordinary Arduino sketches, readability and maintainability usually matter more than this overhead; measure the timing in genuinely time-critical code.
Can a Function Call Another Function?
Yes. Your loop() calls your functions, your functions call digitalWrite(), and any function may call others in the same way. A function can even call itself, but avoid that on small boards, because every unfinished call occupies some of the scarce memory.
Conclusion
- A function is a named block of code that you define once and call as often as you like.
- Every definition has a return type, a name, a parameter list, and a body.
- Parameters carry values into a function, and
returncarries one value back. - Local variables exist only inside their function, whereas global variables are visible everywhere.
- By default, a function receives copies of its arguments, and an
&in the parameter list lets it change the caller's variable instead.
With functions in place, you are ready for the rest of the series. Continue with the arrays tutorial to handle many values at once, then move on to structs and pointers. Later parts cover static variables, classes, and state machines.
References
- Arduino: Sketch Build Process — automatic prototypes and
.inofile handling. - Arduino: Read Analog Voltage — 10-bit readings and conversion to volts.
- Arduino: Serial.print() — floating-point display precision.